Macy’s Garage

© 2026 - Macy’s Garage, Ltd.

Blog
WHAT we’re doing, and HOW we’re doing it!
June 25, 2018
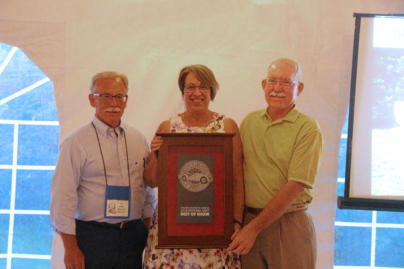
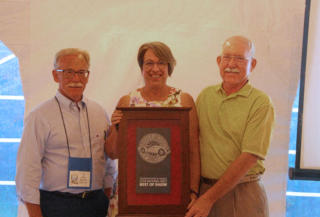
Tonda and Mark Macy are shown here receiving the Best Of Show award from TRA President Jeff Kelley (left) at last week’s Triumph Register of America National Meet, held in Blowing Rock, NC. The Best Of Show award is presented to the car with the highest judged score in the TRA concours competition, and we are proud to announce that Tonda’s early 1961 TR4 (CT288L) is the first TR in the 44 year history of TRA to receive a PERFECT 100 point score. We knew going into this that any car owned by Macy’s Garage would receive extra scrutiny on the show field (and it did!), so we triple checked every detail to make certain that this special car was absolutely perfect. We also had to time the debut of our car to occur in a year when we would not be competing for the BOS honors with any of our client’s cars, as that would have been “bad form”. Being only the 288th TR4 ever built, there were several small details and variances which made this car different from most of the TR4’s that followed, and we had to show documentation concerning many of them to the Chief Judge before the car left the show field. We are pleased beyond words that our efforts were recognized and rewarded!June 18, 2018
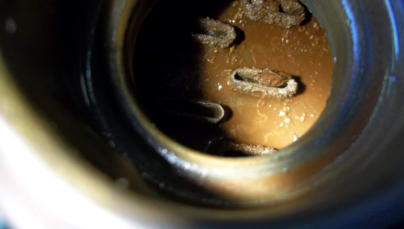
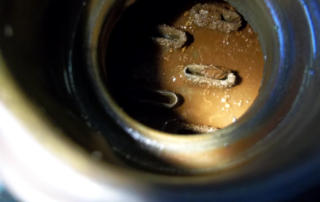
Here’s a good example of why some cars have a persistent overheating problem. You can have your radiator cleaned and even re-cored, but if the inside of the block is coated in flaky rust, it will continue to break loose and float through the cooling system, eventually ending up in the top of the radiator where it will block the tubes and restrict the cooling. Running a can of “Bud’s Miracle Radiator Flush” through isn’t going to dissolve big chunky rust like this, and back- flushing with fancy machines will only remove what’s loose at that particular moment. Now most guys will have the radiator boiled out or re-cored and check the box that the radiator has been taken care of, and I’m sure the thermostat will be removed or replaced pretty early in the process as well. Sooner or later they’ll reach for an electric fan to “cure” the high temperature issue, but in the end that’s only a “Band-Aid” for the real problem, which only an engine tear- down and rebuild (so that the bare engine block can be hot-tanked) is going to solve.June 11, 2018
It is really nice that we are able to buy most every part for our beloved TR’s, even if they need to be modified to fit correctly. Take this TR3A spare tire pan for instance. This would be a very difficult part to make from a new flat piece of sheet metal, but with the major shape already being formed the modification job isn’t really that bad. You can see the cut line where we had to slice this new part and make it just a touch taller, and it was necessary for us to do this on both sides. Fill in the gaps with a TIG welder and small filler pieces, then grind all of the welds smooth so no one will ever know that this is a modified replacement part. Now most home restorers (and many shops) will expect the new parts to jump right out of the box and into place on the car, but we just roll up our sleeves and do what we have to do. We’ve done these enough times to know what has to be done BEFORE we open the box, and we don’t waste any time ranting on the internet about the quality of the parts we are forced to buy. All in all, the time spent adjusting this “close” part fit like it should was far less than what it would have taken to completely fabricate one from scratch. Having three rotisseries with TR body jigs on each one also helps to simplify these types of projects!June 4, 2018
The smallmouth TR3’s are much rarer than the TR3A’s you see most often, with only 5333 drum brake cars produced for 1956, and 7015 disc brake cars built as 1957 models. Now Mark and Tonda personally own 3 1957 smallmouths, but it’s still a rare treat to have a client’s TR3 in the shop, and rarer still to have two full frame-up smallmouth restorations here and finish up at the same time. What made these two cars even more special was that both were restored to their seldom-seen original colors, Beige being available in 1956 and 1957 only, and the Winchester Blue being offered only in 1957. It was really fun to watch the reactions to these two whenever we had visitors here, and we’ll miss having these special colored cars here to decorate the shop. But all is not lost, as we’ll be starting soon on Mark’s own Winchester Blue car to bring back that touch of something different to the Macy’s Garage color palette.May 29, 2018
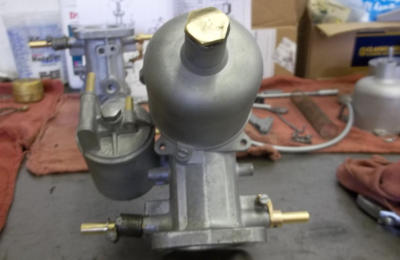
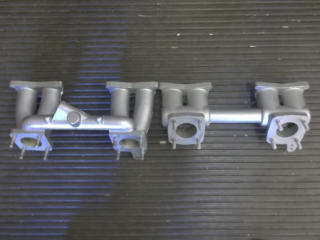
The two intake manifolds pictured on the right go along with the filed SU carburetor tops shown in last week’s photo. Both manifolds are “correct” for use on a TR4, the left manifold being used on the cars equipped with the Zenith-Stromberg carburetors, and the right manifold being used on the earliest TR4’s with SU carbs. You guessed it, this early TR4 had a later and much longer intake manifold installed at some point in the past, but the longer SU carburetors were also retained. This change moved the carbs out farther away from the engine, and moved the carburetor tops out away from the central “high point” of the bonnet “power bulge”. With the hood bulge sloping back down at the outer edges, the tops of the carburetors no doubt hit (or at least rubbed) the bottom of the bonnet. Filing off the carburetor damper tops must have been just enough to allow the bonnet to close. We didn’t spot this mismatch when the car first arrived and we disassembled it completely for a full restoration, but when reassembly time came we quickly noticed that the choke levers were closer to the inner fender well than they should have been. It didn’t take long for all of our TR experience to kick in and recognize the problem in about 5 seconds. We have a healthy supply of new and used TR parts on hand, so we didn’t have to scour the internet looking for the correct manifold either. Problems like this are no problem for the folks who work on these cars EXCLUSIVELY, but would have undoubtedly cost the owner plenty at any other shop.May 21, 2018
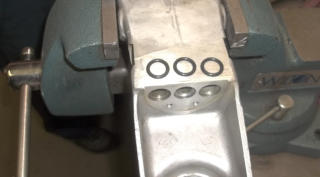
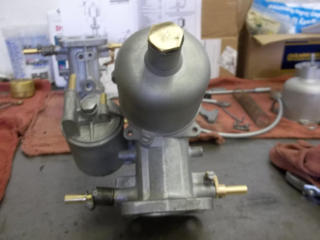
The “common wisdom” when restoring a car is to take plenty of pictures, and then put it back together just like it was when you started. If it were that easy, we’d be able to restore any car that shows up at our door to the same high standard with which we do our Triumph restorations. But all of these cars went through a period when they were just cheap transportation, and worked on by anyone who owned a screwdriver and a hammer. Whatever it took to be able to drive to work or school the next day was good enough, and no one cared how the factory designed it to work. You can’t always trust that just because it came apart one way, that’s how it should go back together. Even we don’t always immediately recognize when a previous ham fisted mechanic has been there ahead of us, but we’ll get to the bottom of it soon enough! At first we wondered why the tops of these SU carburetors had been filed off at an angle? Both carburetors were given the same treatment, and they were both neatly filed away by similar amounts on just one side. Too neat to be caused by a slipping wrench, so it had to be done on purpose. Check back next week and we’ll show you what we found that made it necessary for someone to “re-shape” the tops of their carburetors.May 14, 2018
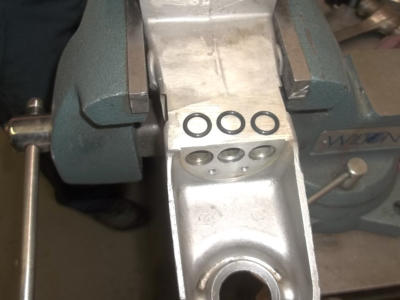
We all know that “all British cars leak oil” don’t we? We’re smart enough to never claim we can stop this condition (due to poorly machined surfaces, etc.), but we do know how to slow them down by a huge amount. One of the spots that most folks ignore is the seals on the gear-shift rods. Now you might not think that 3 little O rings at the top of the gearbox cover would leak that much oil, but we’ve seen rear tail-shafts and overdrives that were just covered in oil from above, and this is the source. The trouble is that it takes an experienced gearbox technician about 3 hours to get a top cover fully apart and back together, just to be able to change these three tiny seals. And if you drop and lose one of the tiny detent springs or balls and it rolls out of sight, chances are you aren’t going to be up and running again at the end of the day. Now you know why these are often missed, or ignored!May 7, 2018
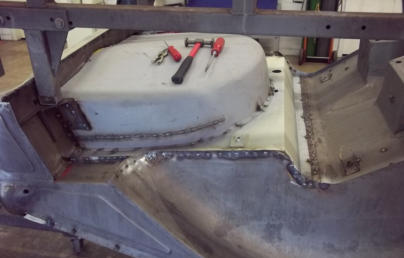
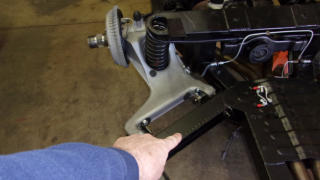
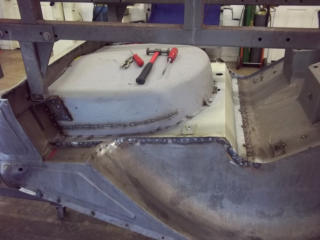
A potential new TR6 owner contacted me this week, and asked what he should be looking for when he goes to inspect the car he’s interested in buying. The first thing I always tell folks looking at a TR4A, TR250, or a TR6 (any car which would have had an IRS suspension), is to get under the car and inspect the rear trailing arm mounts for rust. If a TR frame is going to rust, it will be the IRS cars and the trailing arm mounts will be the first place to suffer from this problem. But how do I tell a TR newbie where the trailing arm mounts are? They always say that a picture is worth 1000 words, and fortunately we had a TR6 chassis that was being made ready to receive the freshly painted body. While potential buyers who are able to get under the car will view this from the other side, there’s no mistaking which section of the frame will require the most scrutiny!April 30, 2018
The absolute worst place to have rust eat away a sidescreen TR is at the very tail end, affecting the rear apron, trunk floor, and all of the various closing panels and rear corner body mounts. Accident damage in this area also causes it’s own set of problems, and when both occur here (as is so often the case), it takes someone with extensive experience and elaborate body jigs to have any hope of ever making it all come back together in an undetectable manner. Now some might think that they’ll be able to find a replacement rear “clip”, or perhaps even a better body shell, but anything ‘better’ is going to be part of a very restorable car, and your chances of purchasing just the hardest piece to get will be slim to none! The truth is that cars in this condition are the norm today, with all of the better cars having been restored many many years ago. Don’t worry though, we have both the proper body jigs AND the experience to save almost any TR2-3 that has been banged up and/or rusted away!April 23, 2018
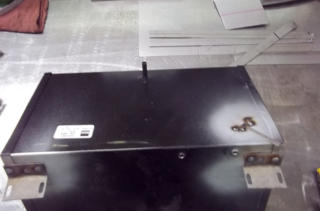
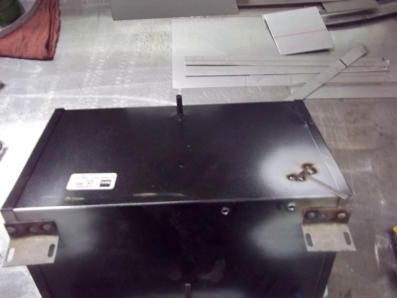
When replacing a very rusty TR2/3 battery box, it’s helpful to know that you need to add these two tabs to connect the lower dash supports. New replacement battery boxes do not come with these tabs installed, and if the bottom half of your original battery box has rusted away, as so many have, you or a restoration shop without extensive TR experience will not normally discover these missing tabs until long after the car had been painted. Since welding is involved (or should be) to attach these tabs, it’s best to fabricate and install them early on in the process, if you know what you’re doing. We find it easiest (and fastest) to attach the tabs while the box is out of the car and on the workbench, as opposed to leaning into the car and under the scuttle if the mistake is discovered after the box is permanently welded into the car.April 16, 2018
Spring has been extremely slow to arrive this year, but we finally got a sunny and dry day to start testing all of the restorations we’ve completed this winter. Here is Ken’s 1957 TR3 (smallmouth) out on it’s maiden voyage, and we’re happy to report that another one is about to wrap up here and begin a second life! Ken’s TR3 will be going home to Houston, TX, following a complete ground-up restoration to our exacting standards. We’re certain that this car will be a big hit upon arrival in Texas, with it’s relatively rare (‘56-’57 only) Beige paint and Vermillion interior.
BLOG
2018-Q2


America’s BEST Triumph Shop


Macy’s Garage

© 2026 - Macy’s Garage, Ltd.

Blog
WHAT we’re doing, and HOW we’re doing it!
June 25, 2018
Tonda and Mark Macy are shown here receiving the Best Of Show award from TRA President Jeff Kelley (left) at last week’s Triumph Register of America National Meet, held in Blowing Rock, NC. The Best Of Show award is presented to the car with the highest judged score in the TRA concours competition, and we are proud to announce that Tonda’s early 1961 TR4 (CT288L) is the first TR in the 44 year history of TRA to receive a PERFECT 100 point score. We knew going into this that any car owned by Macy’s Garage would receive extra scrutiny on the show field (and it did!), so we triple checked every detail to make certain that this special car was absolutely perfect. We also had to time the debut of our car to occur in a year when we would not be competing for the BOS honors with any of our client’s cars, as that would have been “bad form”. Being only the 288th TR4 ever built, there were several small details and variances which made this car different from most of the TR4’s that followed, and we had to show documentation concerning many of them to the Chief Judge before the car left the show field. We are pleased beyond words that our efforts were recognized and rewarded!June 18, 2018
Here’s a good example of why some cars have a persistent overheating problem. You can have your radiator cleaned and even re-cored, but if the inside of the block is coated in flaky rust, it will continue to break loose and float through the cooling system, eventually ending up in the top of the radiator where it will block the tubes and restrict the cooling. Running a can of “Bud’s Miracle Radiator Flush” through isn’t going to dissolve big chunky rust like this, and back-flushing with fancy machines will only remove what’s loose at that particular moment. Now most guys will have the radiator boiled out or re-cored and check the box that the radiator has been taken care of, and I’m sure the thermostat will be removed or replaced pretty early in the process as well. Sooner or later they’ll reach for an electric fan to “cure” the high temperature issue, but in the end that’s only a “Band-Aid” for the real problem, which only an engine tear-down and rebuild (so that the bare engine block can be hot-tanked) is going to solve.June 11, 2018
It is really nice that we are able to buy most every part for our beloved TR’s, even if they need to be modified to fit correctly. Take this TR3A spare tire pan for instance. This would be a very difficult part to make from a new flat piece of sheet metal, but with the major shape already being formed the modification job isn’t really that bad. You can see the cut line where we had to slice this new part and make it just a touch taller, and it was necessary for us to do this on both sides. Fill in the gaps with a TIG welder and small filler pieces, then grind all of the welds smooth so no one will ever know that this is a modified replacement part. Now most home restorers (and many shops) will expect the new parts to jump right out of the box and into place on the car, but we just roll up our sleeves and do what we have to do. We’ve done these enough times to know what has to be done BEFORE we open the box, and we don’t waste any time ranting on the internet about the quality of the parts we are forced to buy. All in all, the time spent adjusting this “close” part fit like it should was far less than what it would have taken to completely fabricate one from scratch. Having three rotisseries with TR body jigs on each one also helps to simplify these types of projects!June 4, 2018
The smallmouth TR3’s are much rarer than the TR3A’s you see most often, with only 5333 drum brake cars produced for 1956, and 7015 disc brake cars built as 1957 models. Now Mark and Tonda personally own 3 1957 smallmouths, but it’s still a rare treat to have a client’s TR3 in the shop, and rarer still to have two full frame-up smallmouth restorations here and finish up at the same time. What made these two cars even more special was that both were restored to their seldom- seen original colors, Beige being available in 1956 and 1957 only, and the Winchester Blue being offered only in 1957. It was really fun to watch the reactions to these two whenever we had visitors here, and we’ll miss having these special colored cars here to decorate the shop. But all is not lost, as we’ll be starting soon on Mark’s own Winchester Blue car to bring back that touch of something different to the Macy’s Garage color palette.May 29, 2018
The two intake manifolds pictured on the right go along with the filed SU carburetor tops shown in last week’s photo. Both manifolds are “correct” for use on a TR4, the left manifold being used on the cars equipped with the Zenith-Stromberg carburetors, and the righ manifold being used on the earliest TR4’s with SU carbs. You guessed it, this early TR4 had a later and much longer intake manifold installed at some point in the past, but the longer SU carburetors were also retained. This change moved the carbs out farther away from the engine, and moved the carburetor tops out away from the central “high point” of the bonnet “power bulge”. With the hood bulge sloping back down at the outer edges, the tops of the carburetors no doubt hit (or at least rubbed) the bottom of the bonnet. Filing off the carburetor damper tops must have been just enough to allow the bonnet to close. We didn’t spot this mis-match when the car first arrived and we disassembled it completely for a full restoration, but when reassembly time came we quickly noticed that the choke levers were closer to the inner fender well than they should have been. It didn’t take long for all of our TR experience to kick in and recognize the problem in about 5 seconds. We have a healthy supply of new and used TR parts on hand, so we didn’t have to scour the internet looking for the correct manifold either. Problems like this are no problem for the folks who work on these cars EXCLUSIVELY, but would have undoubtedly cost the owner plenty at any other shop.May 21, 2018
The “common wisdom” when restoring a car is to take plenty of pictures, and then put it back together just like it was when you started. If it were that easy, we’d be able to restore any car that shows up at our door to the same high standard with which we do our Triumph restorations. But all of these cars went through a period when they were just cheap transportation, and worked on by anyone who owned a screwdriver and a hammer. Whatever it took to be able to drive to work or school the next day was good enough, and no one cared how the factory designed it to work. You can’t always trust that just because it came apart one way, that’s how it should go back together. Even we don’t always immediately recognize when a previous ham fisted mechanic has been there ahead of us, but we’ll get to the bottom of it soon enough! At first we wondered why the tops of these SU carburetors had beed filed off at an angle? Both carburetors were given the same treatment, and they were both neatly filed away by similar amounts on just one side. Too neat to be caused by a slipping wrench, so it had to be done on purpose. Check back next week and we’ll show you what we found that made it necessary for someont to “re-shape” the tops of their carburetors.May 14, 2018
We all know that “all British cars leak oil” don’t we? We’re smart enough to never claim we can stop this condition (due to poorly machined surfaces, etc.), but we do know how to slow them down by a huge amount. One of the spots that most folks ignore is the seals on the gearshift rods. Now you might not think that 3 little O rings at the top of the gearbox cover would leak that much oil, but we’ve seen rear tailshafts and overdrives that were just covered in oil from above, and this is the source. The trouble is that it takes an experienced gearbox technician about 3 hours to get a top cover fully apart and back together, just to be able to change these three tiny seals. And if you drop and lose one of the tiny detent springs or balls and it rolls out of sight, chances are you aren’t going to be up and running again at the end of the day. Now you know why these are often missed, or ingnored!May 7, 2018
A potential new TR6 owner contacted us this week, and asked what he should be looking for when he goes to inspect the car he’s interested in buying. The first thing we always tell folks looking at a TR4A, TR250, or a TR6 (any car which would have had an IRS suspension), is to get under the car and inspect the rear trailing arm mounts for rust. If a TR frame is going to rust, it will be the IRS cars and the trailing arm mounts will be the first place to suffer from this problem. But how do we tell a TR newbie where the trailing arm mounts are? They always say that a picture is worth 1000 words, and fortunately we had a TR6 chassis that was being made ready to receive the freshly painted body. While potential buyers who are able to get under the car will view this from the other side, there’s no mistaking which section of the frame shound receive the most scrutiny!April 30, 2018
The absolute worst place to have rust eat away a sidescreen TR is at the very tail end, affecting the rear apron, trunk floor, and all of the various closing panels and rear corner body mounts. Accident damage in this area also causes it’s own set of problems, and when both occur here (as is so often the case), it takes someone with extensive experience and elaborate body jigs to have any hope of ever making it all come back together in an undetectible manner. Now some might think that they’ll be able to find a replacement rear “clip”, or perhaps even a better body shell, but anything ‘better’ is going to be part of a very restorable car, and your chances of purchasing just the hardest piece to get will be slim to none! The truth is that cars in this condition are the norm today, with all of the better cars having been restored many many years ago. Don’t worry though, we have both the proper body jigs AND the experience to save almost any TR2-3 that has been banged up and/or rusted away!April 23, 2018
When replacing a very rusty TR2/3 battery box, it’s helpful to know that you need to add these two tabs to connect the lower dash supports. New replacement battery boxes do not come with these tabs installed, and if the bottom half of your original battery box has rusted away, as so many have, you or a restoration shop without extensive TR experience will not normally discover these missing tabs until long after the car had been painted. Since welding is involved (or should be) to attach these tabs, it’s best to fabricate and install them early on in the process, if you know what you’re doing. We find it easiest (and fastest) to attach the tabs while the box is out of the car and on the workbench, as opposed to leaning into the car and under the scuttle if the mistake is discovered after the box is permanently welded into the car.April 16, 2018
Spring has been extremely slow to arrive this year, but we finally got a sunny and dry day to start testing all of the restorations we’ve completed this winter. Here is Ken’s 1957 TR3 (smallmouth) out on it’s maiden voyage, and we’re happy to report that another one is about to wrap up here and begin a second life! Ken’s TR3 will be going home to Houston, TX, following a complete ground-up restoration to our exacting standards. We’re certain that this car will be a big hit upon arrival in Texas, with it’s relatively rare (‘56-’57 only) Beige paint and Vermillion interior.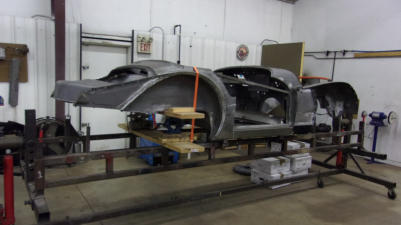


America’s BEST Triumph Shop