Macy’s Garage

© 2026 - Macy’s Garage, Ltd.

Blog
WHAT we’re doing, and HOW we’re doing it!
March 26, 2019
The rearmost bodywork of the sidescreen TR’s (TR2-TR3B) is the most complex area of these cars, and it’s always the first place we check for rust or accident damage when contemplating a purchase. No less than 22 separate pieces join together with or near the rear apron, and making repairs here is a very complicated project. If you jump in and start cutting away bad panels without a plan or proper fixtures, you could easily destroy a body tub and possibly the whole car! This TR3 was pretty typical, with significant rust in 15 of the pieces back here at the tail end. We are repairing the spare tire pan and the rear apron, and installing new replacement panels for the other 13 bad parts. Of course, none of the replacement parts are a precise fit, but fortunately we’ve done this often enough that we know how to make them fit just as they should.March 18, 2019
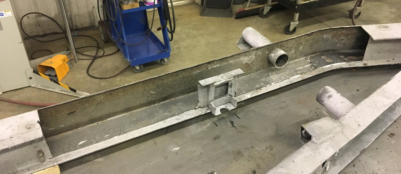
While we’re on the subject of frame repairs, I’ll show you one more photo just to demonstrate that the “rusty frame” problem isn’t exclusive to the TR4A-TR6 “IRS” style frames. The earlier TR2-TR4 frames with the straight side rails can also be found to have small sections of rust damage, but it is a much more rare occurrence than with the later frames. We repair rust damaged early frames in the exact same manner as we do with the later style, using the correct gauge metal and cutting patches which are a perfect fit before TIG welding them into place and grinding away the excess weld to make a strong and invisible repair.March 11, 2019
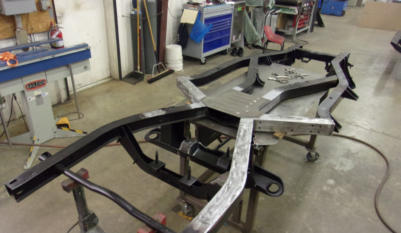
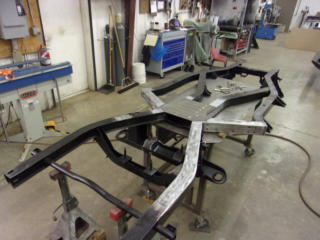
Here is a photo of the TR250 frame from last week, all repaired and ready to paint. Our sandblaster had painted the frame black immediately after blasting, so as to prevent a quick flash rust, so everything you see in this photo that is natural silver is new metal where we have made repairs, plus some areas that you can’t see under the center T-shirt plate. After we’ve painted this again, you will have a very tough time seeing where it has ever been touched! Normally these frames will be rusted in small localized areas, but this one was worse than most. Now the thought of repairing a frame like this might scare many of you into purchasing an expensive new frame, but if you stop and think about it, the frames were originally made by welding numerous smaller pieces together. The new replacement frames are also created today in exactly the same manner, so there’s really no reason to be afraid of welding! We always form our replacement sections from the same gauge (thickness) metal, and we cut back all of the weak spots so that we are welding the new pieces onto old metal that still retains its original strength. Add in our years of experience repairing these and there’s really no reason not to take advantage of this lesser cost alternative when you can. (Total time to repair this frame was only 20 hours, just 2.5 days.) Depending on where the frame is rusted or if it has extensive accident damage, we may not be able to save it, but if you are looking at a “bad” frame under your TR, you really should send us photos and consider sending the car (or just the frame) to us for repair.March 4, 2019
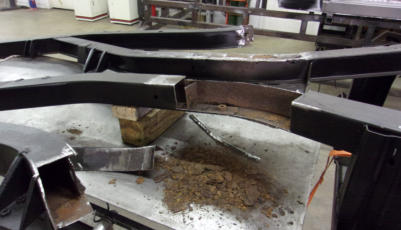
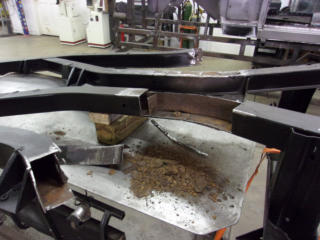
This week and next, we’ll be looking at those “rust prone” TR4A-TR6 frames again. We’ve visited these twice before, first on May 7, 2018 (2018-Q2), where I showed you the first place to check on every one of these cars you might consider buying, and again on Nov. 5, 2018 (2018- Q4), where I showed you a photo of “how not to” repair a rusty frame. This time around, we’ll show you how we repair them here! This week’s photo is a TR250 frame that has plenty of rust in all the familiar places. It really looked pretty good before we sent it off to the sandblaster. But the sandblasting opened up all of the weak areas, which is partially why we do them this way. In this photo, we’ve already cut it open and started removing the weak metal, with the typical trailing arm mount sections and the center “T-shirt” plate being the first to go. You can see the big pile of rust that was hidden in the center rail under the T-shirt, but also notice the small “baffle plate” inside the frame rail that does nothing more than trap the junk inside, allowing it to hold moisture and cause all of the damage. Most any other restoration shop or home restorer would have already had Ratco on the phone to order a new frame, but we’ll show you next week how we repair them here and save our clients thousands of dollars!February 25, 2019
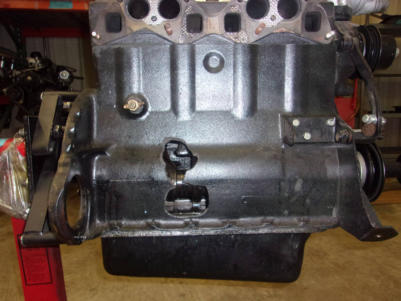
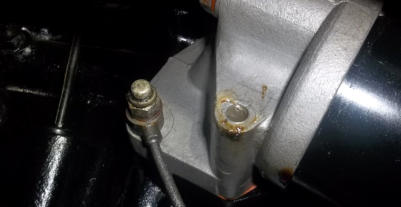
While we’re on the subject of silicone sealer, here’s another one from the same oil filter assembly shown in last week’s photo. If you look closely at the photo on the right, you can see that the lower rear bolt is missing, and yes they filled the bolt hole with more of their favorite clear silicone! If you’ve ever had one of these off, you might know that this is a blind hole which doesn’t pass through the block, so there is no source of oil which could leak out. There’s also no oil passages going to this hole inside the filter head that could leak either, but not holding this unit tightly against the block is certain to leak. Perhaps someone thought silicone would hold the filter head up against the block just as well as a bolt would? Maybe we’ll try this “fix” the next time we have a block with a stripped head stud hole. (Tongue firmly in cheek!) Now that I’m done poking fun at Mr. Silicone, I’ll tell you that we successfully removed the broken bolt from the tapped hole in the block, and reattached the filter head with 4 proper bolts and a new gasket (with appropriate sealer), just as it should have been done back when this atrocity was committed. It will probably still leak (it IS still British), but just not as much!February 19, 2019
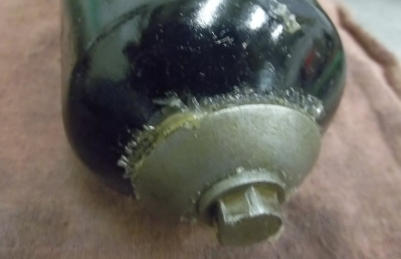
This week we have something which gave everyone here in the shop a chuckle. Someone has taken a tube of silicone sealer to the bottom cap washer of this TR4 oil filter canister in an effort to stop the oil from dripping out. Now while this may have been successful in the short run, it probably did not hold for the length of time between oil changes when it would have to be reapplied all over again. You see, all silicone sealers are not created equal, and most are not oil resistant. When we removed the center bolt, all of the sealer beneath the reinforcement cap popped right off, it wasn’t actually “sealing” anything. There is supposed to be a replaceable rubber seal under the cap that does actually seal the bolt at the bottom of the canister, but it was missing completely when we got this mess apart and cleaned up. It’s not the easiest task to get the clip off of the bolt and disassemble the canister to replace this seal, but being a rubber part which is exposed to oil and heat, you really should replace it every 3-4 years as part of your annual oil and filter change.February 11, 2019
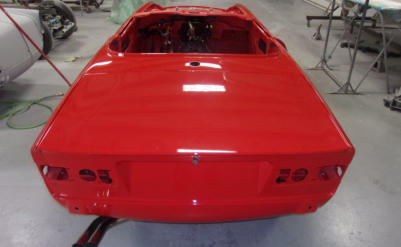
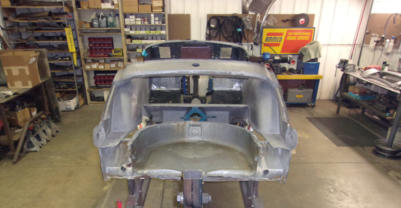
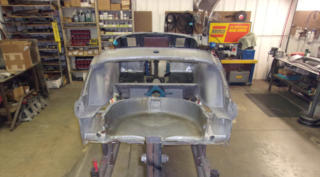
Before we even think about painting the rear tail of a TR6 with the “black out” treatment, we ALWAYS reassemble the rear of the car and align all of the panels. We could take the easy way out, and give it a good guess as to which areas of the fenders and trunk lid should be black and go ahead and tape them off, but we want to be certain that all of the black edges will align. The only way to be certain of perfect alignment is to take the time to fit all of the panels together, and then tape off the areas to receive the black. Then, before painting anything with the semi-gloss black, we’ll remove the trunk lid and tape off the rest of the car, including inside the trunk opening. Only by going through these extra steps can you be certain that the black paint on 4 different panels will align perfectly when the restoration is finished.February 4, 2019
When you hear strange noises coming out of your engine, and the oil pressure gauge is reading ZERO, by all means shut it down immediately and call a tow truck! Don’t be tempted to re-start and drive home (slowly), even if the dipstick still shows plenty of oil, no matter how close to home (or help) you might be. Having oil register on the dipstick is not the same as having oil run through your engine to properly lubricate it, so you’ll probably just turn a repairable problem into a more costly one that cannot be repaired! Oil pressure gauges were placed in the panel with the expectation that drivers would actually monitor them, especially when strange sounds can be heard from under the bonnet! In such cases, both your hearing and sight correlate to confirm that something is VERY wrong, and this is what happens when you ignore those warning signs. Most of you know that I used to be a professional pilot. We had a somewhat humorous saying that the three most dangerous words in aviation were “it’s the gauge”, meaning that there probably wasn’t anything really wrong with the airplane, it was most likely just a faulty gauge indication. Perhaps they are also the three most costly words in the British car hobby!January 28, 2018
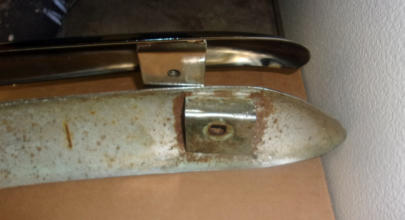
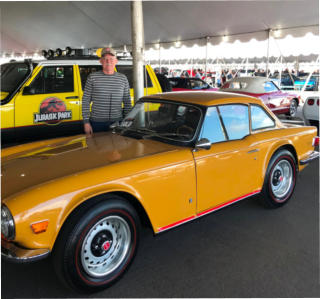
For all you TR4, TR4A, and TR250 owners out there, we’d like to let you know about a recent problem we’ve discovered with the replacement rear bumpers that are currently being supplied (Moss 854-080 and TRF 902685). We have installed plenty of these bumper on our restorations over many years without a problem, but recently something has changed and the rear bumper bars no longer fit. We have found that the overall length of these bumpers is about 1.5” too short, AND the brackets for the forward side holes are also located too far back from tips that were already 3/4” behind where they should be, moving the mount holes an inch or more behind the holes in the rear fenders and the support brackets. It appears that this problem is not going to be resolved any time soon, so our advice is to save your old original bumpers (no matter how bent up they might be) in case you have to send them off to an experienced bumper plating shop to be straightened and re-chromed. January 21, 2019 Mark and Tonda attended the Barrett-Jackson collector car auction in Phoenix last week, and once again we were able to confirm that our restorations are among the finest you will ever see, TR or otherwise! We don’t go there expecting to see Triumphs, or many other British cars, but primarily to compare the quality of our cars to what other individuals and shops are putting out across the entire spectrum of the collector car universe. When we run into a Triumph, we do have to stop and look, and generally shake our heads in wonderment. We didn’t have to look too hard to confirm that there’s an obvious reason why even our lowest level “driver” quality restorations win “Best of Show” honors at car shows all around the country. Our quality and attention to detail is head and shoulders above the “close enough” standard of 85-90% of the cars we saw, and had I been in a buying mood, there wasn’t much there that I could have brought home without feeling the urge to tear it all apart immediately and start over again. Somewhere between this ratty Saffron TR6 and another that was listed as being painted “New BRG”, someone commented that if you bought a Triumph you’d get to meet a lot of tow truck drivers. I knew it would be fruitless to try and educate him, so I simply replied “not if it passes through my shop” and moved on!January 14, 2019
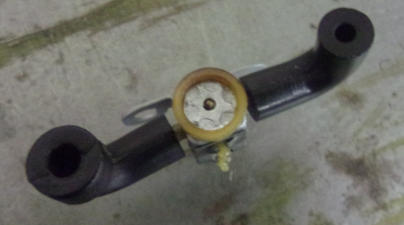
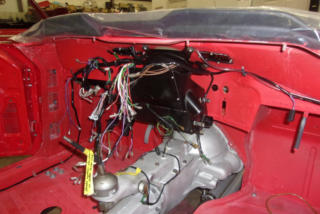
Very few of you will recognize this little part, especially from this angle! This is the back end of a vacuum switch which mounts between and below the carburetors of all Triumph TR250’s and early TR6’s with the dual vacuum unit distributors. The switch controls the engine vacuum to the retard side, depending on the position of the carburetor linkage. Replacement switches are not available, and probably have never been since the original dealer stock was exhausted. They are missing or broken on almost every car we see here, but this one was still there and almost operable. The only problem was that the clip washer from the end which holds the internal spring washer in place had gone missing. Thankfully, the spring had remained in place! All we needed to do was to re-create a new clip washer that would work. Easier said than done, it took almost an hour to come up with something that both worked and would stay in place. The final solution was to first drill a tiny hole for the shaft to pass through, then use our metal punch to pop out a round disc of the proper O.D. After that, a flat punch was used to walk around the outer edge on an anvil and “squeeze” the metal into six small points. Those points then dug into the plastic to hold it all in place. Problem solved! January 7, 2019 One of the biggest benefits of repairing and restoring a single range of cars is that we have been able to establish a “flow” that makes our shop much more efficient than restorers who don’t have this singular focus. Take the dash area of this TR6 for example. While we have to admit that there’s a lot that needs to be done here, we’ve learned a long time ago that it will be much easier, and require less time to install the w/s wiper wheelboxes and wiper drive tubes, access plates, heater assembly, and rough in the wiring well before the instrument panel is put into place. (We’ll also install those little SOB heater hoses and bulkhead fitting, as well as the w/s defroster ducts and hoses ahead of the instrument panel.) Less time equates to less cost for our clients, and a better job overall as we are able to see into areas that will become hidden later, and this lets us position wires and other small components so that they won’t become pinched, rub, or vibrate after the job is finished.
BLOG
2019-Q1
America’s BEST Triumph Shop


Macy’s Garage

© 2026 - Macy’s Garage, Ltd.

Blog
WHAT we’re doing, and HOW we’re doing it!
March 26, 2019
The rearmost bodywork of the sidescreen TR’s (TR2- TR3B) is the most complex area of these cars, and it’s always the first place we check for rust or accident damage when contemplating a purchase. No less than 22 separate pieces join together with or near the rear apron, and making repairs here is a very complicated project. If you jump in and start cutting away bad panels without a plan or proper fixtures, you could easily destroy a body tub and possibly the whole car! This TR3 was pretty typical, with significant rust in 15 of the pieces back here at the tail end. We are repairing the spare tire pan and the rear apron, and installing new replacement panels for the other 13 bad parts. Of course, none of the replacement parts are a precise fit, but fortunately we’ve done this often enough that we know how to make them fit just as they should.March 18, 2019
While we’re on the subject of frame repairs, I’ll show you one more photo just to demonstrate that the “rusty frame” problem isn’t exclusive to the TR4A-TR6 “IRS” style frames. The earlier TR2-TR4 frames with the straight side rails can also be found to have small sections of rust damage, but it is a much more rare occurrence than with the later frames. We repair rust damaged early frames in the exact same manner as we do with the later style, using the correct gauge metal and cutting patches which are a perfect fit before TIG welding them into place and grinding away the excess weld to make a strong and invisible repair.March 11, 2019
Here is a photo of the TR250 frame from last week, all repaired and ready to paint. Our sandblaster had painted the frame black immediately after blasting, so as to prevent a quick flash rust, so everything you see in this photo that is natural silver is new metal where we have made repairs, plus some areas that you can’t see under the center T-shirt plate. After we’ve painted this again, you will have a very tough time seeing where it has ever been touched! Normally these frames will be rusted in small localized areas, but this one was worse than most. Now the thought of repairing a frame like this might scare many of you into purchasing an expensive new frame, but if you stop and think about it, the frames were originally made by welding numerous smaller pieces together. The new replacement frames are also created today in exactly the same manner, so there’s really no reason to be afraid of welding! We always form our replacement sections from the same gauge (thickness) metal, and we cut back all of the weak spots so that we are welding the new pieces onto old metal that still retains its original strength. Add in our years of experience repairing these and there’s really no reason not to take advantage of this lesser cost alternative when you can. (Total time to repair this frame was only 20 hours, just 2.5 days.) Depending on where the frame is rusted or if it has extensive accident damage, we may not be able to save it, but if you are looking at a “bad” frame under your TR, you really should send us photos and consider sending the car (or just the frame) to us for repair.March 4, 2019
This week and next, we’ll be looking at those “rust prone” TR4A-TR6 frames again. We’ve visited these twice before, first on May 7, 2018 (2018-Q2), where I showed you the first place to check on every one of these cars you might consider buying, and again on Nov. 5, 2018 (2018-Q4), where I showed you a photo of “how not to” repair a rusty frame. This time around, we’ll show you how we repair them here! This week’s photo is a TR250 frame that has plenty of rust in all the familiar places. It really looked pretty good before we sent it off to the sandblaster. But the sandblasting opened up all of the weak areas, which is partially why we do them this way. In this photo, we’ve already cut it open and started removing the weak metal, with the typical trailing arm mount sections and the center “T-shirt” plate being the first to go. You can see the big pile of rust that was hidden in the center rail under the T-shirt, but also notice the small “baffle plate” inside the frame rail that does nothing more than trap the junk inside, allowing it to hold moisture and cause all of the damage. Most any other restoration shop or home restorer would have already had Ratco on the phone to order a new frame, but we’ll show you next week how we repair them here and save our clients thousands of dollars!February 25, 2019
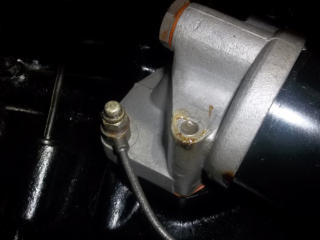
While we’re on the subject of silicone sealer, here’s another one from the same oil filter assembly shown in last week’s photo. If you look closely at the photo above, you can see that the lower rear bolt is missing, and yes they filled the bolt hole with more of their favorite clear silicone! If you’ve ever had one of these off, you might know that this is a blind hole which doesn’t pass through the block, so there is no source of oil which could leak out. There’s also no oil passages going to this hole inside the filter head that could leak either, but not holding this unit tightly against the block is certain to leak. Perhaps someone thought silicone would hold the filter head up against the block just as well as a bolt would? Maybe we’ll try this “fix” the next time we have a block with a stripped head stud hole. (Tongue firmly in cheek!) Now that I’m done poking fun at Mr. Silicone, I’ll tell you that we successfully removed the broken bolt from the tapped hole in the block, and reattached the filter head with 4 proper bolts and a new gasket (with appropriate sealer), just as it should have been done back when this atrocity was committed. It will probably still leak (it IS still British), but just not as much!February 19, 2019
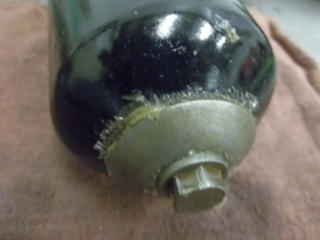
This week we have something which gave everyone here in the shop a chuckle. Someone has taken a tube of silicone sealer to the bottom cap washer of this TR4 oil filter canister in an effort to stop the oil from dripping out. Now while this may have been successful in the short run, it probably did not hold for the length of time between oil changes when it would have to be reapplied all over again. You see, all silicone sealers are not created equal, and most are not oil resistant. When we removed the center bolt, all of the sealer beneath the reinforcement cap popped right off, it wasn’t actually “sealing” anything. There is supposed to be a replaceable rubber seal under the cap that does actually seal the bolt at the bottom of the canister, but it was missing completely when we got this mess apart and cleaned up. It’s not the easiest task to get the clip off of the bolt and disassemble the canister to replace this seal, but being a rubber part which is exposed to oil and heat, you really should replace it every 3-4 years as part of your annual oil and filter change.February 11, 2019
Before we even think about painting the rear tail of a TR6 with the “black out” treatment, we ALWAYS reassemble the rear of the car and align all of the panels. We could take the easy way out, and give it a good guess as to which areas of the fenders and trunk lid should be black and go ahead and tape them off, but we want to be certain that all of the black edges will align. The only way to be certain of perfect alignment is to take the time to fit all of the panels together, and then tape off the areas to receive the black. Then, before painting anything with the semi-gloss black, we’ll remove the trunk lid and tape off the rest of the car, including inside the trunk opening. Only by going through these extra steps can you be certain that the black paint on 4 different panels will align perfectly when the restoration is finished.February 4, 2019
When you hear strange noises coming out of your engine, and the oil pressure gauge is reading ZERO, by all means shut it down immediately and call a tow truck! Don’t be tempted to re-start and drive home (slowly), even if the dipstick still shows plenty of oil, no matter how close to home (or help) you might be. Having oil register on the dipstick is not the same as having oil run through your engine to properly lubricate it, so you’ll probably just turn a repairable problem into a more costly one that cannot be repaired! Oil pressure gauges were placed in the panel with the expectation that drivers would actually monitor them, especially when strange sounds can be heard from under the bonnet! In such cases, both your hearing and sight correlate to confirm that something is VERY wrong, and this is what happens when you ignore those warning signs. Most of you know that I used to be a professional pilot. We had a somewhat humorous saying that the three most dangerous words in aviation were “it’s the gauge”, meaning that there probably wasn’t anything really wrong with the airplane, it was most likely just a faulty gauge indication. Perhaps they are also the three most costly words in the British car hobby!January 28, 2019
For all you TR4, TR4A, and TR250 owners out there, we’d like to let you know about a recent problem we’ve discovered with the replacement rear bumpers that are currently being supplied (Moss 854-080 and TRF 902685). We have installed plenty of these bumper on our restorations over many years without a problem, but recently something has changed and the rear bumper bars no longer fit. We have found that the overall length of these bumpers is about 1.5” too short, AND the brackets for the forward side holes are also located too far back from tips that were already 3/4” behind where they should be, moving the mount holes an inch or more behind the holes in the rear fenders and the support brackets. It appears that this problem is not going to be resolved any time soon, so our advice is to save your old original bumpers (no matter how bent up they might be) in case you have to send them off to an experienced bumper plating shop to be straightened and re-chromed.January 21, 2019
Mark and Tonda attended the Barrett-Jackson collector car auction in Phoenix last week, and once again we were able to confirm that our restorations are among the finest you will ever see, TR or otherwise! We don’t go there expecting to see Triumphs, or many other British cars, but primarily to compare the quality of our cars to what other individuals and shops are putting out across the entire spectrum of the collector car universe. When we run into a Triumph, we do have to stop and look, and generally shake our heads in wonderment. We didn’t have to look too hard to confirm that there’s an obvious reason why even our lowest level “driver” quality restorations win “Best of Show” honors at car shows all around the country. Our quality and attention to detail is head and shoulders above the “close enough” standard of 85-90% of the cars we saw, and had I been in a buying mood, there wasn’t much there that I could have brought home without feeling the urge to tear it all apart immediately and start over again. Somewhere between this ratty Saffron TR6 and another that was listed as being painted “New BRG”, someone commented that if you bought a Triumph you’d get to meet a lot of tow truck drivers. I knew it would be fruitless to try and educate him, so I simply replied “not if it passes through my shop” and moved on!January 14, 2019
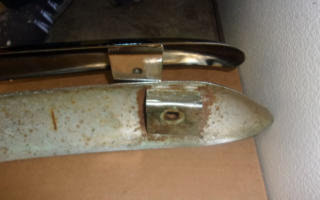
Very few of you will recognize this little part, especially from this angle! This is the back end of a vacuum switch which mounts between and below the carburetors of all Triumph TR250’s and early TR6’s with the dual vacuum unit distributors. The switch controls the engine vacuum to the retard side, depending on the position of the carburetor linkage. Replacement switches are not available, and probably have never been since the original dealer stock was exhausted. They are missing or broken on almost every car we see here, but this one was still there and almost operable. The only problem was that the clip washer from the end which holds the internal spring washer in place had gone missing. Thankfully, the spring had remained in place! All we needed to do was to re-create a new clip washer that would work. Easier said than done, it took almost an hour to come up with something that both worked and would stay in place. The final solution was to first drill a tiny hole for the shaft to pass through, then use our metal punch to pop out a round disc of the proper O.D. After that, a flat punch was used to walk around the outer edge on an anvil and “squeeze” the metal into six small points. Those points then dug into the plastic to hold it all in place. Problem solved!January 7, 2019
One of the biggest benefits of repairing and restoring a single range of cars is that we have been able to establish a “flow” that makes our shop much more efficient than restorers who don’t have this singular focus. Take the dash area of this TR6 for example. While we have to admit that there’s a lot that needs to be done here, we’ve learned a long time ago that it will be much easier, and require less time to install the w/s wiper wheelboxes and wiper drive tubes, access plates, heater assembly, and rough in the wiring well before the instrument panel is put into place. (We’ll also install those little SOB heater hoses and bulkhead fitting, as well as the w/s defroster ducts and hoses ahead of the instrument panel.) Less time equates to less cost for our clients, and a better job overall as we are able to see into areas that will become hidden later, and this lets us position wires and other small components so that they won’t become pinched, rub, or vibrate after the job is finished.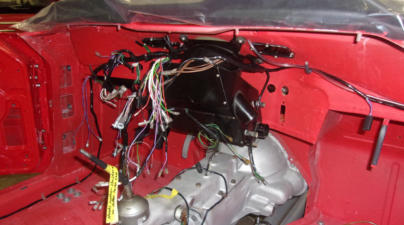


America’s BEST Triumph Shop