Macy’s Garage

© 2026 - Macy’s Garage, Ltd.

Blog
WHAT we’re doing, and HOW we’re doing it!
September 30, 2019
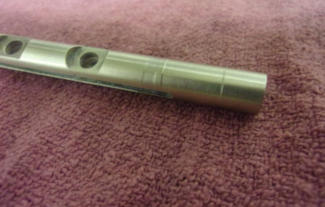
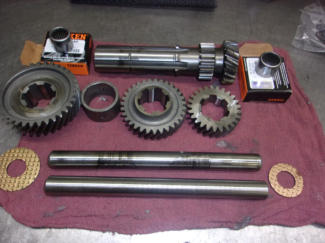
Here we have a combination of new and used parts for a TR6 gearbox. Someone had previously “rebuilt” the gearbox in question, and we were surprised that the owner was ever able to drive it! The two shafts at the bottom of the photo are the countershafts, the upper one is what was removed, and the lower is the new part which will be installed. You can clearly see the scoring on the upper shaft, and this is how we know this gearbox was previously “rebuilt”. Whomever did the deed, failed to install the countershaft bearings. None, zero, nothing! This allowed the countershaft gear, the long gear at the top of the photo, to bounce around and tear up the shaft. The inside of the countershaft gear was also worked over pretty well, but we were able to save it by gentle use of a die grinder, and by installing a set of earlier TR4/4A countershaft bearings which are caged in a shell, shown at the outer top corners of the photo. The later TR6 gearboxes use an “open cage” bearing, where the rollers ride directly on the inside of the gear. Anyone who doesn’t rebuild as many of these as we do, probably wouldn’t know this trick, and the owner would be buying a VERY expensive gear unnecessarily!September 23, 2019
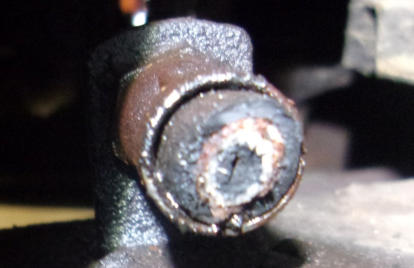
This week’s photo is a bearing race from a TR2-TR3B steering box. We rebuild 2-3 of these steering boxes every month, and have done so for over 10 years now. Originally, we posted a “how-to” page on our website thinking that folks would just rebuild their own, but the importance of steering or the special tools needed scares most folks off, so they send them here for us to work our magic. While this photo and the commentary is regarding the steering box, it’s also appropriate to apply to all bearings. When inspecting or “packing” all other bearings on your TR, such as wheel bearings, be sure to inspect not only the bearings for pitting like this, but also take a look at the bearing races. If even one roller on a bearing looks like this, or you see just one single pit on a bearing race, then the bearing and race both will need to be replaced. Once the metal starts to disintegrate like this, the parts will continue to deteriorate rapidly.September 16, 2019
Here’s one that made us all chuckle. When disassembling this TR6 transmission, we discovered that someone had made a tailshaft housing gasket from whatever they had laying around. We’re still trying to decide if it was the page from a magazine, or perhaps a cereal box or a poster. It’s cut such that there isn’t enough visible that we can decide what it says or where it came from, but with enough gasket sealer it should be all right, shouldn’t it? Sorry to say, but there were signs of leakage from this joint, so either the “gasket” didn’t offer enough “crush”, or the enterprising mechanic didn’t use enough sealer, or even the correct type of sealer. If anyone out there recognises this as their handiwork, would you please contact us and fill in the blanks as to the origins of this “gasket”? We’d all LOVE to know!September 9, 2019
What we see this week is a throttle shaft which runs across the firewall at the back of the engine, and below the battery. This section of the throttle linkage is supposed to be straight, but far too many are curved, as this one is. These rods become bent when someone removes the gearbox and does not support the back of the engine properly, allowing the engine to tilt back and bend the rod as shown in this photo. This one isn’t the worst we have seen, as it isn’t quite touching the firewall, but we have seen cases where the shaft was bent up against the firewall. This causes a “hard” gas pedal, and in some cases restricts the motion so much that the carburetors do not open fully, restricting power to the point your TR feels more like an MG! This photo was taken of a TR6 that was in our shop for an assortment of small problems, a sloppy gas pedal being one of them. The throttle linkage mounts/bushings on a TR2-TR4A are good sized nylon balls which self adjust to small amounts of mis-alignment like this, but the 6 cylinder TR250 and TR6 cars have small plastic bushings to hold both ends of this rod where it passes through the firewall. Even small bends like this one will put pressure on these bushings, quickly wearing them away to where the whole pedal assembly just wallows around at the back of the engine when the pedal is depressed. Next time your bonnet is open, take a peak at the rear of your engine and see if there might be a problem there which needs to be resolved!September 3, 2019
We get a huge number of cars in our shop that have ancient brake hoses on them, and in many instances they appear to still be the original hoses! While they may still look “good” on the outside, it’s the inside that you should be most concerned about. Unfortunately, the only way to tell that the brake fluid has been attacking the inside is to cut the hose and destroy it, in which case it’s going to require replacement for certain! This photo is a rear brake hose that we cut open on a TR6. The owner complained that it didn’t want to stop very well, and the hoses did all appear to be originals, so we were pretty sure that we wouldn’t be destroying a good hose by cutting it open. Sure enough, it was just as expected and the inside of the hose was almost completely swollen shut. It does make it difficult to stop the car when the brake fluid can’t get to the wheels! As you saw in last week’s photo, brake fluid is very corrosive. It not only eats paint, but over time it does a pretty good job on rubber brake hoses as well! With your life and that of your passengers relying on the car’s brakes, it would be a good idea to change all of your rubber brake hoses every 10 years or so if using DOT3 or DOT 4 brake fluid, and every 15 years if you are using silicone DOT5. Not that the silicone fluid is likely to eat the hose from the inside out, but rubber components do tend to deteriorate all on their own, even NOS parts that are just sitting on a shelf! And don’t think you are immune if you have stainless steel hoses on your TR. The stainless steel braid is only an outer covering. They are still rubber on the inside!August 26, 2019
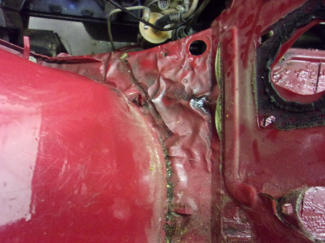
What we have here is evidence that normal DOT3 and DOT4 brake fluid makes one of the best paint strippers that you’ll ever find! This is the lower firewall section of a TR6 just below the master cylinders, and it’s plain to see that brake fluid leaks and spills have done a fantastic job of stripping the paint. This TR6 had been previously painted, with a color change from Sienna (brown) to the more timeless Carmine Red. They did a nice job of painting under the bonnet and the entire engine bay, instead of the usual “black-out” treatment with a spray can, as is usually the case with low budget “restorations”. Its too bad they didn’t change over to silicone DOT5 brake fluid at the same time, which is not harmful to paint. The internet has no shortage of “experts” who will caution or even scare you away from using DOT5 brake fluid, but my theory is that they have little or no personal experience to base their opinions on. I have been using silicone brake fluid in my own personal TR’s for well over 20 years now, and I’m absolutely in love with all of the benefits it provides, not just for paint protection! We use it in every restoration that rolls out of our shop.August 19, 2019
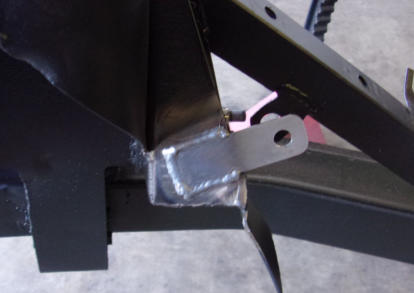
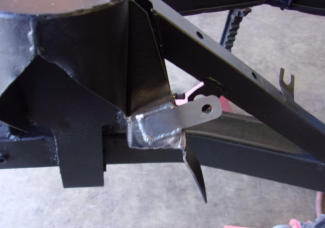
Changing the TR2’s and early TR3’s to front disc brakes is a popular modification, and a smart one too! It’s almost a “bolt-on” modification, but there are a few minor details that requires someone with extensive knowledge of these cars to pull off quickly, efficiently, and most importantly safely! Take for instance this bracket for the junction of the front brake hose and the steel brake line. It’s in a different place on the drum brake cars, and can be seen in the photo just behind the new bracket that we fabricated and welded into the correct position. We have seen this done before without the bracket being added, and it isn’t pretty. Leaving the junction between steel and rubber lines dangling in mid-air is a popular but poor option as the steel line will flex and vibrate, causing it to eventually crack with the loss of all normal braking. It’s even worse when the steel line was run through the old Lockheed drum brake bracket to help “keep it located” as the steel line rubbed the inside of the bracket hole and wore through the line at that exact spot! But what’s to worry about? You’ve still got a handbrake, right?August 12, 2019
Brought to you from high atop Pikes Peak in Colorado, somewhere around 13000 feet MSL, you see one of our TR6 restorations following the lengthy climb up the mountain. This is the point where the TR6 ran out of oxygen, and the owner didn’t feel it was worth the effort to lean out the carbs enough to climb another 1115’ to the top. The amazing part of this is that he had just picked the car up from us a week earlier, and set out to drive this fresh restoration all the way home to NM! The car had only about 100 miles on it when we turned it over to him, and after a day of driving around SW Ohio and SE Indiana, he stopped back in to have a couple of small adjustments made before pointing the car west and beginning the big adventure. We build our cars to be driven, and the priority list always begins with making them SAFE. Making them RELIABLE is item #2 on that list, and once numbers one and two are satisfied, making them PRETTY follows close behind in the #3 spot. I think this photo demonstrates how successful we are at achieving those goals! BTW, this is the same car shown below receiving the interior on July 8. We also build them QUICKLY!August 5, 2019
Take a look at the inside of this TR4-6 heater bulkhead (firewall) fitting, and you can see that it is pretty well packed full of rust and debris. The condition shown here is quite normal, and any of these fittings which are clean and clear whenever a hose removed is going to be a real rarity. You can almost bet that the inside of the heater core is going to be at least half plugged up as well, so a quick “change the hoses” job is liable to expand into an all day (or week) affair! Any time that you are purchasing replacement hoses (and don’t forget about the 2 small hoses inside the car and under the dash), you might as well go ahead and order this fitting and the rubber mounting pad at the same time. You’re probably going to need them! It would also be helpful to plan on pulling the heater assembly out from under the dash and sending the heater core out to your local radiator shop to be cleaned and tested. And it will also give you a chance to clean those smelly mouse nests out from inside the heater box!July 29, 2019
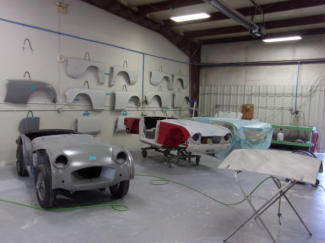
This week’s photo was taken in our paint shop. What is notable here is how clean and organized it is, plus the fact that every car in the shop is a Triumph TR (that’s a TR4 under the cover at the far end). Those of you who’ve been inside a body shop (or a restoration shop that does their own paint work as we do) will know that they don’t ever look anything like this. If you’ve ever seen a TR that was restored here and marvelled at the high quality of the paint, this photo demonstrates the attention to detail that allows us to achieve such spectacular results. The bodywork and final paint preparation process generates a large amount of fine dust, and it’s hard to walk into any automotive body shop and not come back out with dusty/dirty clothing. It’s also difficult to keep all of that dirt and dust out of the final paint, even with a state of the art paint booth such as we have here. Our painter Jake always wears a new lint free paint suit when painting our clients’ Triumphs, but keeping the shop clean and organized helps him to keep that suit clean when he moves between the paint mixing room and the booth.July 22, 2019
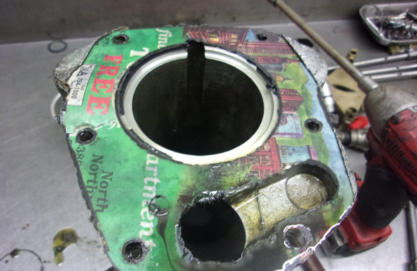
This week’s photo has two stories with it. It shows a worn throttle shaft from a TR6 Z-S carburetor, but we see the same wear on SU throttle shafts as well. This type of wear is the natural result of two metal pieces rubbing together, but British car owners who think they need to “pump” the gas pedal before starting the car only accelerate the wear process. Unlike carbureted American cars, which have an “accelerator pump” that shoots a small stream of gas into the carburetors, the British carbs do not have this tiny pump, so when you pump the pedal the only thing which gets accomplished is to hasten the wear of this shaft (and the carburetor body as well). Wear like this will allow extra air to slide into the mixture, causing erratic fuel delivery and idle speeds that can never be stabilized by simple tuning adjustments. The second part of this story is that it demonstrates why simply installing new seals and gaskets from a “carburetor kit” isn’t a complete rebuild, and won’t necessarily solve the problems you were hoping to resolve!July 15, 2019
Yesterday, Mark and shop GM Austin took Tonda’s early TR4, CT288L to the Cincinnatti British Car Day (BCD) at Harbin Park in Fairfield, OH. Here is a photo of Mark, taken right after the awards ceremony, holding the hardware that gets added to the Macy’s Garage collection. The smaller trophy is for first place in the TR4-4A-250 class, and the larger trophy on the right is for “People’s Choice”, the Cincinnati equivalent of “Best of Show”. The big trophy was awarded by popular vote via a special ballot given to not only all show participants, but also to all spectators who passed through the gate. While we kind-of expect other British car owners to recognize the “over the top” quality of this TR4, you never know what non-car folks are thinking and we wouldn’t have been surprised to see a Jaguar or an Aston Martin win this award. What is surprising is to now look back at the three British car shows where we’ve shown this car (Triumph Register of America (TRA) plus Dayton and Cincinnati BCD’s) and we’ve won Best of Show at each and every one of them! While every car we repair and restore here receives the benefit of our passion, experience, and attention to detail, most of the full restorations will be serious contenders for Best of Show honors wherever they go. But a three-peat is practically unheard of, so we’ll have to keep our expectations in check going forward from here!July 8, 2019
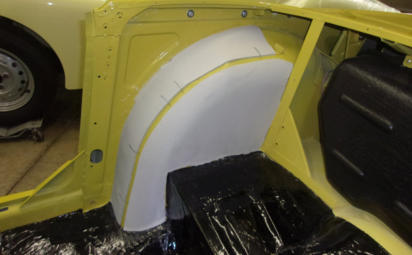
When installing rear wheel arch covers, it all starts with a smooth metal surface, to which the correct (thin) padding is firmly glued. On the sidescreen cars, the narrow strip on the top surface is all that they receive, and the larger side pad shown here on the side is not used. This is why the metal must be smooth, because without padding, every speck of dirt or rust will look like a small mountain through the thin vinyl covers. When padding a TR4-TR6 rear wheel arch, you will achieve a more professional result if you leave a small channel between the two pieces of pad, as shown here on this TR6. The channel allows the bulky seam allowance and piping of the cover to sink down below the surface, resulting in a nice smooth wheel arch cover without a huge ridge sticking up under the seam. The only trick is placing the channel directly under where the seam will lay! Pay attention to different cars the next time you are at a gathering of TR’s, and you’ll be able to spot the ones that should have had this relief groove in the padding!July 1, 2019
We see these rear brake wheel cylinders installed all kinds of different ways, but very rarely are they installed the one and only CORRECT way! This one is “close”, in that all of the pieces are there and stacked in the proper order, but the center lock plate isn’t in all the way, and it’s not “locked”. The installation of these rear wheel cylinders hasn’t changed since Triumph went to the Girling systems with the addition of disc brakes in the fall of 1956 (‘57 models starting with TS13046), and carried on through the very last TR6 in 1976. You’d think that with all that time to figure it out, TR owners and mechanics wouldn’t keep making the same mistakes! To help you get it right the next time, see our WHEEL CYLINDER INSTALL page.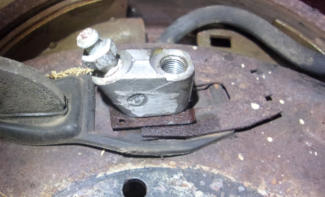

BLOG
2019-Q3
America’s BEST Triumph Shop


Macy’s Garage

© 2026 - Macy’s Garage, Ltd.

Blog
WHAT we’re doing, and HOW we’re doing it!
September 30, 2019
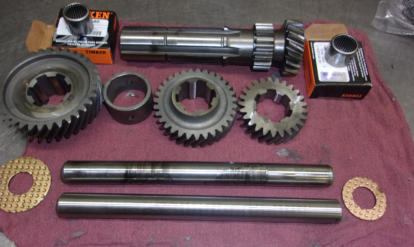
Here we have a combination of new and used parts for a TR6 gearbox. Someone had previously “rebuilt” the gearbox in question, and we were surprised that the owner was ever able to drive it! The two shafts at the bottom of the photo are the countershafts, the upper one is what was removed, and the lower is the new part which will be installed. You can clearly see the scoring on the upper shaft, and this is how we know this gearbox was previously “rebuilt”. Whomever did the deed, failed to install the countershaft bearings. None, zero, nothing! This allowed the countershaft gear, the long gear at the top of the photo, to bounce around and tear up the shaft. The inside of the countershaft gear was also worked over pretty well, but we were able to save it by gentle use of a die grinder, and by installing a set of earlier TR4/4A countershaft bearings which are caged in a shell, shown at the outer top corners of the photo. The later TR6 gearboxes use an “open cage” bearing, where the rollers ride directly on the inside of the gear. Anyone who doesn’t rebuild as many of these as we do, probably wouldn’t know this trick, and the owner would be buying a VERY expensive gear unnecessarily!September 23, 2019
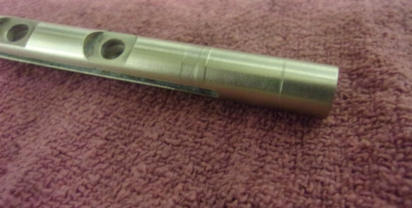
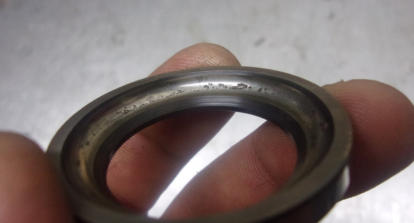
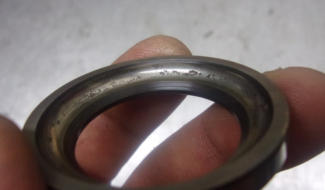
This week’s photo is a bearing race from a TR2-TR3B steering box. We rebuild 2-3 of these steering boxes every month, and have done so for over 10 years now. Originally, we posted a “how-to” page on our website thinking that folks would just rebuild their own, but the importance of steering or the special tools needed scares most folks off, so they send them here for us to work our magic. While this photo and the commentary is regarding the steering box, it’s also appropriate to apply to all bearings. When inspecting or “packing” all other bearings on your TR, such as wheel bearings, be sure to inspect not only the bearings for pitting like this, but also take a look at the bearing races. If even one roller on a bearing looks like this, or you see just one single pit on a bearing race, then the bearing and race both will need to be replaced. Once the metal starts to disintegrate like this, the parts will continue to deteriorate rapidly.September 16, 2019
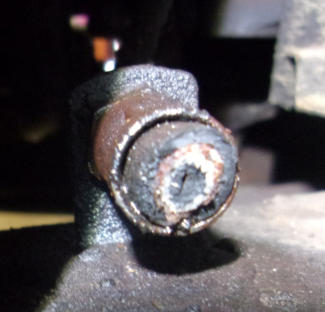
Here’s one that made us all chuckle. When disassembling this TR6 transmission, we discovered that someone had made a tailshaft housing gasket from whatever they had laying around. We’re still trying to decide if it was the page from a magazine, or perhaps a cereal box or a poster. It’s cut such that there isn’t enough visible that we can decide what it says or where it came from, but with enough gasket sealer it should be all right, shouldn’t it? Sorry to say, but there were signs of leakage from this joint, so either the “gasket” didn’t offer enough “crush”, or the enterprising mechanic didn’t use enough sealer, or even the correct type of sealer. If anyone out there recognises this as their handiwork, would you please contact us and fill in the blanks as to the origins of this “gasket”? We’d all LOVE to know!September 9, 2019
What we see this week is a throttle shaft which runs across the firewall at the back of the engine, and below the battery. This section of the throttle linkage is supposed to be straight, but far too many are curved, as this one is. These rods become bent when someone removes the gearbox and does not support the back of the engine properly, allowing the engine to tilt back and bend the rod as shown in this photo. This one isn’t the worst we have seen, as it isn’t quite touching the firewall, but we have seen cases where the shaft was bent up against the firewall. This causes a “hard” gas pedal, and in some cases restricts the motion so much that the carburetors do not open fully, restricting power to the point your TR feels more like an MG! This photo was taken of a TR6 that was in our shop for an assortment of small problems, a sloppy gas pedal being one of them. The throttle linkage mounts/bushings on a TR2-TR4A are good sized nylon balls which self adjust to small amounts of mis-alignment like this, but the 6 cylinder TR250 and TR6 cars have small plastic bushings to hold both ends of this rod where it passes through the firewall. Even small bends like this one will put pressure on these bushings, quickly wearing them away to where the whole pedal assembly just wallows around at the back of the engine when the pedal is depressed. Next time your bonnet is open, take a peak at the rear of your engine and see if there might be a problem there which needs to be resolved!September 3, 2019
We get a huge number of cars in our shop that have ancient brake hoses on them, and in many instances they appear to still be the original hoses! While they may still look “good” on the outside, it’s the inside that you should be most concerned about. Unfortunately, the only way to tell that the brake fluid has been attacking the inside is to cut the hose and destroy it, in which case it’s going to require replacement for certain! This photo is a rear brake hose that we cut open on a TR6. The owner complained that it didn’t want to stop very well, and the hoses did all appear to be originals, so we were pretty sure that we wouldn’t be destroying a good hose by cutting it open. Sure enough, it was just as expected and the inside of the hose was almost completely swollen shut. It does make it difficult to stop the car when the brake fluid can’t get to the wheels! As you saw in last week’s photo, brake fluid is very corrosive. It not only eats paint, but over time it does a pretty good job on rubber brake hoses as well! With your life and that of your passengers relying on the car’s brakes, it would be a good idea to change all of your rubber brake hoses every 10 years or so if using DOT3 or DOT 4 brake fluid, and every 15 years if you are using silicone DOT5. Not that the silicone fluid is likely to eat the hose from the inside out, but rubber components do tend to deteriorate all on their own, even NOS parts that are just sitting on a shelf! And don’t think you are immune if you have stainless steel hoses on your TR. The stainless steel braid is only an outer covering. They are still rubber on the inside!August 26, 2019
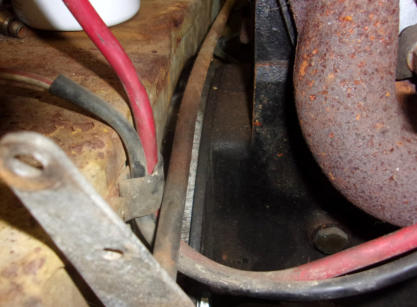
What we have here is evidence that normal DOT3 and DOT4 brake fluid makes one of the best paint strippers that you’ll ever find! This is the lower firewall section of a TR6 just below the master cylinders, and it’s plain to see that brake fluid leaks and spills have done a fantastic job of stripping the paint. This TR6 had been previously painted, with a color change from Sienna (brown) to the more timeless Carmine Red. They did a nice job of painting under the bonnet and the entire engine bay, instead of the usual “black-out” treatment with a spray can, as is usually the case with low budget “restorations”. Its too bad they didn’t change over to silicone DOT5 brake fluid at the same time, which is not harmful to paint. The internet has no shortage of “experts” who will caution or even scare you away from using DOT5 brake fluid, but my theory is that they have little or no personal experience to base their opinions on. I have been using silicone brake fluid in my own personal TR’s for well over 20 years now, and I’m absolutely in love with all of the benefits it provides, not just for paint protection! We use it in every restoration that rolls out of our shop.August 19, 2019
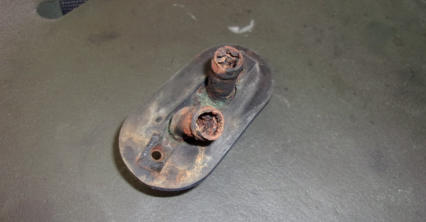
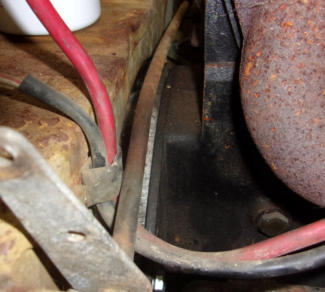
Changing the TR2’s and early TR3’s to front disc brakes is a popular modification, and a smart one too! It’s almost a “bolt-on” modification, but there are a few minor details that requires someone with extensive knowledge of these cars to pull off quickly, efficiently, and most importantly safely! Take for instance this bracket for the junction of the front brake hose and the steel brake line. It’s in a different place on the drum brake cars, and can be seen in the photo just behind the new bracket that we fabricated and welded into the correct position. We have seen this done before without the bracket being added, and it isn’t pretty. Leaving the junction between steel and rubber lines dangling in mid-air is a popular but poor option as the steel line will flex and vibrate, causing it to eventually crack with the loss of all normal braking. It’s even worse when the steel line was run through the old Lockheed drum brake bracket to help “keep it located” as the steel line rubbed the inside of the bracket hole and wore through the line at that exact spot! But what’s to worry about? You’ve still got a handbrake, right?August 12, 2019
Brought to you from high atop Pikes Peak in Colorado, somewhere around 13000 feet MSL, you see one of our TR6 restorations following the lengthy climb up the mountain. This is the point where the TR6 ran out of oxygen, and the owner didn’t feel it was worth the effort to lean out the carbs enough to climb another 1115’ to the top. The amazing part of this is that he had just picked the car up from us a week earlier, and set out to drive this fresh restoration all the way home to NM! The car had only about 100 miles on it when we turned it over to him, and after a day of driving around SW Ohio and SE Indiana, he stopped back in to have a couple of small adjustments made before pointing the car west and beginning the big adventure. We build our cars to be driven, and the priority list always begins with making them SAFE. Making them RELIABLE is item #2 on that list, and once numbers one and two are satisfied, making them PRETTY follows close behind in the #3 spot. I think this photo demonstrates how successful we are at achieving those goals! BTW, this is the same car shown below receiving the interior on July 8. We also build them QUICKLY!August 5, 2019
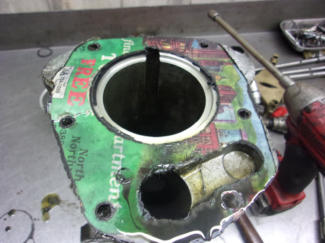
Take a look at the inside of this TR4-6 heater bulkhead (firewall) fitting, and you can see that it is pretty well packed full of rust and debris. The condition shown here is quite normal, and any of these fittings which are clean and clear whenever a hose removed is going to be a real rarity. You can almost bet that the inside of the heater core is going to be at least half plugged up as well, so a quick “change the hoses” job is liable to expand into an all day (or week) affair! Any time that you are purchasing replacement hoses (and don’t forget about the 2 small hoses inside the car and under the dash), you might as well go ahead and order this fitting and the rubber mounting pad at the same time. You’re probably going to need them! It would also be helpful to plan on pulling the heater assembly out from under the dash and sending the heater core out to your local radiator shop to be cleaned and tested. And it will also give you a chance to clean those smelly mouse nests out from inside the heater box!July 29, 2019
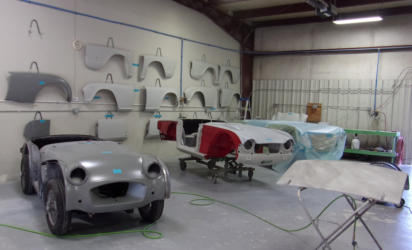
This week’s photo was taken in our paint shop. What is notable here is how clean and organized it is, plus the fact that every car in the shop is a Triumph TR (that’s a TR4 under the cover at the far end). Those of you who’ve been inside a body shop (or a restoration shop that does their own paint work as we do) will know that they don’t ever look anything like this. If you’ve ever seen a TR that was restored here and marvelled at the high quality of the paint, this photo demonstrates the attention to detail that allows us to achieve such spectacular results. The bodywork and final paint preparation process generates a large amount of fine dust, and it’s hard to walk into any automotive body shop and not come back out with dusty/dirty clothing. It’s also difficult to keep all of that dirt and dust out of the final paint, even with a state of the art paint booth such as we have here. Our painter Jake always wears a new lint free paint suit when painting our clients’ Triumphs, but keeping the shop clean and organized helps him to keep that suit clean when he moves between the paint mixing room and the booth.July 22, 2019
This week’s photo has two stories with it. It shows a worn throttle shaft from a TR6 Z-S carburetor, but we see the same wear on SU throttle shafts as well. This type of wear is the natural result of two metal pieces rubbing together, but British car owners who think they need to “pump” the gas pedal before starting the car only accelerate the wear process. Unlike carbureted American cars, which have an “accelerator pump” that shoots a small stream of gas into the carburetors, the British carbs do not have this tiny pump, so when you pump the pedal the only thing which gets accomplished is to hasten the wear of this shaft (and the carburetor body as well). Wear like this will allow extra air to slide into the mixture, causing erratic fuel delivery and idle speeds that can never be stabilized by simple tuning adjustments. The second part of this story is that it demonstrates why simply installing new seals and gaskets from a “carburetor kit” isn’t a complete rebuild, and won’t necessarily solve the problems you were hoping to resolve!July 15, 2019
Yesterday, Mark and shop GM Austin took Tonda’s early TR4, CT288L to the Cincinnatti British Car Day (BCD) at Harbin Park in Fairfield, OH. Here is a photo of Mark, taken right after the awards ceremony, holding the hardware that gets added to the Macy’s Garage collection. The smaller trophy is for first place in the TR4-4A-250 class, and the larger trophy on the right is for “People’s Choice”, the Cincinnati equivalent of “Best of Show”. The big trophy was awarded by popular vote via a special ballot given to not only all show participants, but also to all spectators who passed through the gate. While we kind-of expect other British car owners to recognize the “over the top” quality of this TR4, you never know what non-car folks are thinking and we wouldn’t have been surprised to see a Jaguar or an Aston Martin win this award. What is surprising is to now look back at the three British car shows where we’ve shown this car (Triumph Register of America (TRA) plus Dayton and Cincinnati BCD’s) and we’ve won Best of Show at each and every one of them! While every car we repair and restore here receives the benefit of our passion, experience, and attention to detail, most of the full restorations will be serious contenders for Best of Show honors wherever they go. But a three-peat is practically unheard of, so we’ll have to keep our expectations in check going forward from here!July 8, 2019
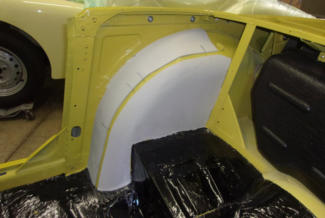
When installing rear wheel arch covers, it all starts with a smooth metal surface, to which the correct (thin) padding is firmly glued. On the sidescreen cars, the narrow strip on the top surface is all that they receive, and the larger side pad shown here on the side is not used. This is why the metal must be smooth, because without padding, every speck of dirt or rust will look like a small mountain through the thin vinyl covers. When padding a TR4-TR6 rear wheel arch, you will achieve a more professional result if you leave a small channel between the two pieces of pad, as shown here on this TR6. The channel allows the bulky seam allowance and piping of the cover to sink down below the surface, resulting in a nice smooth wheel arch cover without a huge ridge sticking up under the seam. The only trick is placing the channel directly under where the seam will lay! Pay attention to different cars the next time you are at a gathering of TR’s, and you’ll be able to spot the ones that should have had this relief groove in the padding!July 1, 2019
We see these rear brake wheel cylinders installed all kinds of different ways, but very rarely are they installed the one and only CORRECT way! This one is “close”, in that all of the pieces are there and stacked in the proper order, but the center lock plate isn’t in all the way, and it’s not “locked”. The installation of these rear wheel cylinders hasn’t changed since Triumph went to the Girling systems with the addition of disc brakes in the fall of 1956 (‘57 models starting with TS13046), and carried on through the very last TR6 in 1976. You’d think that with all that time to figure it out, TR owners and mechanics wouldn’t keep making the same mistakes! To help you get it right the next time, see our WHEEL CYLINDER INSTALL page.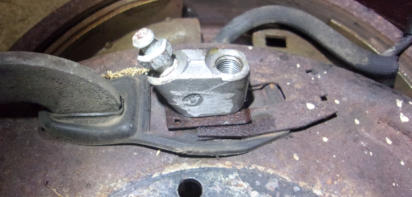


America’s BEST Triumph Shop