Macy’s Garage

© 2026 - Macy’s Garage, Ltd.

Blog
WHAT we’re doing, and HOW we’re doing it!
March 30, 2020
No BLOG entry for this week because we were closed by the State Of Ohio order to “Stay at Home” due to the global pandemic.March 23, 2020
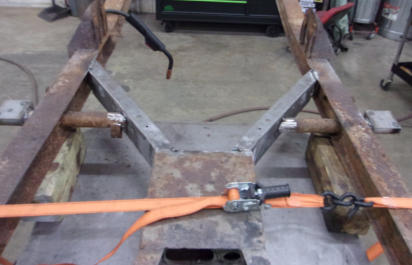
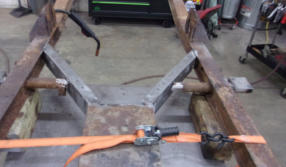
We see a lot of TR frames that have relatively minor damage from rust or collisions, and in most cases we are able to make strong and accurate repairs here. For example, this TR3B frame had 2 sections that were both banged-up AND weakened by rust. Rather than look for a better frame (the proverbial needle in a haystack), or shell out $6-7k for a new reproduction frame, we opted to repair the original. We never throw anything away (TR hoarders), and a frame that was beyond saving donated the two replacement sections we needed. You can see the 2 new sections that were blasted and cleaned prior to welding, and now that the repairs have been accomplished, the entire frame will be sent out to our sandblaster to prepare for paint.March 16, 2020
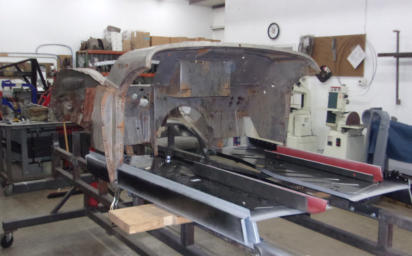
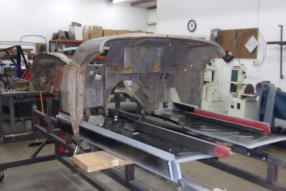
And here we have it, an intact (and straight) TR3A body tub. With the front and floors joined, we next install the rear “clip”. Using the rear body mounts and our body jig fixture to establish a preliminary location, we also install an interior brace and both doors just to make sure that the door openings are correct before welding anything. Multiple measurements are taken to make sure it’s all “square”, and then we stand back and sight along both sides as a final check to verify everything is aligned. Many rust repairs were needed along the lower edges before these bigger pieces could be joined together, and there’s still plenty of repair needed higher up on the tub, but it’s now assured that this TR3A will indeed come back from the dead!March 9, 2020
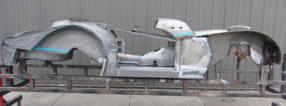
To begin the reassembly of Humpty Dumpty, we start by bolting both of the new inner sills onto one of our rotisserie and body jig fixtures. The replacement floor pans are next, followed by the front “clip” or forward body section. We use the front body mount locations, as well as the relationship between the diagonal suspension supports and the sloping bottom edge of the inner front wings to position the front section, and then lightly tack the bottom of the A posts to the new inner sills. In most cases, the bottom of the A posts will have some rust damage which needs to be repaired, as well as the bottom edge of the firewall toe boards. Many times the lower portions of the bulkhead side panels (kick plates) will be heavily rusted as well, and all of these attachment points must be accurately repaired before the front section can be permanently attached to the new floors and sills. When faced with a situation where much of the original attachment areas are damaged by rust or missing altogether, we have to strictly adhere to the old saying, “measure twice and weld once”!March 2, 2020
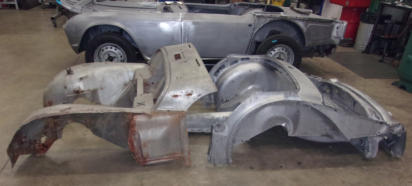
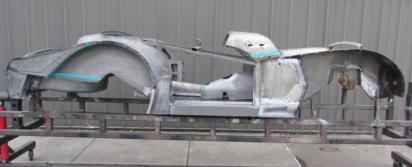
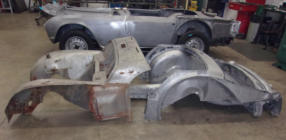
No, this is not what’s meant by a “short door” TR2! But it is (unfortunately) the condition of most restoration projects we receive these days. Over the 58 years that have passed since the last sidescreen TR’s were built, almost all of the “easy” cars have been restored, and what we are left with are cars that would not have been a good parts car as little as 10-15 years ago. (I’ll also add that most of those “easy” restorations that were done 20-30 years back were not done to the standards of today, and many of them have deteriorated to where they could stand to be restored again now.) But the good news is that we have the skills and expertise to make a superb TR out of a car like this one, and over the next couple of weeks I’ll post photos showing just how quickly we’ll be able to put Humpty Dumpty back together again!February 24, 2020
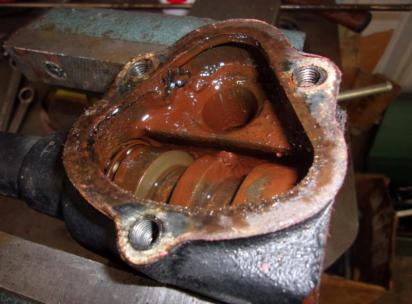
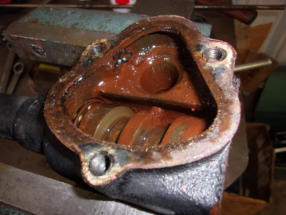
We rebuild a very large quantity of TR2-TR3B steering boxes here, averaging 25 per year for the last 10+ years, and it isn’t uncommon to find one that has been filled with water at some time or another like this one has. Our best guess is that the rubber fill plug in the column was left out (or fell out), and then years of driving through all kinds of weather allowed the splash from the front tires to make it’s way into the column and box. Any thoughtful owner who might have tried to wash away the oil under the bonnet would have surely added to the problem as well! After disassembling a box like this and washing all of the parts in solvent, it’s not uncommon to find that a whole bunch of expensive parts have been damaged by rust pits on precision surfaces! But the good news is that a steering box like this can be rebuilt and saved, and your sidescreen TR is going to drive a whole lot better as the result.February 17, 2020
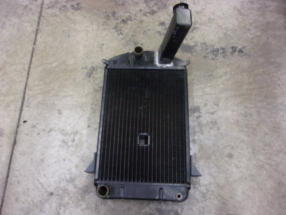
This week we have a TR2-TR3B radiator with the long neck, and these were also used on some of the earliest TR4’s. Look closely where the neck joins the top tank, and you can see the fresh silver colored solder where our local radiator shop has just repaired a crack that was leaking coolant. This is a very common repair, because the length of the neck puts a huge amount of pressure on this joint every time the radiator cap is taken off or installed. The radiator caps have a spring that must be pushed down to get the cap on and off, and in doing so you will eventually cause this joint to crack and leak! To help avoid this damage from happening, and the need to remove the front apron of a TR2-TR3B just to get the radiator out for a repair, simply hold one hand under the neck to support it every time you remove or install your radiator cap. It does sound strange that you need two hands to take off a radiator cap, but the little bit of support you’ll get from the second hand will save you a lot of work and grief later!February 10, 2020
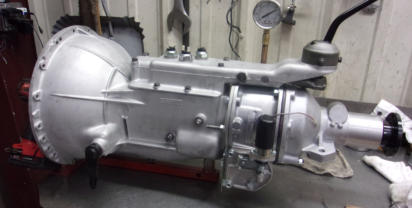
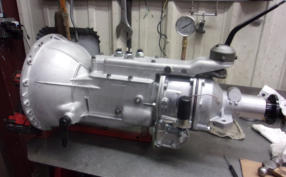
Adding an overdrive to your TR’s gearbox is probably the best thing you can do to enhance your driving pleasure. But the cores needed to add this valuable option have been difficult to find for many years, which led to the “lesser” choice of adding a Japanese 5 speed to your proper British sports car. The 5 speeds do drop a few revs in top gear, but with a real Triumph O/D gearbox you’ll soon appreciate having the O/D available on other gears as well. The 6 speeds you’ll get with a J-type overdrive (late TR6), or 7 speeds from an A-type (TR2-early 6) are useful in more situations than you can imagine until you’ve driven one! We have been hoarding cores for use in our complete restorations for quite awhile now, and we’ve finally reached a point where we can offer a few O/D conversions for TR owners who are not receiving a full restoration here. If you’d like to add an overdrive to make your TR more enjoyable to drive, please call to discuss while the extras are still available.February 3, 2020
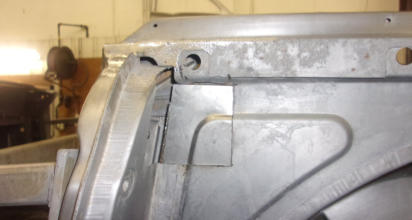
Back on the December 16, 2019 photo (Blog 2019-Q4), we showed you how many folks “repair” rusty spots by tacking a piece of metal over the rust to either hide it, or to keep the bondo or undercoating from falling through the hole. Repairs made in this manner are no better than trying to cure melanoma by placing a band-aid over the cancer spot. You haven’t cured the problem, but maybe it looks a little better! Today we see another proper repair in progress. While this location behind the driver’s door is hidden by the left rear fender and never going to be seen, we make our repair pieces to be precise duplicates of the original metal (before it rusted away). Once this has been TIG welded and the welds ground down, no one will ever know that we’ve been working here.January 27, 2020
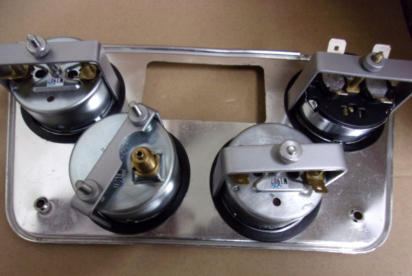
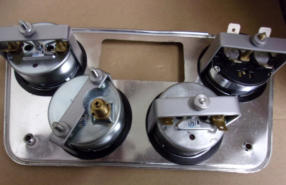
This is the rear side of an early TR4 gauge panel, rarely seen and even more rare to see it from this view. The earliest TR4’s up to body number 4398CT used this stamped aluminum panel to hold the gauges, and it was shiny embossed silver on the normally seen front side. After 4398CT, this panel was black steel until the wood dashes were introduced. But what is really interesting here is the black steel rings which can be seen around each gauge. These steel rings are in addition to the rubber insulating rings just under the chrome gauge bezel on the front side, and the steel is used to keep the gauge mounts from pushing into the soft aluminum. These rings are often missing or lost during disassembly by some overly enthusiastic restorer, and only the most knowledgeable TR restorers like the team here at Macy’s Garage will know they should be there, or where to obtain replacements if yours are missing. Are you really sure that hiring the local Mustang guy to work on your TR is really the best idea idea?January 20, 2020
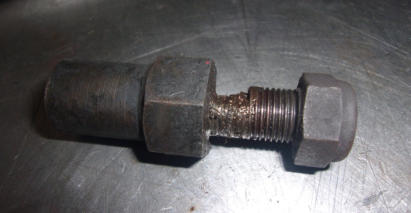
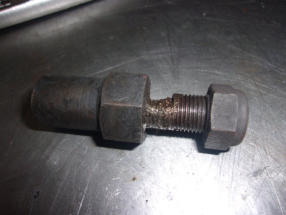
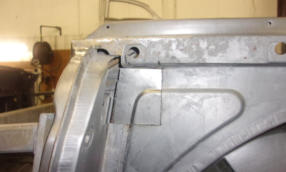
This week we have another example of why you need to periodically check your generator mountings. This is the lower front mounting stud, and you can see that it has been loose and wobbling for quite some time. Even the huge nyloc nut was not enough to keep it tight, allowing the generator to bounce around and causing the mounting stud to wear itself away in the mounting hole. While this part can be somewhat easily replaced, it is the damage to the mounting hole that is much more difficult to repair. This stud mounts through a separate mounting plate which is bolted to the side of the engine block, and that part can also be changed, but it passes through the front engine mounting plate too, and that will require welding and re-drilling to repair. Just installing a new stud into a wallowed-out hole will not solve the problem for very long, as the new stud is going to start moving around inside the distorted hole rather quickly, no matter how tight you crank down on the nut! Check these fasteners annually, or at least every 1000 miles if you drive your TR more than that each year, and perhaps you’ll be able to avoid this kind of damage (as long as it hasn’t already started).January 13, 2020
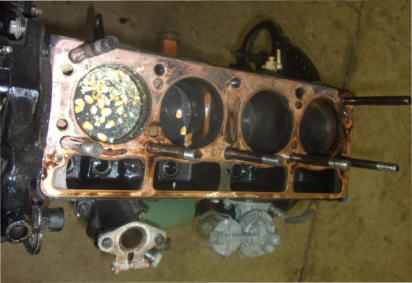
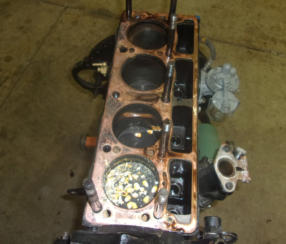
This TR3 engine came out of a car that sat unused for a little longer than it should have. The engine was “locked”, meaning that it could not be turned over, so we needed to find the cause. We began by pulling the spark plugs and taking a look inside the cylinders with our bore scope, and the trouble quickly revealed itself. Not only were the cylinders rusty, but the mice had been using the #1 cylinder as a grain storage silo! But just how did they get the corn in there? By crawling through the exhaust system and into the exhaust manifold, where an open exhaust valve gave them just enough of an opening to deposit their treasure. Too bad that after all that work, they were not able to get down into the cylinder to retrieve their food reserves. I suppose this is the point where they turned to eating upholstery and wiring!January 6, 2020
Glove box doors on the early TR4 metal dash cars are notorious for chipping paint due to the poor fit of the doors in the panel opening. So before diving in and starting the paint process for a TR4 white dash, the dash and the glove box door take a trip through our metal shop, where the edges of the door are ground down, welded up, and ground down again until the gap between the door and the dash are even. And more importantly, we make sure the gap is wide enough that the paint won’t be chipped by the simple task of opening and closing the door!
BLOG
2020-Q1
America’s BEST Triumph Shop


Macy’s Garage

© 2026 - Macy’s Garage, Ltd.

Blog
WHAT we’re doing, and HOW we’re doing it!
March 30, 2020
No BLOG entry for this week because we were closed by the State Of Ohio order to “Stay at Home”.March 23, 2020
We see a lot of TR frames that have relatively minor damage from rust or collisions, and in most cases we are able to make strong and accurate repairs here. For example, this TR3B frame had 2 sections that were both banged-up AND weakened by rust. Rather than look for a better frame (the proverbial needle in a haystack), or shell out $6-7k for a new reproduction frame, we opted to repair the original. We never throw anything away (TR hoarders), and a frame that was beyond saving donated the two replacement sections we needed. You can see the 2 new sections that were blasted and cleaned prior to welding, and now that the repairs have been accomplished, the entire frame will be sent out to our sandblaster to prepare for paint.March 16, 2020
And here we have it, an intact (and straight) TR3A body tub. With the front and floors joined, we next install the rear “clip”. Using the rear body mounts and our body jig fixture to establish a preliminary location, we also install an interior brace and both doors just to make sure that the door openings are correct before welding anything. Multiple measurements are taken to make sure it’s all “square”, and then we stand back and sight along both sides as a final check to verify everything is aligned. Many rust repairs were needed along the lower edges before these bigger pieces could be joined together, and there’s still plenty of repair needed higher up on the tub, but it’s now assured that this TR3A will indeed come back from the dead!March 9, 2020
To begin the reassembly of Humpty Dumpty, we start by bolting both of the new inner sills onto one of our rotisserie and body jig fixtures. The replacement floor pans are next, followed by the front “clip” or forward body section. We use the front body mount locations, as well as the relationship between the diagonal suspension supports and the sloping bottom edge of the inner front wings to position the front section, and then lightly tack the bottom of the A posts to the new inner sills. In most cases, the bottom of the A posts will have some rust damage which needs to be repaired, as well as the bottom edge of the firewall toe boards. Many times the lower portions of the bulkhead side panels (kick plates) will be heavily rusted as well, and all of these attachment points must be accurately repaired before the front section can be permanently attached to the new floors and sills. When faced with a situation where much of the original attachment areas are damaged by rust or missing altogether, we have to strictly adhere to the old saying, “measure twice and weld once”!March 2, 2020
No, this is not what’s meant by a “short door” TR2! But it is (unfortunately) the condition of most restoration projects we receive these days. Over the 58 years that have passed since the last sidescreen TR’s were built, almost all of the “easy” cars have been restored, and what we are left with are cars that would not have been a good parts car as little as 10-15 years ago. (I’ll also add that most of those “easy” restorations that were done 20-30 years back were not done to the standards of today, and many of them have deteriorated to where they could stand to be restored again now.) But the good news is that we have the skills and expertise to make a superb TR out of a car like this one, and over the next couple of weeks I’ll post photos showing just how quickly we’ll be able to put Humpty Dumpty back together again!February 24, 2020
We rebuild a very large quantity of TR2-TR3B steering boxes here, averaging 25 per year for the last 10+ years, and it isn’t uncommon to find one that has been filled with water at some time or another like this one has. Our best guess is that the rubber fill plug in the column was left out (or fell out), and then years of driving through all kinds of weather allowed the splash from the front tires to make it’s way into the column and box. Any thoughtful owner who might have tried to wash away the oil under the bonnet would have surely added to the problem as well! After disassembling a box like this and washing all of the parts in solvent, it’s not uncommon to find that a whole bunch of expensive parts have been damaged by rust pits on precision surfaces! But the good news is that a steering box like this can be rebuilt and saved, and your sidescreen TR is going to drive a whole lot better as the result.February 17, 2020
This week we have a TR2-TR3B radiator with the long neck, and these were also used on some of the earliest TR4’s. Look closely where the neck joins the top tank, and you can see the fresh silver colored solder where our local radiator shop has just repaired a crack that was leaking coolant. This is a very common repair, because the length of the neck puts a huge amount of pressure on this joint every time the radiator cap is taken off or installed. The radiator caps have a spring that must be pushed down to get the cap on and off, and in doing so you will eventually cause this joint to crack and leak! To help avoid this damage from happening, and the need to remove the front apron of a TR2-TR3B just to get the radiator out for a repair, simply hold one hand under the neck to support it every time you remove or install your radiator cap. It does sound strange that you need two hands to take off a radiator cap, but the little bit of support you’ll get from the second hand will save you a lot of work and grief later!February 10, 2020
Adding an overdrive to your TR’s gearbox is probably the best thing you can do to enhance your driving pleasure. But the cores needed to add this valuable option have been difficult to find for many years, which led to the “lesser” choice of adding a Japanese 5 speed to your proper British sports car. The 5 speeds do drop a few revs in top gear, but with a real Triumph O/D gearbox you’ll soon appreciate having the O/D available on other gears as well. The 6 speeds you’ll get with a J-type overdrive (late TR6), or 7 speeds from an A-type (TR2-early 6) are useful in more situations than you can imagine! We have been hoarding cores for use in our complete restorations for quite awhile now, and we’ve finally reached a point where we can offer a few O/D conversions for TR owners who are not receiving a full restoration here. If you’d like to add an overdrive to make your TR more enjoyable to drive, please call to discuss while the extras are still available.February 3, 2020
Back on the December 16, 2019 photo (Blog 2019-Q4), we showed you how many folks “repair” rusty spots by tacking a piece of metal over the rust to either hide it, or to keep the bondo or undercoating from falling through the hole. Repairs made in this manner are no better than trying to cure melanoma by placing a band-aid over the cancer spot. You haven’t cured the problem, but maybe it looks a little better! Today we see another proper repair in progress. While this location behind the driver’s door is hidden by the left rear fender and never going to be seen, we make our repair pieces to be precise duplicates of the original metal (before it rusted away). Once this has been TIG welded and the welds ground down, no one will ever know that we’ve been working here.January 27, 2020
This is the rear side of an early TR4 gauge panel, rarely seen and even more rare to see it from this view. The earliest TR4’s up to body number 4398CT used this stamped aluminum panel to hold the gauges, and it was shiny embossed silver on the normally seen front side. After 4398CT, this panel was black steel until the wood dashes were introduced. But what is really interesting here is the black steel rings which can be seen around each gauge. These steel rings are in addition to the rubber insulating rings just under the chrome gauge bezel on the front side, and the steel is used to keep the gauge mounts from pushing into the soft aluminum. These rings are often missing or lost during disassembly by some overly enthusiastic restorer, and only the most knowledgeable TR restorers like the team here at Macy’s Garage will know they should be there, or where to obtain replacements if yours are missing. Are you really sure that hiring the local Mustang guy to work on your TR is really the best idea idea?January 20, 2020
This week we have another example of why you need to periodically check your generator mountings. This is the lower front mounting stud, and you can see that it has been loose and wobbling for quite some time. Even the huge nyloc nut was not enough to keep it tight, allowing the generator to bounce around and causing the mounting stud to wear itself away in the mounting hole. While this part can be somewhat easily replaced, it is the damage to the mounting hole that is much more difficult to repair. This stud mounts through a separate mounting plate which is bolted to the side of the engine block, and that part can also be changed, but it passes through the front engine mounting plate too, and that will require welding and re- drilling to repair. Just installing a new stud into a wallowed- out hole will not solve the problem for very long, as the new stud is going to start moving around inside the distorted hole rather quickly, no matter how tight you crank down on the nut! Check these fasteners annually, or at least every 1000 miles if you drive your TR more than that each year, and perhaps you’ll be able to avoid this kind of damage (as long as it hasn’t already started).January 13, 2020
This TR3 engine came out of a car that sat unused for a little longer than it should have. The engine was “locked”, meaning that it could not be turned over, so we needed to find the cause. We began by pulling the spark plugs and taking a look inside the cylinders with our bore scope, and the trouble quickly revealed itself. Not only were the cylinders rusty, but the mice had been using the #1 cylinder as a grain storage silo! But just how did they get the corn in there? By crawling through the exhaust system and into the exhaust manifold, where an open exhaust valve gave them just enough of an opening to deposit their treasure. Too bad that after all that work, they were not able to get down into the cylinder to retrieve their food reserves. I suppose this is the point where they turned to eating upholstery and wiring!January 6, 2020
Glove box doors on the early TR4 metal dash cars are notorious for chipping paint due to the poor fit of the doors in the panel opening. So before diving in and starting the paint process for a TR4 white dash, the dash and the glove box door take a trip through our metal shop, where the edges of the door are ground down, welded up, and ground down again until the gap between the door and the dash are even. And more importantly, we make sure the gap is wide enough that the paint won’t be chipped by the simple task of opening and closing the door!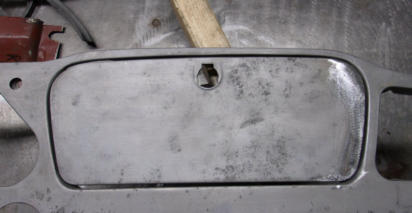


America’s BEST Triumph Shop