Macy’s Garage

© 2026 - Macy’s Garage, Ltd.

Blog
WHAT we’re doing, and HOW we’re doing it!
September 28, 2020
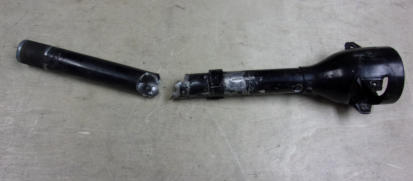
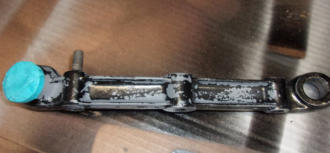
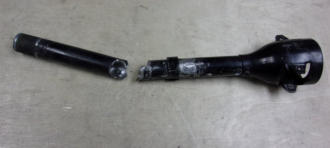
We see a lot of “loose” steering columns in the TR4-TR6 cars, but we’ve never seen one like this! Usually it is worn bushings inside the column, or loose mountings under the dash, and sometimes a combination of both. This was by far the worst, and it felt like the column would drop out of the dash and into our laps on the short drive from the parking lot into the building! This outer column tube was broken completely in two at the column lock location, and it appeared to have been done with a hammer and chisel. Bruce bought this TR6 in 1975, when it was only 1 year old. At the time, he noted that one front fender was a different color and was told that it had been in a “minor fender bender”. We suspect that the car was stolen, and the thief wrecked the car. Bruce has accepted a loose steering column during his entire 45 year ownership, that is until now, when he finally brought the car to someone who knew better!September 21, 2020
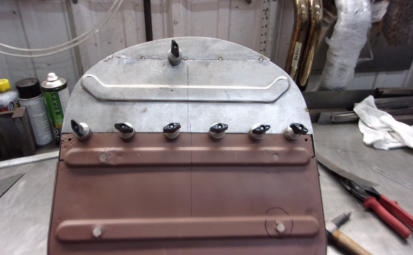
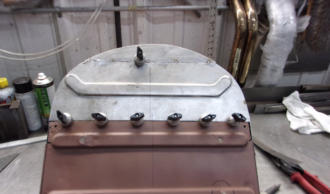
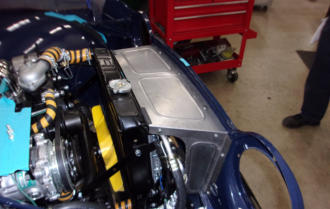
We are installing an aftermarket air conditioning unit during this TR250 restoration, and this addition ups the ante on making the cooling system as efficient as possible. The factory style radiator duct on a TR250 consists of only two small pieces of fiberboard along the sides of the radiator, which does nothing to prevent air from bypassing the radiator over the top. A TR6 style air duct could be trimmed and modified to fit the shape of the TR250 front valance, and then trimmed again to clear all of the a/c components. A better option was to simply start from scratch and fabricate something in house that fit tighter and looked better than a chunk of cardboard which obviously had major surgery. What we created is this sturdy steel air deflector that will channel most of the incoming air through the radiator core. Once it’s been massaged and painted in our paint shop, it will match the quality that is apparent throughout this TR250, as well as that of any other TR that was restored here at Macy’s Garage.September 14, 2020
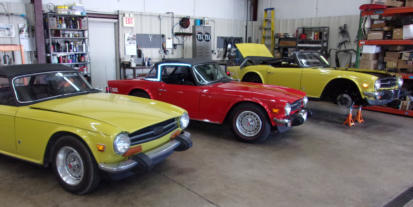
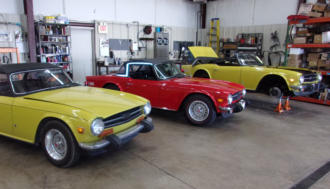
In the crazy year that 2020 has been, even the smallest things can seem HUGE! Here we are in the middle of September, and we just got to attend our first car event of the year! This past Saturday, 3 members of the Macy’s Garage staff and 3 local clients took six TR’s on a short cruise to Dayton’s “British Biscuits and Tea”, a gathering of British car folks. This very small event of 30-35 cars was only about 10% of the annual Dayton British Car Day (which was cancelled this year), but the weather was beautiful and we had a chance to catch up with folks we haven’t seen for a very long time. A few were difficult to recognise from behind their masks, but this new challenge just added to the adventure! It was refreshing to look in the mirror and see a line of TR’s following behind, much more fun than commuting solo to the shop in my TR250 a couple days each week. Even without a “formal” event to attend, cruising the back roads with your friends is a nice way to get together and have no trouble remaining 6 feet apart! We’ll certainly be getting together again for another drive or two before the snow flies later this year. Good for the soul, and good for the Triumphs too!September 8, 2020
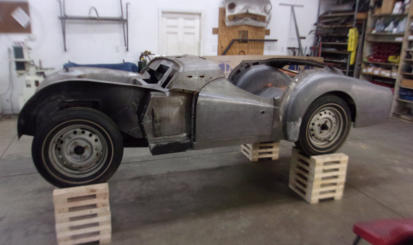
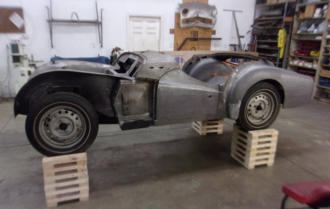
One of the biggest advantages we have gained from working on the same cars over and over again, is that we’ve had time to develop special tools and equipment that make the restoration tasks easier and faster, resulting in huge efficiency gains for our clients. Take these whole car stands for example. When fitting doors and adjusting panel gaps in our metal shop, we have always wanted to have the car sitting on it’s wheels in a natural position, but that puts the lower door edge and sills very close to the floor, making the work slow and difficult. Elevating the car onto jack stands is different than having the weight on the tires, and not nearly as high as it needs to be. While a 4-post lift would support the car from under the tires, working around the big bulky lift itself would be worse than working down near the floor. Enter these clever stands to get the car way up in the air for easier access, and with the weight distributed just where we want it to be. And, we also devised a special jack to get the cars up and down quickly!August 31, 2020
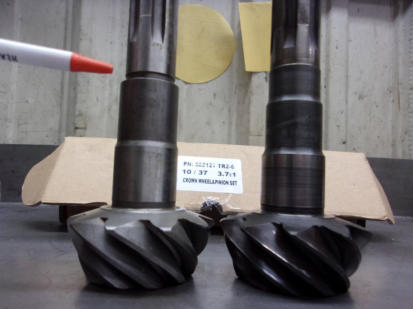
There once was a time when Triumph enthusiasts could not find parts to repair their beloved little sports cars. The situation today is much better, as you don’t need to find a local Triumph dealer and have them order the parts you need to keep your car on the road. With a telephone or a keyboard and a plastic credit card, you can have almost everything needed to repair your TR as soon as the very next day. Now most of the parts which are available today are produced in small numbers, by very small shops scattered around the globe, and all are produced without the benefit of original factory drawings, meaning that they are “reverse engineered”. Many hobbyists will complain when these reproduction parts don’t jump right out of the box and onto the car all by themselves, but professionals like ourselves know that many times they have to be “massaged” to fit. And then there are times like these rear differential pinion gears which are a “new” design and different from the originals. As can be seen in the photo here, the gear on the left has a machined step which is approximately ¼” above the spot it needs to be, as seen on the original Triumph gear on the right. The trick is to know these cars well enough to spot the issue and know which additional parts are required, before wasting hours trying to make a revised part work!August 24, 2020
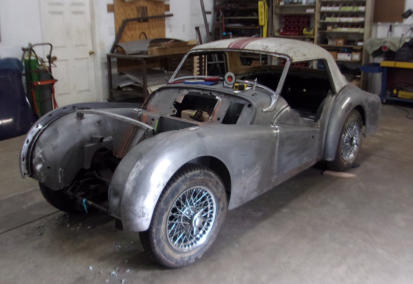
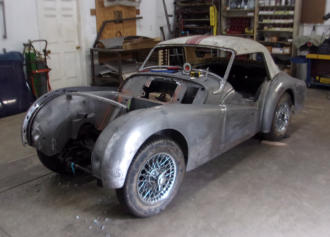
If you are going to restore Triumphs, it sure helps to have an abundance of cars and parts on hand! This is not a hardtop car, nor will it be receiving one during this restoration. So why did we bother to pull a hardtop from our used parts warehouse and fit it to this car you might ask? We took this extra step because this car had suffered some hefty accident damage many years ago, and an abundance of twisted and distorted metal on the right side of the scuttle (cowl) needed to be replaced. We had taken numerous measurements of this and other cars in the shop throughout the process, but bolting a hardtop onto the windshield frame and visually checking how it fit across the rear cowl was the final step to verify we had made a perfect repair. We needed to be absolutely certain that we did not have any minor twist still left in the body tub, and to reassure ourselves that the soft top would fit later without any twist or errant wrinkles.August 17, 2020
We call the seat frames for TR2-early TR4 seats “pans”, because with the 90 degree edge all around the base, they do resemble a frying pan. While the edge helps to hold the bottom seat springs in place, it also allows them to hold water when someone gets caught in the rain with the top down (not that these cars were ever watertight to begin with!). And, as you can probably guess, this water will eventually cause rust! Now a rusty seat is not something that most automotive trim shops have ever had to deal with, but in the Triumph World, it’s nice that we have a metal fabrication shop to accompany our upholstery department. These rusty seat bottoms are so common, that we even devised a press to duplicate the stiffening ribs on the bottom. Just another of those special tools that we could easily justify making, because by working on Triumph TR’s exclusively, we know that we’ll get to use it multiple times every year.August 10, 2020
Triumphs are the cars that people fell in love with and tended to keep. If the day ever came that they were no longer able to drive them due to some reliability problem or a lack of parts (or competent mechanics to repair them), they tended to hide them away in garages and barns with the promise to fix them and drive them again some day. It’s not uncommon for us to see 3 or 4 original owner TR’s here for service and restoration every single year, but this is the first time that we’ve had three one-owner TR’s here at the same time for minor service! We find the stories these owners tell to be fascinating, and understand completely why their TR’s are so near and dear to their hearts. We’re also very honored to play a part in the ongoing story of these folks and their beloved Little British Cars. And if you happen to be one of those original or long term owners who’s TR is still sitting in storage, isn’t it time that you fulfill that promise and call us to resume your own Triumph story?August 3, 2020
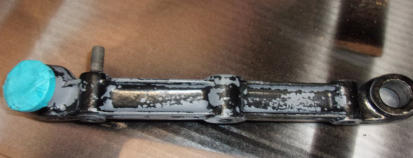
While pressure washing the body shop dust off of the restored chassis from last week’s photo, much of the owner applied black paint blew right off of several suspension components, as seen in this week’s photo. We inquired as to what paint he had used, suspecting some generic black from the hardware store, and at first we were surprised to hear that he was using some highly advertised super-duper chassis black from one of the big automotive mail order places. A little more digging, and we learned that he had primed the parts a few at a time, and then waited several months until all parts were primed before he sprayed the black. Mystery solved! Modern catalysed paints must be applied one right after another within a narrow time window, so that the different layers can chemically bond. Waiting for several months allowed the primer to get so hard that the black would never be able to stick to it. The lesson to be learned here is that when dealing with modern chemicals, you simply MUST read and follow the instructions, even though that goes against a Man’s nature!July 27, 2020
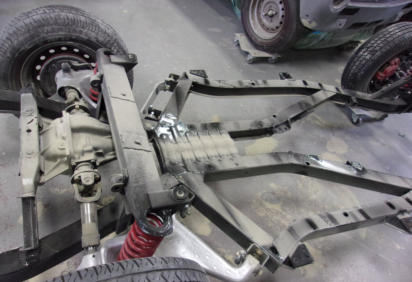
It is called a “frame-up” restoration, so you’re supposed to restore the frame and suspension first, right? That’s how most home restorers and many pro shops will approach a restoration, but that’s not how we do it here, and one look at this photo will tell you why! The owner of this TR6 had started the restoration at home, and first thing after disassembly he restored the complete chassis. What he and others who have used this approach didn’t realize, is just what a mess the metalwork, bodywork, and paint processes will make on top of your freshly restored chassis. We tried to protect his handiwork by wrapping as much as possible in plastic, but as you can see here, the fine dust has a way of working itself in where you don’t want it to go. We prefer to keep the chassis intact until the body is ready to enter the paint booth, so that all of the panels are kept in alignment through the sanding and bodywork. Then, when all of the sheetmetal is ready for paint, we’ll blow the car back apart and restore the chassis while the body tub rolls into the paint booth on a dolly. After the paint is complete and sanded/buffed to a mirror finish, the painted and polished body is reunited with the freshly restored chassis, complete with the entire drivetrain and exhaust system already in place.July 20, 2020
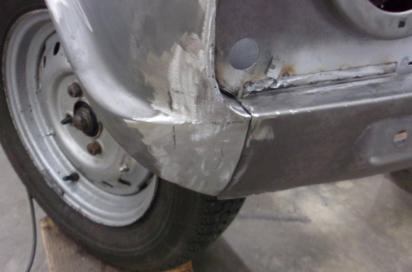
All of the rusty, perforated, and thin metal shown in last week’s photo was cut away, and then it was time to create a new patch. We had to make this complicated section out of 3 different pieces, and tack weld them all into position. Once all of the sections were tack welded and the shape of the fender was confirmed, everything was solidly TIG welded and the welds ground down to make this virtually invisible repair. No overlapping pieces, and no cracks or small pockets to hold moisture. Only a paper thin wipe of body filler will be needed to create a perfect repair which will halt the decay and last for many decades into the future.July 13, 2020
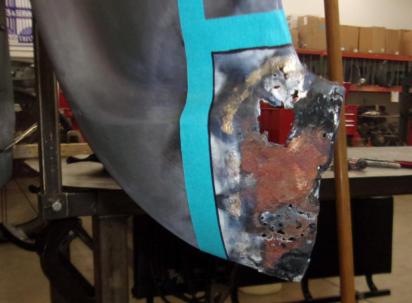
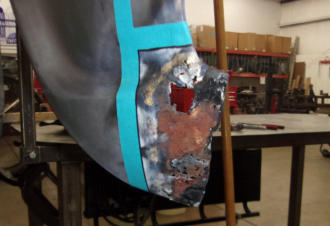
Here we have the TR4 RF fender from last week, after the “Band-Aid” has been ripped off, and the scab it was hiding is none too pretty. We’ve seen worse, but then again we never know just how bad things were before the “patch” was applied all those years ago. The big square rust hole was left open, allowing moisture to enter the area and trap it there to accelerate the rusting process. Notice the large area of lighter brown rust just below the square hole, and then look closely at the numerous small dark holes below that. This is the place where water from above drained down, and was trapped in a small pocket, allowing the damage to keep feeding on itself. Nothing was ever “fixed” here, only hidden from view and allowed to fester. It’s prior “repairs” like this that make us insist on completely stripping any car that we will be painting here as part of a complete frame-up restoration. We simply must find all of the hidden damage and repair it properly, so that it doesn’t bubble through in a few years and imply that we did a lousy paint job.July 6, 2020
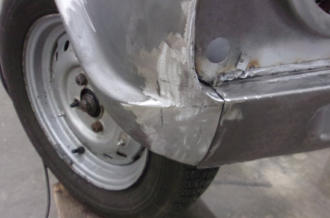
This photo shows the lower front corner of a TR4 RF fender. We get to see plenty of these 1970’s style repairs when we have all of our restorations chemically stripped. We always strip our cars to bare metal in part to reveal “patches” of this sort, where metal or some other substance was used as a backing for the filler which would always be smeared over the top. As long as you can’t see it immediately after the paint is applied, we’re good to go, right? Well, perhaps in the short run, but eventually rust that was just glossed over will return, just as cancer will do the same if your doctor doesn’t get it all out. Check back next week, and we’ll post another photo showing the rot that was still growing below the “repair”.

BLOG
2020-Q3
America’s BEST Triumph Shop


Macy’s Garage

© 2026 - Macy’s Garage, Ltd.

Blog
WHAT we’re doing, and HOW we’re doing it!
September 28, 2020
We see a lot of “loose” steering columns in the TR4-TR6 cars, but we’ve never seen one like this! Usually it is worn bushings inside the column, or loose mountings under the dash, and sometimes a combination of both. This was by far the worst, and it felt like the column would drop out of the dash and into our laps on the short drive from the parking lot into the building! This outer column tube was broken completely in two at the column lock location, and it appeared to have been done with a hammer and chisel. Bruce bought this TR6 in 1975, when it was only 1 year old. At the time, he noted that one front fender was a different color and was told that it had been in a “minor fender bender”. We suspect that the car was stolen, and the thief wrecked the car. Bruce has accepted a loose steering column during his entire 45 year ownership, that is until now, when he finally brought the car to someone who knew better!September 21, 2020
We are installing an aftermarket air conditioning unit during this TR250 restoration, and this addition ups the ante on making the cooling system as efficient as possible. The factory style radiator duct on a TR250 consists of only two small pieces of fiberboard along the sides of the radiator, which does nothing to prevent air from bypassing the radiator over the top. A TR6 style air duct could be trimmed and modified to fit the shape of the TR250 front valance, and then trimmed again to clear all of the a/c components. A better option was to simply start from scratch and fabricate something in house that fit tighter and looked better than a chunk of cardboard which obviously had major surgery. What we created is this sturdy steel air deflector that will channel most of the incoming air through the radiator core. Once it’s been massaged and painted in our paint shop, it will match the quality that is apparent throughout this TR250, as well as that of any other TR that was restored here at Macy’s Garage.September 14, 2020
In the crazy year that 2020 has been, even the smallest things can seem HUGE! Here we are in the middle of September, and we just got to attend our first car event of the year! This past Saturday, 3 members of the Macy’s Garage staff and 3 local clients took six TR’s on a short cruise to Dayton’s “British Biscuits and Tea”, a gathering of British car folks. This very small event of 30-35 cars was only about 10% of the annual Dayton British Car Day (which was cancelled this year), but the weather was beautiful and we had a chance to catch up with folks we haven’t seen for a very long time. A few were difficult to recognise from behind their masks, but this new challenge just added to the adventure! It was refreshing to look in the mirror and see a line of TR’s following behind, much more fun than commuting solo to the shop in my TR250 a couple days each week. Even without a “formal” event to attend, cruising the back roads with your friends is a nice way to get together and have no trouble remaining 6 feet apart! We’ll certainly be getting together again for another drive or two before the snow flies later this year. Good for the soul, and good for the Triumphs too!September 8, 2020
One of the biggest advantages we have gained from working on the same cars over and over again, is that we’ve had time to develop special tools and equipment that make the restoration tasks easier and faster, resulting in huge efficiency gains for our clients. Take these whole car stands for example. When fitting doors and adjusting panel gaps in our metal shop, we have always wanted to have the car sitting on it’s wheels in a natural position, but that puts the lower door edge and sills very close to the floor, making the work slow and difficult. Elevating the car onto jack stands is different than having the weight on the tires, and not nearly as high as it needs to be. While a 4-post lift would support the car from under the tires, working around the big bulky lift itself would be worse than working down near the floor. Enter these clever stands to get the car way up in the air for easier access, and with the weight distributed just where we want it to be. We also made a special jack to get the cars up and down quickly!August 31, 2020
There once was a time when Triumph enthusiasts could not find parts to repair their beloved little sports cars. The situation today is much better, as you don’t need to find a local Triumph dealer and have them order the parts you need to keep your car on the road. With a telephone or a keyboard and a plastic credit card, you can have almost everything needed to repair your TR as soon as the very next day. Now most of the parts which are available today are produced in small numbers, by very small shops scattered around the globe, and all are produced without the benefit of original factory drawings, meaning that they are “reverse engineered”. Many hobbyists will complain when these reproduction parts don’t jump right out of the box and onto the car all by themselves, but professionals like ourselves know that many times they have to be “massaged” to fit. And then there are times like these rear differential pinion gears which are a “new” design and different from the originals. As can be seen in the photo here, the gear on the left has a machined step which is approximately ¼” above the spot it needs to be, as seen on the original Triumph gear on the right. The trick is to know these cars well enough to spot the issue and know which additional parts are required, before wasting hours trying to make a revised part work!August 24, 2020
If you are going to restore Triumphs, it sure helps to have an abundance of cars and parts on hand! This is not a hardtop car, nor will it be receiving one during this restoration. So why did we bother to pull a hardtop from our used parts warehouse and fit it to this car you might ask? We took this extra step because this car had suffered some hefty accident damage many years ago, and an abundance of twisted and distorted metal on the right side of the scuttle (cowl) needed to be replaced. We had taken numerous measurements of this and other cars in the shop throughout the process, but bolting a hardtop onto the windshield frame and visually checking how it fit across the rear cowl was the final step to verify we had made a perfect repair. We needed to be absolutely certain that we did not have any minor twist still left in the body tub, and to reassure ourselves that the soft top would fit later without any twist or errant wrinkles.August 17, 2020
We call the seat frames for TR2-early TR4 seats “pans”, because with the 90 degree edge all around the base, they do resemble a frying pan. While the edge helps to hold the bottom seat springs in place, it also allows them to hold water when someone gets caught in the rain with the top down (not that these cars were ever watertight to begin with!). And, as you can probably guess, this water will eventually cause rust! Now a rusty seat is not something that most automotive trim shops have ever had to deal with, but in the Triumph World, it’s nice that we have a metal fabrication shop to accompany our upholstery department. These rusty seat bottoms are so common, that we even devised a press to duplicate the stiffening ribs on the bottom. Just another of those special tools that we could easily justify making, because by working on Triumph TR’s exclusively, we know that we’ll get to use it multiple times every year.August 10, 2020
Triumphs are the cars that people fell in love with and tended to keep. If the day ever came that they were no longer able to drive them due to some reliability problem or a lack of parts (or competent mechanics to repair them), they tended to hide them away in garages and barns with the promise to fix them and drive them again some day. It’s not uncommon for us to see 3 or 4 original owner TR’s here for service and restoration every single year, but this is the first time that we’ve had three one-owner TR’s here at the same time for minor service! We find the stories these owners tell to be fascinating, and understand completely why their TR’s are so near and dear to their hearts. We’re also very honored to play a part in the ongoing story of these folks and their beloved Little British Cars. And if you happen to be one of those original or long term owners who’s TR is still sitting in storage, isn’t it time that you fulfill that promise and call us to resume your own Triumph story?August 3, 2020
While pressure washing the body shop dust off of the restored chassis from last week’s photo, much of the owner applied black paint blew right off of several suspension components, as seen in this week’s photo. We inquired as to what paint he had used, suspecting some generic black from the hardware store, and at first we were surprised to hear that he was using some highly advertised super-duper chassis black from one of the big automotive mail order places. A little more digging, and we learned that he had primed the parts a few at a time, and then waited several months until all parts were primed before he sprayed the black. Mystery solved! Modern catalysed paints must be applied one right after another within a narrow time window, so that the different layers can chemically bond. Waiting for several months allowed the primer to get so hard that the black would never be able to stick to it. The lesson to be learned here is that when dealing with modern chemicals, you simply MUST read and follow the instructions, even though that goes against a Man’s nature!July 27, 2020
It is called a “frame-up” restoration, so you’re supposed to restore the frame and suspension first, right? That’s how most home restorers and many pro shops will approach a restoration, but that’s not how we do it here, and one look at this photo will tell you why! The owner of this TR6 had started the restoration at home, and first thing after disassembly he restored the complete chassis. What he and others who have used this approach didn’t realize, is just what a mess the metalwork, bodywork, and paint processes will make on top of your freshly restored chassis. We tried to protect his handiwork by wrapping as much as possible in plastic, but as you can see here, the fine dust has a way of working itself in where you don’t want it to go. We prefer to keep the chassis intact until the body is ready to enter the paint booth, so that all of the panels are kept in alignment through the sanding and bodywork. Then, when all of the sheetmetal is ready for paint, we’ll blow the car back apart and restore the chassis while the body tub rolls into the paint booth on a dolly. After the paint is complete and sanded/buffed to a mirror finish, the painted and polished body is reunited with the freshly restored chassis, complete with the entire drivetrain and exhaust system already in place.July 20, 2020
All of the rusty, perforated, and thin metal shown in last week’s photo was cut away, and then it was time to create a new patch. We had to make this complicated section out of 3 different pieces, and tack weld them all into position. Once all of the sections were tack welded and the shape of the fender was confirmed, everything was solidly TIG welded and the welds ground down to make this virtually invisible repair. No overlapping pieces, and no cracks or small pockets to hold moisture. Only a paper thin wipe of body filler will be needed to create a perfect repair which will halt the decay and last for many decades into the future.July 13, 2020
Here we have the TR4 RF fender from last week, after the “Band-Aid” has been ripped off, and the scab it was hiding is none too pretty. We’ve seen worse, but then again we never know just how bad things were before the “patch” was applied all those years ago. The big square rust hole was left open, allowing moisture to enter the area and trap it there to accelerate the rusting process. Notice the large area of lighter brown rust just below the square hole, and then look closely at the numerous small dark holes below that. This is the place where water from above drained down, and was trapped in a small pocket, allowing the damage to keep feeding on itself. Nothing was ever “fixed” here, only hidden from view and allowed to fester. It’s prior “repairs” like this that make us insist on completely stripping any car that we will be painting here as part of a complete frame-up restoration. We simply must find all of the hidden damage and repair it properly, so that it doesn’t bubble through in a few years and imply that we did a lousy paint job.July 6, 2020
This photo shows the lower front corner of a TR4 RF fender. We get to see plenty of these 1970’s style repairs when we have all of our full restorations chemically stripped. We always strip our cars to bare metal in part to reveal “patches” of this sort, where metal or some other substance was used as a backing for the filler which would always be smeared over the top. As long as you can’t see it immediately after the paint is applied, we’re good to go, right? Well, perhaps in the short run, but eventually rust that was just glossed over will return, just as cancer will do the same if your doctor doesn’t get it all out. Check back next week, and we’ll post another photo showing the rot that was still growing below the “repair”.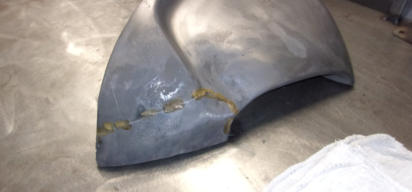


America’s BEST Triumph Shop