Macy’s Garage

© 2026 - Macy’s Garage, Ltd.

Blog
WHAT we’re doing, and HOW we’re doing it!
June 28, 2021
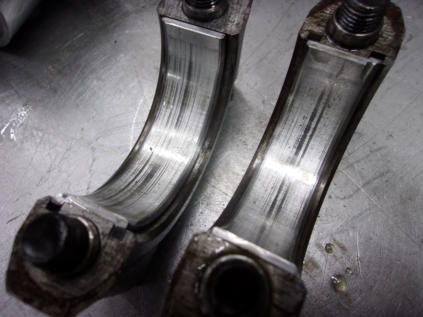
Remember the TR6 engine with the stuck valve from May 24 (below)? Remember us saying that “Hopefully, this is the last surprise we’ll find inside this “rebuilt” engine!”? Guess what? It wasn’t! We drove the car all of about 30 miles, and total running time on the engine is probably less than an hour. The tailpipe was smoking so bad that you couldn’t see the car at all when following it down the street, just the blue cloud. We had to pull the engine and disassemble it completely to find the cause, which turned out to be 5 of 6 oil rings installed on the pistons incorrectly. That tiny error is hard to photograph, so we’ll show you a couple of rod bearings instead. Remember us saying that we wouldn’t mention how filthy the engine was inside and out? Well, now’s the time and here’s the proof of that, as the bearings AND crankshaft are all scored up pretty badly. So much for “Mr. Famous” race engine builder! He might build a good race car engine that only has to last for one race at a time, but when you bring those type guys something from a car they aren’t passionate about, you aren’t going to get their best work. We probably wouldn’t do as well with an MG engine either, which is why we refuse them, but we take enough pride in our work that we would have made sure that everything was spotlessly clean and assembled correctly. Who will you trust to rebuild your TR engine?June 21, 2021
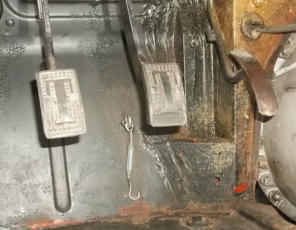
Here’s another one for the “What were they thinking?” file. Different TR6 from last week, but yet another owner modification that’s hard to explain. A screw eye was installed through the floor, to which a small turnbuckle was attached. The other end of the turnbuckle has a hook, presumably to loop over the brake pedal and hold it down. Now we have a special tool that wedges between the seat and the brake pedal when we want to keep pressure on a system for an hour or so to check for leaks, but this seems like a lot of effort to set up for the infrequent times when brake service is performed. It’s probably not a good substitute for an emergency brake either, as you’d have to reach down under the dash and try to hook the loop, all while steering the car and praying that it gets stopped. We finally reached the conclusion that this is either a modified parking brake, or an amateur anti-theft device. It’s a good thing that unlike most cars, Triumphs need to have the ignition key ON before the brake lights work. Otherwise, this is a single-use device before the battery goes dead. And you really don’t need to go drilling extra holes in your floors and firewall either. The Rust Gods will do that without your help!June 14, 2021
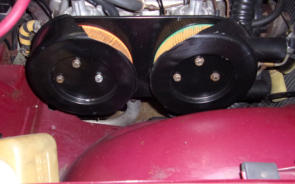
Sometimes, we just have to scratch our heads and ask, “What were they thinking?”. This is one of those times. A large portion of the air filter housing has been cut away from this TR6 engine, possibly in search of more power or better fuel economy? How much was this TR6 engine suffering by needing to draw all of it’s air through those two small tubes at the front of the housing? It makes us wonder just how much faster this “improvement” would have gotten the previous owner down to the local Cars & Coffee on Saturday mornings? One thing we do know for sure is that he would have certainly been looking at faster intervals between air filter changes! Of all the TR’s that have been through our shop, this is the first time we’ve ever seen this done, and it makes me wonder why the thousands of TR6 owners over the last 50 years didn’t think of this same solution to what was obviously a major mistake by the engineers in Coventry!June 7, 2021
Many of you visit our “Blog” pages frequently to keep up with the weekly posts, but you probably don’t check the “Cars4Sale” page as often because it rarely ever changes. We’re not really in the business of buying and selling cars, but occasionally a good car comes along and we feel obligated to take it under our wing and give it the love it needs. Such is the case with this really nice 1960 TR3A. Under the care of the same owner for over 40 years, it was reluctantly offered for sale now because advancing age and physical ailments were making it more and more difficult to use. After nearly 200 hours in our shop for catch-up maintenance and improvements to the previous work, this one now carries the Macy’s Garage stamp of approval and is ready to provide many years of fun for its new owners. Check our Cars4Sale page for more info, and a link to additional photos. And if you are looking for a ‘project’ TR3A to have restored here, you’ll also find a new restoration candidate on that same page.June 1, 2021
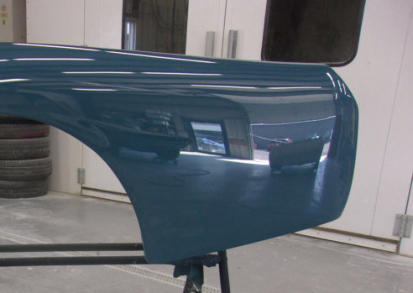
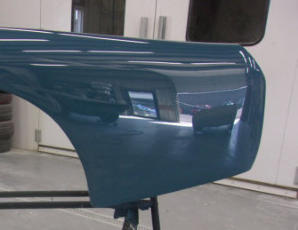
This ‘57 TR3 rear fender in the rare one-year-only Winchester Blue color has just been completed by our paint shop, and is ready to move over to the final assembly building and be mounted onto the car. What’s interesting here are the reflections that can be seen in the paint, namely the walk through and overhead doors, the TR6 in the paint shop near the overhead door, and the main shop building and row of cars parked along it on the other side of our parking lot. Also note the paint shop lights reflecting in the paint, and how straight each of those lines are. This is “raw” paint, without any wax or finish products applied, and it could still be slightly hazy at this point from remaining polishing compound residue! Results like this are only possible after a laborious preparation process, followed by another lengthy process of sanding the new paint with progressively finer sandpaper and polishing with finer and finer polishing compounds. Holding the spray gun and squirting the paint onto the car is the easy (and quick) part, but still requires skill to minimize the finishing work. Preparation and finishing are the difficult and costly operations, and when done correctly without shortcuts, both will combine to produce results like this. Now that you see how paint should look, you can learn more about the process by reading Richard Lentinello’s “Paint Cost” from our INFO tab.May 24, 2021
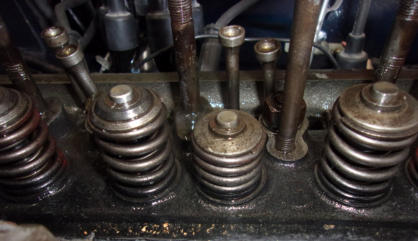
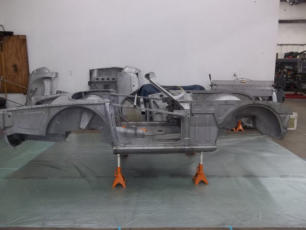
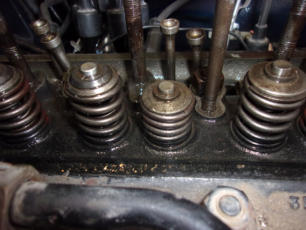
Any time a valve stays down without the rocker arm pushing it spells trouble, and a sure recipe for trouble is to take your Triumph to several different shops before bringing it here. The owner of this TR6 told us the engine had been rebuilt by “some famous race car engine builder” (who’s name he can’t remember!), and that he had heard it run, briefly. When we had assembled the car enough to make it run (and hopefully drive), we didn’t get too far before it developed a nasty miss. We had previously adjusted the valves, but we pulled the rocker cover again to investigate the strange noises coming from inside. We found that several pushrods had come out from under their rocker arms, and this one valve was stuck wide open. We consulted with the owner before removing the head and taking it to our machinist for evaluation. The diagnosis was that Mr. Famous had installed some fancy seals on the valves, just as he probably did on all of his “race” engines, and they had starved the valve guides for oil and caused them to gall and seize. He also failed to install hardened seats on the exhaust valves for a no-lead gas conversion, and he replaced only two of the 12 valve springs. All the rest were old originals that had been compressed billions of times over the last 45 years. I won’t even get started on how filthy the engine was inside and out! We’re having the head re-done, AGAIN, and correctly this time. Hopefully, this is the last surprise we’ll find inside this “rebuilt” engine!May 17, 2021
When we are doing a full frame-up restoration here, we always start the body and paint work with metal that has been completely stripped. Big rust holes and crunched metal is easy to see, but we want to find all of the thin metal that’s almost rusted through, as well as all the tiny pin holes that will pop up and spoil a fresh paint job in just a couple of years. There are several ways to accomplish the stripping, but we settled on chemical stripping a long time ago, and cars we’ve restored nearly 20 years ago still look as good as the day we finished them. Chemical stripping gets into all of the tiny places where sand and soda blasting can’t, and it also gets to the bottom of all deep rust pits, especially important for the tiny pits where a grain of sand would bounce off the rim and never reach the bottom. The internet is full of “experts” who will claim that chemical immersion will leave a residue that’ll seep out and ruin a paint job quickly, but given our success I’d have to say that they either did something wrong or their stripper failed to neutralize the chemicals properly. It’s really fun to see a car come back from the stripper, and know that the metal hasn’t been this clean since the day Triumph stamped it out!May 10, 2021
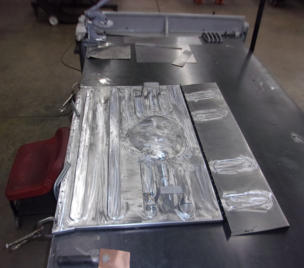
The large round bump for differential clearance will give this away as being a rear floor section, and the particulars are that this piece fits a TR3A after TS60000, or a TR3B. What you might not know is that although new reproductions are listed in some catalogs, they are not always easy to get. This isn’t normally a “high rust” area because water leaks have a tendency to sink to the lowest point (floor pans), but once in a great while we’ll find one like this car that has too many holes to repair. The solution to keep this project from stalling was to put our talented metal shop to work and make this floor section here. By adding our skills and experience to all of the specialized equipment in our shop, we were able to create a new rear floor in the same configuration as the original. We did have to make one small concession to originality, and that was that originals were made from a single piece of metal. It was necessary for us to break this into two sections so that we could reach far into the center and create the strengthening ribs, but no one who ever sees this car in the future, even if completely disassembled, will ever suspect that this isn’t a factory panel that has remained in excellent “as-new” condition. (Sharp eyes among you will probably notice that the short vertical panel shown here on the right will actually attach to the left edge of the center panel. Don’t worry, we got it right!)May 3, 2021
Installing a new wiring harness in a fresh restoration should be a quick and simple matter of following the colors on the wires and matching them to what’s shown on the diagram, but nothing is ever as easy as you’d like it to be! Dave has done this countless times in the 11.5 years he’s been here, but it’s still one of those tasks where he knows to make himself comfortable, ‘cause it’s gonna take awhile! The new wiring harnesses are not complete, missing all of the instrument light wiring and sockets, and there are ground wires and jumper wires which have to be fabricated and installed to make everything work. Not to be forgotten is that Standard-Triumph did not re-draw their wiring diagrams when the wiper circuit was changed from a switched power on the TR2 to a switched ground that made a wiper “park” function possible for the TR3s, and that one confuses a lot of Triumph neophytes! It’s no wonder that the Mustang restorer or the local hot rod shop where some guys take their TR’s will want to install a “modern” universal type wiring harness in a Triumph, claiming that the Lucas stuff never worked right when it was new. We never have any problems with OEM style Lucas wiring in the cars that pass through here, so the only reason we can think of for the Lucas reputation is that some guys who were just like the modern nay-sayers had been fiddling with them “back in the day”!April 26, 2021
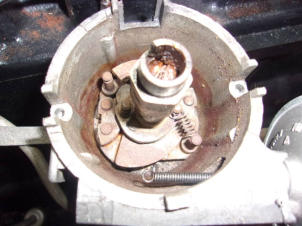
This photo shows the inside of a TR6 distributor. This is the hidden area under the breaker plate, and it takes a little bit of distributor disassembly to see this. There are supposed to be two springs here, attached to two weights which swing out under centrifugal force to advance the ignition timing as engine RPM’s increase. Now as you might imagine with one missing spring, and the brown rust which prohibits free movement of the weights, the advance function of this distributor was not working as it should. The engine had been recently “rebuilt” by the local MG mechanic, and then brought to us when no one could manage to make the car run properly. It didn’t take us long to get to the bottom of the problem, and it makes us wonder what else was neglected and ignored during this supposed overhaul. No matter what the MG guy’s “specialty” is, failure to inspect or rebuild a distributor along with a full engine overhaul is one fine example of poor workmanship, be it an MG, a Triumph, or anything else.April 19, 2021
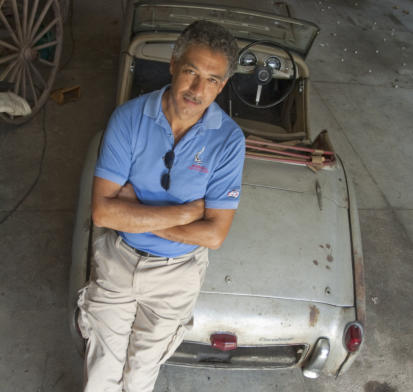
For those of you who don’t know Mr. Richard Lentinello, please let me introduce you. Richard is the Editor and Publisher of the new CRANKSHAFT Magazine that I mentioned here back on March 22, 2021. More interesting to us Triumph guys is that he’s one of us! His Triumph collection consists of the RHD TR2 pictured with him in this photo, as well as a TR3A, a GT6, and two Spitfires, one of which was his own very first car! Richard is very well known throughout the entire classic car community, thanks to his 17 year stint as editor and executive editor at Hemmings. While there, Richard played a major roll in the launch of Hemmings Classic Car and Hemmings Sports & Exotic Car magazines, as well as adding interesting articles to the boring all classified format of hobby mainstay Hemmings Motor News. I dare say he has been to every major show in the USA multiple times, viewed and photographed more vintage cars than most of us can even imagine, and discussed their care, restoration, maintenance, and history with the owners and caretakers of all types of collector vehicles. He’s also visited most of the major restoration shops in the country, (including Macy’s Garage), so he’s well versed in what works and what does not. When Richard speaks, the collector car world listens! With that in mind, we are honored to announce that six of Richard’s past Hemmings articles on restoration are now available here on our website under the INFO button. Read, learn, and most of all ENJOY!April 12, 2021
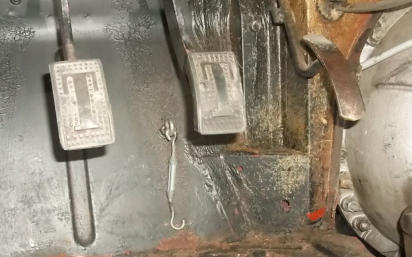
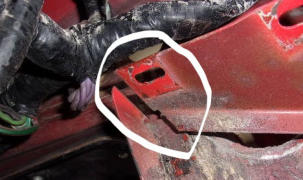
We’ve seen quite a number of TR’s here lately that had loose steering columns. Most of the owners claim to have never noticed, but to us it’s kinda hard to miss when the steering wheel and column act like they are about to drop out onto your lap! Most times, the slop can be traced to either the bushings inside of the column tube, or worn/missing felt at the column mounts. But then occasionally there will be cracked column mounts like this one, so it’s something to check anytime you’re working on a loose or wobbly column We’ve seen this enough times lately that it’s starting to look like a more common problem, and the only fix is to crawl up under the dash with your MIG welder and stitch it back together.April 5, 2021
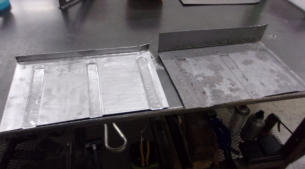
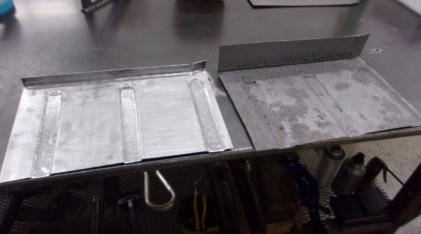
One place on a TR that you can guarantee will have rust is the area below the battery. On the TR2-3B it’s an actual box which sticks through the firewall, and with the TR4-6 it’s this flat shelf with 3 strengthening ribs. Replacement boxes are available for the sidescreen cars, but they take some “fitting” to make them work. With the later TR4-6 cars, it’s a different matter altogether. This battery shelf is part of the firewall, and replacements have never been available (to our knowledge). Fortunately, we have a very well equipped metal shop to fabricate pieces like this, and talented people who know how to use the equipment. It also helps that they make several of these every year, so it’s really a quick process to make the required part, complete with the factory style ribs. This will be an invisible repair when TIG welded into place, and look a whole lot better than a piece of flat metal or plywood that has been placed over the rust!
BLOG
2021-Q2
America’s BEST Triumph Shop


Macy’s Garage

© 2026 - Macy’s Garage, Ltd.

Blog
WHAT we’re doing, and HOW we’re doing it!
June 28, 2021
Remember the TR6 engine with the stuck valve from May 24 (below)? Remember us saying that “Hopefully, this is the last surprise we’ll find inside this “rebuilt” engine!”? Guess what? It wasn’t! We drove the car all of about 30 miles, and total running time on the engine is probably less than an hour. The tailpipe was smoking so bad that you couldn’t see the car at all when following it down the street, just the blue cloud. We had to pull the engine and disassemble it completely to find the cause, which turned out to be 5 of 6 oil rings installed on the pistons incorrectly. That tiny error is hard to photograph, so we’ll show you a couple of rod bearings instead. Remember us saying that we wouldn’t mention how filthy the engine was inside and out? Well, now’s the time and here’s the proof of that, as the bearings AND crankshaft are all scored up pretty badly. So much for “Mr. Famous” race engine builder! He might build a good race car engine that only has to last for one race at a time, but when you bring those type guys something from a car they aren’t passionate about, you aren’t going to get their best work. We probably wouldn’t do as well with an MG engine either, which is why we refuse them, but we take enough pride in our work that we would have made sure that everything was spotlessly clean and assembled correctly. Who will you trust to rebuild your TR engine?June 21, 2021
Here’s another one for the “What were they thinking?” file. Different TR6 from last week, but yet another owner modification that’s hard to explain. A screw eye was installed through the floor, to which a small turnbuckle was attached. The other end of the turnbuckle has a hook, presumably to loop over the brake pedal and hold it down. Now we have a special tool that wedges between the seat and the brake pedal when we want to keep pressure on a system for an hour or so to check for leaks, but this seems like a lot of effort to set up for the infrequent times when brake service is performed. It’s probably not a good substitute for an emergency brake either, as you’d have to reach down under the dash and try to hook the loop, all while steering the car and praying that it gets stopped. We finally reached the conclusion that this is either a modified parking brake, or an amateur anti-theft device. It’s a good thing that unlike most cars, Triumphs need to have the ignition key ON before the brake lights work. Otherwise, this is a single-use device before the battery goes dead. And you really don’t need to go drilling extra holes in your floors and firewall either. The Rust Gods will do that without your help!June 14, 2021
Sometimes, we just have to scratch our heads and ask, “What were they thinking?”. This is one of those times. A large portion of the air filter housing has been cut away from this TR6 engine, possibly in search of more power or better fuel economy? How much was this TR6 engine suffering by needing to draw all of it’s air through those two small tubes at the front of the housing? It makes us wonder just how much faster this “improvement” would have gotten the previous owner down to the local Cars & Coffee on Saturday mornings? One thing we do know for sure is that he would have certainly been looking at faster intervals between air filter changes! Of all the TR’s that have been through our shop, this is the first time we’ve ever seen this done, and it makes me wonder why the thousands of TR6 owners over the last 50 years didn’t think of this same solution to what was obviously a major mistake by the engineers in Coventry!June 7, 2021
Many of you visit our “Blog” pages frequently to keep up with the weekly posts, but you probably don’t check the “Cars4Sale” page as often because it rarely ever changes. We’re not really in the business of buying and selling cars, but occasionally a good car comes along and we feel obligated to take it under our wing and give it the love it needs. Such is the case with this really nice 1960 TR3A. Under the care of the same owner for over 40 years, it was reluctantly offered for sale now because advancing age and physical ailments were making it more and more difficult to use. After nearly 200 hours in our shop for catch-up maintenance and improvements to the previous work, this one now carries the Macy’s Garage stamp of approval and is ready to provide many years of fun for its new owners. Check our Cars4Sale page for more info, and a link to additional photos. And if you are looking for a ‘project’ TR3A to have restored here, you’ll also find a new restoration candidate on that same page.June 1, 2021
This ‘57 TR3 rear fender in the rare one-year-only Winchester Blue color has just been completed by our paint shop, and is ready to move over to the final assembly building and be mounted onto the car. What’s interesting here are the reflections that can be seen in the paint, namely the walk through and overhead doors, the TR6 in the paint shop near the overhead door, and the main shop building and row of cars parked along it on the other side of our parking lot. Also note the paint shop lights reflecting in the paint, and how straight each of those lines are. This is “raw” paint, without any wax or finish products applied, and it could still be slightly hazy at this point from remaining polishing compound residue! Results like this are only possible after a laborious preparation process, followed by another lengthy process of sanding the new paint with progressively finer sandpaper and polishing with finer and finer polishing compounds. Holding the spray gun and squirting the paint onto the car is the easy (and quick) part, but still requires skill to minimize the finishing work. Preparation and finishing are the difficult and costly operations, and when done correctly without shortcuts, both will combine to produce results like this. Now that you see how paint should look, you can learn more about the process by reading Richard Lentinello’s “Paint Cost” from our INFO tab.May 24, 2021
Any time a valve stays down without the rocker arm pushing it spells trouble, and a sure recipe for trouble is to take your Triumph to several different shops before bringing it here. The owner of this TR6 told us the engine had been rebuilt by “some famous race car engine builder” (who’s name he can’t remember!), and that he had heard it run, briefly. When we had assembled the car enough to make it run (and hopefully drive), we didn’t get too far before it developed a nasty miss. We had previously adjusted the valves, but we pulled the rocker cover again to investigate the strange noises coming from inside. We found that several pushrods had come out from under their rocker arms, and this one valve was stuck wide open. We consulted with the owner before removing the head and taking it to our machinist for evaluation. The diagnosis was that Mr. Famous had installed some fancy seals on the valves, just as he probably did on all of his “race” engines, and they had starved the valve guides for oil and caused them to gall and seize. He also failed to install hardened seats on the exhaust valves for a no-lead gas conversion, and he replaced only two of the 12 valve springs. All the rest were old originals that had been compressed billions of times over the last 45 years. I won’t even get started on how filthy the engine was inside and out! We’re having the head re-done, AGAIN, and correctly this time. Hopefully, this is the last surprise we’ll find inside this “rebuilt” engine!May 17, 2021
When we are doing a full frame-up restoration here, we always start the body and paint work with metal that has been completely stripped. Big rust holes and crunched metal is easy to see, but we want to find all of the thin metal that’s almost rusted through, as well as all the tiny pin holes that will pop up and spoil a fresh paint job in just a couple of years. There are several ways to accomplish the stripping, but we settled on chemical stripping a long time ago, and cars we’ve restored nearly 20 years ago still look as good as the day we finished them. Chemical stripping gets into all of the tiny places where sand and soda blasting can’t, and it also gets to the bottom of all deep rust pits, especially important for the tiny pits where a grain of sand would bounce off the rim and never reach the bottom. The internet is full of “experts” who will claim that chemical immersion will leave a residue that’ll seep out and ruin a paint job quickly, but given our success I’d have to say that they either did something wrong or their stripper failed to neutralize the chemicals properly. It’s really fun to see a car come back from the stripper, and know that the metal hasn’t been this clean since the day Triumph stamped it!May 10, 2021
The large round bump for differential clearance will give this away as being a rear floor section, and the particulars are that this piece fits a TR3A after TS60000, or a TR3B. What you might not know is that although new reproductions are listed in some catalogs, they are not always easy to get. This isn’t normally a “high rust” area because water leaks have a tendency to sink to the lowest point (floor pans), but once in a great while we’ll find one like this car that has too many holes to repair. The solution to keep this project from stalling was to put our talented metal shop to work and make this floor section here. By adding our skills and experience to all of the specialized equipment in our shop, we were able to create a new rear floor in the same configuration as the original. We did have to make one small concession to originality, and that was that originals were made from a single piece of metal. It was necessary for us to break this into two sections so that we could reach far into the center and create the strengthening ribs, but no one who ever sees this car in the future, even if completely disassembled, will ever suspect that this isn’t a factory panel that has remained in excellent “as-new” condition. (Sharp eyes among you will probably notice that the short vertical panel shown here on the right will actually attach to the left edge of the center panel. Don’t worry, we got it right!)May 3, 2021
Installing a new wiring harness in a fresh restoration should be a quick and simple matter of following the colors on the wires and matching them to what’s shown on the diagram, but nothing is ever as easy as you’d like it to be! Dave has done this countless times in the 11.5 years he’s been here, but it’s still one of those tasks where he knows to make himself comfortable, ‘cause it’s gonna take awhile! The new wiring harnesses are not complete, missing all of the instrument light wiring and sockets, and there are ground wires and jumper wires which have to be fabricated and installed to make everything work. Not to be forgotten is that Standard-Triumph did not re-draw their wiring diagrams when the wiper circuit was changed from a switched power on the TR2 to a switched ground that made a wiper “park” function possible for the TR3s, and that one confuses a lot of Triumph neophytes! It’s no wonder that the Mustang restorer or the local hot rod shop where some guys take their TR’s will want to install a “modern” universal type wiring harness in a Triumph, claiming that the Lucas stuff never worked right when it was new. We never have any problems with OEM style Lucas wiring in the cars that pass through here, so the only reason we can think of for the Lucas reputation is that some guys who were just like the modern nay-sayers had been fiddling with them “back in the day”!April 26, 2021
This photo shows the inside of a TR6 distributor. This is the hidden area under the breaker plate, and it takes a little bit of distributor disassembly to see this. There are supposed to be two springs here, attached to two weights which swing out under centrifugal force to advance the ignition timing as engine RPM’s increase. Now as you might imagine with one missing spring, and the brown rust which prohibits free movement of the weights, the advance function of this distributor was not working as it should. The engine had been recently “rebuilt” by the local MG mechanic, and then brought to us when no one could manage to make the car run properly. It didn’t take us long to get to the bottom of the problem, and it makes us wonder what else was neglected and ignored during this supposed overhaul. No matter what the MG guy’s “specialty” is, failure to inspect or rebuild a distributor along with a full engine overhaul is one fine example of poor workmanship, be it an MG, a Triumph, or anything else.April 19, 2021
For those of you who don’t know Mr. Richard Lentinello, please let me introduce you. Richard is the Editor and Publisher of the new CRANKSHAFT Magazine that I mentioned here back on March 22, 2021. More interesting to us Triumph guys is that he’s one of us! His Triumph collection consists of the RHD TR2 pictured with him in this photo, as well as a TR3A, a GT6, and two Spitfires, one of which was his own very first car! Richard is very well known throughout the entire classic car community, thanks to his 17 year stint as editor and executive editor at Hemmings. While there, Richard played a major roll in the launch of Hemmings Classic Car and Hemmings Sports & Exotic Car magazines, as well as adding interesting articles to the boring all classified format of hobby mainstay Hemmings Motor News. I dare say he has been to every major show in the USA multiple times, viewed and photographed more vintage cars than most of us can even imagine, and discussed their care, restoration, maintenance, and history with the owners and caretakers of all types of collector vehicles. He’s also visited most of the major restoration shops in the country, (including Macy’s Garage), so he’s well versed in what works and what does not. When Richard speaks, the collector car world listens! With that in mind, we are honored to announce that six of Richard’s past Hemmings articles on restoration are now available here on our website under the INFO button. Read, learn, and most of all ENJOY!April 12, 2021
We’ve seen quite a number of TR’s here lately that had loose steering columns. Most of the owners claim to have never noticed, but to us it’s kinda hard to miss when the steering wheel and column act like they are about to drop out onto your lap! Most times, the slop can be traced to either the bushings inside of the column tube, or worn/missing felt at the column mounts. But then occasionally there will be cracked column mounts like this one, so it’s something to check anytime you’re working on a loose or wobbly column We’ve seen this enough times lately that it’s starting to look like a more common problem, and the only fix is to crawl up under the dash with your MIG welder and stitch it back together.April 5, 2021
One place on a TR that you can guarantee will have rust is the area below the battery. On the TR2-3B it’s an actual box which sticks through the firewall, and with the TR4-6 it’s this flat shelf with 3 strengthening ribs. Replacement boxes are available for the sidescreen cars, but they take some “fitting” to make them work. With the later TR4-6 cars, it’s a different matter altogether. This battery shelf is part of the firewall, and replacements have never been available (to our knowledge). Fortunately, we have a very well equipped metal shop to fabricate pieces like this, and talented people who know how to use the equipment. It also helps that they make several of these every year, so it’s really a quick process to make the required part, complete with the factory style ribs. This will be an invisible repair when TIG welded into place, and look a whole lot better than a piece of flat metal or plywood that has been placed over the rust!


America’s BEST Triumph Shop