Macy’s Garage

© 2026 - Macy’s Garage, Ltd.

Blog
WHAT we’re doing, and HOW we’re doing it!
September 27, 2021
Once a Triumph Family, always a Triumph Family! Anne and her husband Mickey had several TR’s through their courtship and early married life, and the TR disease rubbed off on their son Mike somewhere along the way. Several years ago, Mike had us restore this TR3A for his parents to drive and enjoy. Although Mickey is no longer with us, Anne still manages (at a young 81) to take her TR3A out for pleasure and to attend car shows several times each summer. It’s no surprise that she usually hauls home the awards from shows she attends, because it is after all one of our typical Macy’s Garage restorations! This photo, taken earlier in September, shows Anne out and about in her TR3A and enjoying another fun day of Triumph motoring. And as for son Mike’s TR affliction, we’ve just started another TR project for him, the full restoration of a very early TR2 long door, TS333L.September 20, 2021
Congratulations this week to Derrick and Britny for their wedding last week. Derrick has been a member of the Macy’s Garage team for 3-½ years now, and Britny has been a member of Derrick’s team for longer than either of them care to admit! Derrick is a life-long Chrysler (Mopar) fanatic, but he finally caught Triumph-itis like the rest of us and simply had to have one of his own. It’s well known by car folks that the most memorable events in our lives are enhanced when they include our special cars, and Derrick wanted to include his own Triumph in the wedding plans. To achieve this goal, he bought this orange TR3A from our project pool just two short months ago and dove in, working nights and weekends to have it ready for the big day. No one here was surprised when the broken head stud that sidelined the car 45 years ago was repaired in just two days, because Derrick is the primary engine builder here at Macy’s Garage. When one cheeky buggar asked if the car would be for sale following the wedding photos, Derrick promptly and emphatically stated that both The Car and Britny were keepers. We couldn’t help but notice and smile at the order in which he placed his Triumph and his new Wife!September 13, 2021
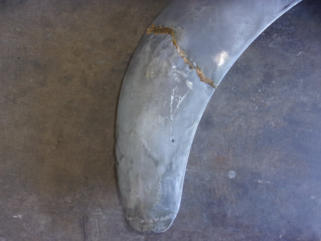
It’s always interesting to see prior “repairs” whenever a car comes back from the stripper. Take the leading edge of this TR2 fender for example. What looks like a rear fender stoneguard that was permanently welded and brazed to the front edge of the fender, is actually a “repair” that was made to the leading edge of a front fender! Covered with enough bondo, it probably looked OK from 20 feet back (or more), but it probably didn’t look good from anything closer or for more than a year or two. We still consider this to be badly damaged, and botched previous repairs and hidden damage such as this are the primary reasons that we won’t paint a car here unless we are starting from bare metal. It would be impossible to produce a paint finish that would continue to look perfect and new for decades into the future if it were applied over the top of a mess like this. It’s also the reason that you should be VERY cautious about buying a car that has been previously “restored”, because unless the car was restored here, you can’t know how much of this type work is hiding below the shiny surface. And cars restored here are almost never offered for sale on the open market, so you’ll need to have us restore one special for you!September 7, 2021
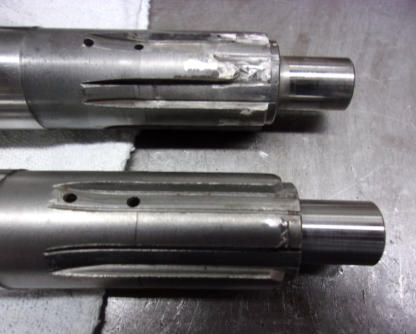
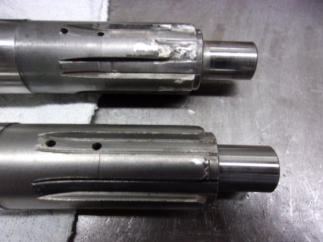
While we are having a run of overdrive information, we’ll show you this photo of two O/D transmission mainshafts. This is the rear end of the shaft which slides into the overdrive, mating the two units into one. The splines deep in the rear of the overdrive where this shaft slides in are made up of two different sets of splines, one set inside the planet gear carrier, and the other inside the uni-directional clutch. If you don’t have these two sets of splines aligned BEFORE attempting to slide the overdrive onto the rear of the gearbox, chances are that you’ll never be able to mate the two units. Normally, they just won’t go and you end up breaking the adapter plate while trying to draw them together, but in this case the hardened mainshaft (top) was severely damaged. It should look clean and crisp like the new shaft shown in the lower portion of the photo. While someone eventually got this together and it probably did work, we always replace damaged parts such as this whenever we find them. We never want to be the last people to work on a Triumph or its components and have something like this found inside years into the future.August 30, 2021
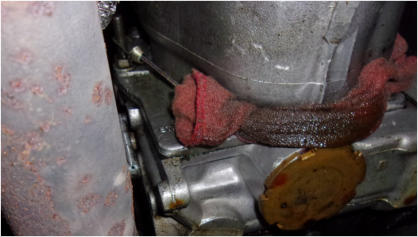
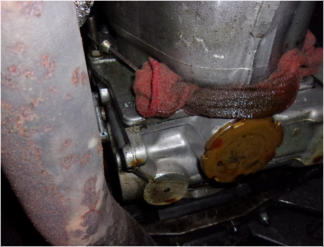
Undisputed facts: 1. British cars leak oil, 2. Triumphs are British cars, 3. Triumphs WILL leak oil. If you own a Triumph, the best you can hope for is to slow down the oil loss, but this is NOT the way to go about that! Some enterprising TR6 owner (or hired wrench) thought that wrapping the gearbox and overdrive with a rag would do the job, but as you can see from the oil soaked rag, their attempt was in vain. If I can say anything positive about this, it’s that I have never seen such a creative use of a bungee cord before, using it to hold a rag in place (white arrow) to “repair” a huge oil leak. Overdrives are particularly prone to oil leaks, as there is no gasket between the steel brake ring and the aluminum case components. There’s also no way to put a gasket in there either. Sealers won’t work for very long because the different expansion rates of the steel and aluminum parts will crack every sealer available, allowing the oil to find an escape route soon enough. But in this particular case, the solution is much simpler than that. We noticed that the O/D adapter plate is loose on the back of the transmission, so the gasket in that particular spot never had a chance. Obviously the genius with the shop rag just didn’t know what to look for!August 23, 2021
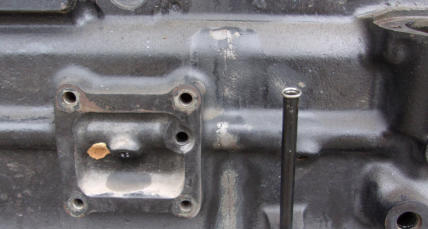
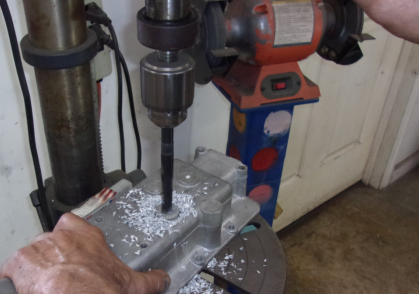
Having an overdrive makes a whole new car out of your Triumph, and after you’ve driven a TR with the factory O/D, you’ll never want to be without it. Whenever I add a new TR to my collection, adding an overdrive is the first thing I do to it if it comes to me without one. Now I know many of you are enamoured with the Toyota 5-speed conversions, but going that route limits you to only 5 speeds, whereas a Triumph gearbox with overdrive will net you 7 (6 for a late TR6). Sticking with the “correct” Triumph gearbox will also let you keep gear ratios that were selected to optimize the power range of your TR engine, and not something chosen to work well with a high revving Japanese product. For awhile, the Toyota conversion was necessary because proper TR overdrives were scarce, but we have stumbled across a good source in the UK and for the foreseeable future we should have them available. Now to the subject of this weeks photo: When performing an overdrive conversion, it’s necessary to drill and tap the gearbox top to accept the switches. Naturally we have located the special size drill bit and the special tap needed to complete this phase of the conversion.August 16, 2021
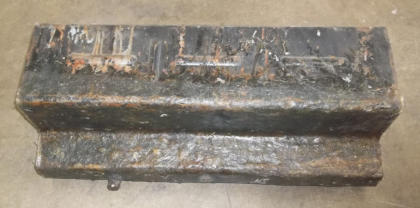
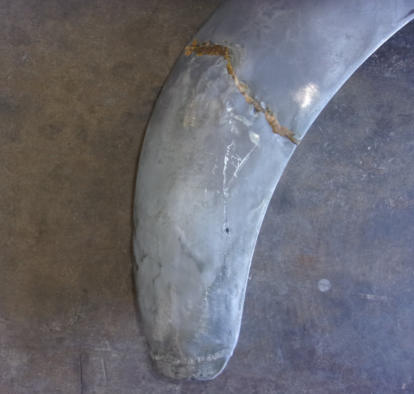
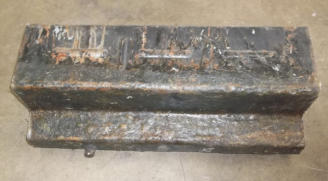
Look closely at the bottom if this TR2 gas tank and you can see that it has been slathered with a layer of fiberglass mat and resin. This must have been a popular “repair” back in the day, as we’ve seen this done dozens of times, and always with the same results. Gasoline must be an excellent de-bonding agent for fiberglass, because just about every time we’ve run across this, the fiberglass would easily peel off the bottom of the tank. Bottom line is that this isn’t a good or long lasting way to repair a leaking fuel tank. In this case, it looks like the fiberglass was laid directly over the tank’s black paint, and that probably didn’t help it to stick either! Now believe it or not, there is hope for this tank. We’ll send it out to our local Gas-Tank-Renu franchise, and they’ll clean away all this mess and weld in new metal where needed, then coat the inside and outside of the tank and provide a lifetime warranty. It’s really a better option than using a gas tank to practice your fiberglass skills!August 9, 2021
Last Saturday was the annual Dayton British Car Day, cancelled last year just like everything else. We put together a group of 10 cars from our shop, 9 of which are shown here before the caravan departed for the show. The 10th car met us there. Included in this group were three cars that we’d just completed full restorations. The owners of two of those three drove here from Eastern PA and New Jersey to see their cars for the first time, and then they drove them to the show. Of the remaining 7 cars, 6 were owned and driven by team members here at Macy’s Garage. At the end of the day, our little group of 10 TR’s brought home 5 awards, but most important of all was the opportunity to visit with old friends and start feeling like the world was finally returning to normal.August 2, 2021
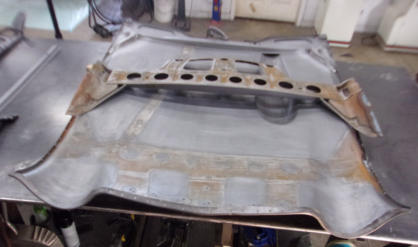
Most of the Triumphs we get here for restoration have hit something or been hit in the front at some time during the last 45+ years, so much so that front end collision repairs are almost a given. Front aprons on the sidescreen cars are easy enough to get to the damage (front and back) to facilitate repairs, but starting with the TR4, access to the back side of the bonnet is not quite so easy. In cases like this, we will often drill the spot welds and remove the inner structure completely so we can massage the outer skin back into shape, and straighten the inner bracing if we need to. This also allows us to clean any remaining rust or chemical residue from the stripping process, and also to prime areas which were never painted when the cars originally left the factory. Sure, it’s a little more work to do it this way, but the owners will never have to worry about thick body filler shrinking and cracking in a few short years. Our motto is to fix it right the first time so that it never has to be re-done again, at least until some idiot backs into your TR or you decide to use the front end for additional braking!July 26, 2021
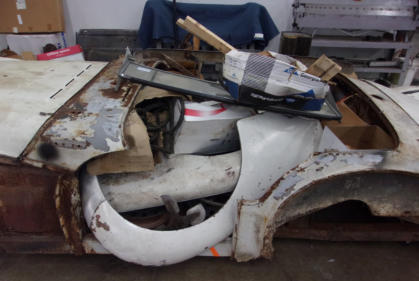
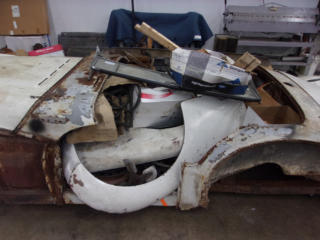
Here lies the remains of a VERY early long door TR2, TS333L. It’s also the basis for our next full restoration project. We start a new complete restoration every 6-8 weeks, and this pile of parts has been on our waiting list for a little over a year. Fortunately, the car came here to the guys who know them best, because some overly ambitious shop completely disassembled the entire car several years ago for a previous owner. Just about every component was completely taken apart, and we received boxes and piles of parts including every tiny piece from the engine, transmission, and rear end. The suspension had been completely disassembled as well, and it rolled into our shop on a pair of wooden dollies. The cost of this disassembly was reported to be $10k, and we don’t know if the owner got cold feet or the restoration shop got it all apart and didn’t know where to start putting it back together. All we know for certain is that the project was abandoned and the car was sold. This is the second car we’ve restored for the current owner, so he knew full well that we were the only shop who stood a chance of ever making a whole car out of this mess. Doing a quick inventory of the parts has revealed several missing parts which are unique to the earliest cars, and knowing this will allow the search to begin now before they’re actually needed.July 19, 2021
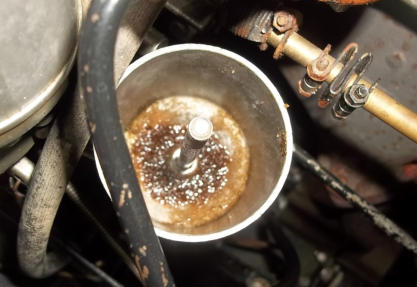
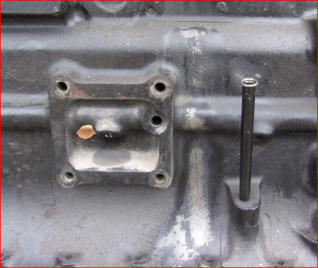
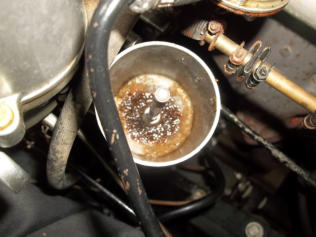
We see a large number of TR’s here that were parked for one reason or another, and then allowed to sit for a number of years before the owners decided they’d like to drive them again. While parking a car safely in a dry garage is better than leaving it in the back yard under a tarp or totally exposed in a field, allowing any car to sit anywhere for a lengthy period of time doesn’t ever do it any good. Unbelievable as it may seem, it’s always the fluids and the systems they work in that tend to spoil first, and gasoline is the worst of the bunch. While it’s pretty easy to pop open a gas cap and smell the nasty gasoline, getting a car back up and running reliably again is more involved than simply draining the tank and pouring in some fresh gas. Here we see a TR3A carburetor that’s had the bowl top removed, and you can see the residue that was left behind when the gas evaporated while sitting for a couple of years. Now some of the finer grit might have made it’s way through the fuel system and was already here before the lengthy storage, and it could have been the reason that the car was parked in the first place. However it got here, now that the varnish component of the old fuel has glued it all together, nothing short of a complete carburetor rebuild, along with a new fuel pump and thorough cleaning of the tank and lines will ever return this car to reliable operation. Then we’ll have to move on to the hydraulic and cooling systems!July 12, 2021
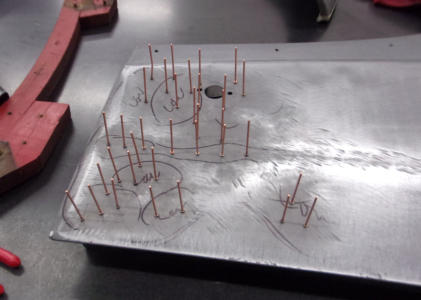
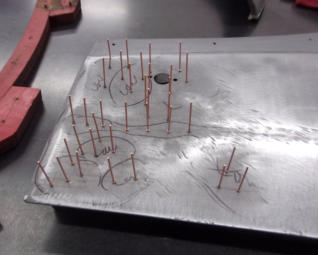
Forming or re-forming sheet metal might not seem like a delicate process considering all of the hammering and grinding involved, but once the metal is close to the desired shape, the finesse part of the process comes into play. What we have going on here is that little studs have been welded to the door skin using a special piece of equipment which is obviously called a stud welder. Now most folks who even have one of these only use it to attach a slide hammer and pull out dents, but a true craftsman knows that applying a tiny amount of heat with pinpoint accuracy is a perfect way to shrink high spots. Stretched metal will naturally gather up and shrink down as it cools, and controlling the heat to shrink the metal just enough is always a challenge. After the cooling and shrinking process has occurred, the studs are bent over and snapped off, leaving just a tiny point that is easily ground away for a smooth surface. This procedure usually must be repeated several times to shrink a severely stretched panel, but it’s still a better option than beating the high spot down with a hammer and filling it back up with bondo (sometimes referred to as “cave it and pave it”). While that may work in the short run, it won’t be a repair that continues to look perfect for very long into the future.July 5, 2021
Like a nightmare that never ends, this is the block from the problematic TR6 engine shown here in our blog on May 24 and June 28. We sent the block, crank, pistons and rods to our machine shop, and after just a preliminary cleaning they called with the bad news. We noted early on that this “rebuilt” engine was filthy inside and out, and had Mr. Famous race car engine builder bothered to clean the block, this crack should have been discovered a very long time ago. Being able to see the crack was enough to raise suspicions, and simply spraying the crack with carburetor cleaner and watching it appear on the inside was all it took to confirm the worst. No high tech testing was required, just old school simplicity. If there’s a silver lining in this for the owner, it’s the fact that he brought this mess here to be straightened out. We keep a large inventory of used parts on hand that are reserved strictly to support our own shop projects, so we didn’t have to start a nationwide search for a replacement block and then have it shipped here and hope it would be OK. We simply pulled a late TR6 engine block from our 9000 sq. ft. warehouse, and the very next day our machine shop was back to work.
BLOG
2021-Q3
America’s BEST Triumph Shop


Macy’s Garage

© 2026 - Macy’s Garage, Ltd.

Blog
WHAT we’re doing, and HOW we’re doing it!
September 27, 2021
Once a Triumph Family, always a Triumph Family! Anne and her husband Mickey had several TR’s through their courtship and early married life, and the TR disease rubbed off on their son Mike somewhere along the way. Several years ago, Mike had us restore this TR3A for his parents to drive and enjoy. Although Mickey is no longer with us, Anne still manages (at a young 81) to take her TR3A out for pleasure and to attend car shows several times each summer. It’s no surprise that she usually hauls home the awards from shows she attends, because it is after all one of our typical Macy’s Garage restorations! This photo, taken earlier in September, shows Anne out and about in her TR3A and enjoying another fun day of Triumph motoring. And as for son Mike’s TR affliction, we’ve just started another TR project for him, the full restoration of a very early TR2 long door, TS333L.September 20, 2021
Congratulations this week to Derrick and Britny for their wedding last week. Derrick has been a member of the Macy’s Garage team for 3-½ years now, and Britny has been a member of Derrick’s team for longer than either of them care to admit! Derrick is a life-long Chrysler (Mopar) fanatic, but he finally caught Triumph-itis like the rest of us and simply had to have one of his own. It’s well known by car folks that the most memorable events in our lives are enhanced when they include our special cars, and Derrick wanted to include his own Triumph in the wedding plans. To achieve this goal, he bought this orange TR3A from our project pool just two short months ago and dove in, working nights and weekends to have it ready for the big day. No one here was surprised when the broken head stud that sidelined the car 45 years ago was repaired in just two days, because Derrick is the primary engine builder here at Macy’s Garage. When one cheeky buggar asked if the car would be for sale following the wedding photos, Derrick promptly and emphatically stated that both The Car and Britny were keepers. We couldn’t help but notice and smile at the order in which he placed his Triumph and his new Wife!September 13, 2021
It’s always interesting to see prior “repairs” whenever a car comes back from the stripper. Take the leading edge of this TR2 fender for example. What looks like a rear fender stoneguard that was permanently welded and brazed to the front edge of the fender, is actually a “repair” that was made to the leading edge of a front fender! Covered with enough bondo, it probably looked OK from 20 feet back (or more), but it probably didn’t look good from anything closer or for more than a year or two. We still consider this to be badly damaged, and botched previous repairs and hidden damage such as this are the primary reasons that we won’t paint a car here unless we are starting from bare metal. It would be impossible to produce a paint finish that would continue to look perfect and new for decades into the future if it were applied over the top of a mess like this. It’s also the reason that you should be VERY cautious about buying a car that has been previously “restored”, because unless the car was restored here, you can’t know how much of this type work is hiding below the shiny surface. And cars restored here are almost never offered for sale on the open market, so you’ll need to have us restore one for you!September 7, 2021
While we are having a run of overdrive information, we’ll show you this photo of two O/D transmission mainshafts. This is the rear end of the shaft which slides into the overdrive, mating the two units into one. The splines deep in the rear of the overdrive where this shaft slides in are made up of two different sets of splines, one set inside the planet gear carrier, and the other inside the uni-directional clutch. If you don’t have these two sets of splines aligned BEFORE attempting to slide the overdrive onto the rear of the gearbox, chances are that you’ll never be able to mate the two units. Normally, they just won’t go and you end up breaking the adapter plate while trying to draw them together, but in this case the hardened mainshaft (top) was severely damaged. It should look clean and crisp like the new shaft shown in the lower portion of the photo. While someone eventually got this together and it probably did work, we always replace damaged parts such as this whenever we find them. We never want to be the last people to work on a Triumph or its components and have something like this found inside years into the future.August 30, 2021
Undisputed facts: 1. British cars leak oil, 2. Triumphs are British cars, 3. Triumphs WILL leak oil. If you own a Triumph, the best you can hope for is to slow down the oil loss, but this is NOT the way to go about that! Some enterprising TR6 owner (or hired wrench) thought that wrapping the gearbox and overdrive with a rag would do the job, but as you can see from the oil soaked rag, their attempt was in vain. If I can say anything positive about this, it’s that I have never seen such a creative use of a bungee cord before, using it to hold a rag in place (white arrow) to “repair” a huge oil leak. Overdrives are particularly prone to oil leaks, as there is no gasket between the steel brake ring and the aluminum case components. There’s also no way to put a gasket in there either. Sealers won’t work for very long because the different expansion rates of the steel and aluminum parts will crack every sealer available, allowing the oil to find an escape route soon enough. But in this particular case, the solution is much simpler than that. We noticed that the O/D adapter plate is loose on the back of the transmission, so the gasket in that particular spot never had a chance. Obviously the genius with the shop rag just didn’t know what to look for!August 23, 2021
Having an overdrive makes a whole new car out of your Triumph, and after you’ve driven a TR with the factory O/D, you’ll never want to be without it. Whenever I add a new TR to my collection, adding an overdrive is the first thing I do to it if it comes to me without one. Now I know many of you are enamoured with the Toyota 5-speed conversions, but going that route limits you to only 5 speeds, whereas a Triumph gearbox with overdrive will net you 7 (6 for a late TR6). Sticking with the “correct” Triumph gearbox will also let you keep gear ratios that were selected to optimize the power range of your TR engine, and not something chosen to work well with a high revving Japanese product. For awhile, the Toyota conversion was necessary because proper TR overdrives were scarce, but we have stumbled across a good source in the UK and for the foreseeable future we should have them available. Now to the subject of this weeks photo: When performing an overdrive conversion, it’s necessary to drill and tap the gearbox top to accept the switches. Naturally we have located the special size drill bit and the special tap needed to complete this phase of the conversion.August 16, 2021
Look closely at the bottom if this TR2 gas tank and you can see that it has been slathered with a layer of fiberglass mat and resin. This must have been a popular “repair” back in the day, as we’ve seen this done dozens of times, and always with the same results. Gasoline must be an excellent de-bonding agent for fiberglass, because just about every time we’ve run across this, the fiberglass would easily peel off the bottom of the tank. Bottom line is that this isn’t a good or long lasting way to repair a leaking fuel tank. In this case, it looks like the fiberglass was laid directly over the tank’s black paint, and that probably didn’t help it to stick either! Now believe it or not, there is hope for this tank. We’ll send it out to our local Gas-Tank-Renu franchise, and they’ll clean away all this mess and weld in new metal where needed, then coat the inside and outside of the tank and provide a lifetime warranty. It’s really a better option than using a gas tank to practice your fiberglass skills!August 9, 2021
Last Saturday was the annual Dayton British Car Day, cancelled last year just like everything else. We put together a group of 10 cars from our shop, 9 of which are shown here before the caravan departed for the show. The 10th car met us there. Included in this group were three cars that we’d just completed full restorations. The owners of two of those three drove here from Eastern PA and New Jersey to see their cars for the first time, and then they drove them to the show. Of the remaining 7 cars, 6 were owned and driven by team members here at Macy’s Garage. At the end of the day, our little group of 10 TR’s brought home 5 awards, but most important of all was the opportunity to visit with old friends and start feeling like the world was finally returning to normal.August 2, 2021
Most of the Triumphs we get here for restoration have hit something or been hit in the front at some time during the last 45+ years, so much so that front end collision repairs are almost a given. Front aprons on the sidescreen cars are easy enough to get to the damage (front and back) to facilitate repairs, but starting with the TR4, access to the back side of the bonnet is not quite so easy. In cases like this, we will often drill the spot welds and remove the inner structure completely so we can massage the outer skin back into shape, and straighten the inner bracing if we need to. This also allows us to clean any remaining rust or chemical residue from the stripping process, and also to prime areas which were never painted when the cars originally left the factory. Sure, it’s a little more work to do it this way, but the owners will never have to worry about thick body filler shrinking and cracking in a few short years. Our motto is to fix it right the first time so that it never has to be re-done again, at least until some idiot backs into your TR or you decide to use the front end for additional braking!July 26, 2021
Here lies the remains of a VERY early long door TR2, TS333L. It’s also the basis for our next full restoration project. We start a new complete restoration every 6-8 weeks, and this pile of parts has been on our waiting list for a little over a year. Fortunately, the car came here to the guys who know them best, because some overly ambitious shop completely disassembled the entire car several years ago for a previous owner. Just about every component was completely taken apart, and we received boxes and piles of parts including every tiny piece from the engine, transmission, and rear end. The suspension had been completely disassembled as well, and it rolled into our shop on a pair of wooden dollies. The cost of this disassembly was reported to be $10k, and we don’t know if the owner got cold feet or the restoration shop got it all apart and didn’t know where to start putting it back together. All we know for certain is that the project was abandoned and the car was sold. This is the second car we’ve restored for the current owner, so he knew full well that we were the only shop who stood a chance of ever making a whole car out of this mess. Doing a quick inventory of the parts has revealed several missing parts which are unique to the earliest cars, and knowing this will allow the search to begin now before they’re actually needed. July 19, 2021 We see a large number of TR’s here that were parked for one reason or another, and then allowed to sit for a number of years before the owners decided they’d like to drive them again. While parking a car safely in a dry garage is better than leaving it in the back yard under a tarp or totally exposed in a field, allowing any car to sit anywhere for a lengthy period of time doesn’t ever do it any good. Unbelievable as it may seem, it’s always the fluids and the systems they work in that tend to spoil first, and gasoline is the worst of the bunch. While it’s pretty easy to pop open a gas cap and smell the nasty gasoline, getting a car back up and running reliably again is more involved than simply draining the tank and pouring in some fresh gas. Here we see a TR3A carburetor that’s had the bowl top removed, and you can see the residue that was left behind when the gas evaporated while sitting for a couple of years. Now some of the finer grit might have made it’s way through the fuel system and was already here before the lengthy storage, and it could have been the reason that the car was parked in the first place. However it got here, now that the varnish component of the old fuel has glued it all together, nothing short of a complete carburetor rebuild, along with a new fuel pump and thorough cleaning of the tank and lines will ever return this car to reliable operation. Then we’ll have to move on to the hydraulic and cooling systems!July 12, 2021
Forming or re-forming sheet metal might not seem like a delicate process considering all of the hammering and grinding involved, but once the metal is close to the desired shape, the finesse part of the process comes into play. What we have going on here is that little studs have been welded to the door skin using a special piece of equipment which is obviously called a stud welder. Now most folks who even have one of these only use it to attach a slide hammer and pull out dents, but a true craftsman knows that applying a tiny amount of heat with pinpoint accuracy is a perfect way to shrink high spots. Stretched metal will naturally gather up and shrink down as it cools, and controlling the heat to shrink the metal just enough is always a challenge. After the cooling and shrinking process has occurred, the studs are bent over and snapped off, leaving just a tiny point that is easily ground away for a smooth surface. This procedure usually must be repeated several times to shrink a severely stretched panel, but it’s still a better option than beating the high spot down with a hammer and filling it back up with bondo (sometimes referred to as “cave it and pave it”). While that may work in the short run, it won’t be a repair that continues to look perfect for very long into the future.July 5, 2021
Like a nightmare that never ends, this is the block from the problematic TR6 engine shown here in our blog on May 24 and June 28. We sent the block, crank, pistons and rods to our machine shop, and after just a preliminary cleaning they called with the bad news. We noted early on that this “rebuilt” engine was filthy inside and out, and had Mr. Famous race car engine builder bothered to clean the block, this crack should have been discovered a very long time ago. Being able to see the crack was enough to raise suspicions, and simply spraying the crack with carburetor cleaner and watching it appear on the inside was all it took to confirm the worst. No high tech testing was required, just old school simplicity. If there’s a silver lining in this for the owner, it’s the fact that he brought this mess here to be straightened out. We keep a large inventory of used parts on hand that are reserved strictly to support our own shop projects, so we didn’t have to start a nationwide search for a replacement block and then have it shipped here and hope it would be OK. We simply pulled a late TR6 engine block from our 9000 sq. ft. warehouse, and the very next day our machine shop was back to work.

America’s BEST Triumph Shop