Macy’s Garage

© 2026 - Macy’s Garage, Ltd.

Blog
WHAT we’re doing, and HOW we’re doing it!
December 26, 2023
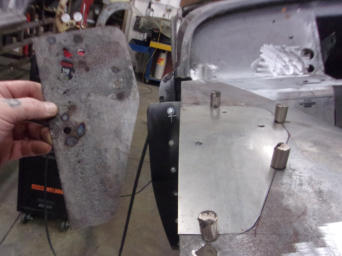
To complete the story of welding clamps, here is another example of a situation where the magnets shown last week were needed. There’s not a flat spot to be had anywhere around this patch for normal clamps to grab without distorting something, so the magnets were the perfect solution to hold this difficult patch into position. So why did we choose to replace only the center section of this area? Because that’s all that was damaged! At times, we’re not shy about cutting off the front half of a fender and grafting on a better section from another part, but this one was sooo very good around the wheel opening that it just made sense to try and save it. Amazingly the center section had suffered from some sort of minor collision without distorting the wheel opening, and someone had then beaten the central area to death in a crude attempt to straighten it. The result of their efforts stretched and distorted the metal to a point where only the most heroic efforts could have saved it. It was faster and less costly for our talented metal shop to form this complex shape out of a piece of flat steel, and then drop it into the opening and TIG weld it solidly into place. And this is where the super strong magnets entered into the story, as conventional clamps would have made this a real wrestling match to try and hold it while the tack welds were being applied. Once this patch was welded 100% of the way around and the welds were ground smooth, the repair became invisible to the naked eye, even while in this bare-metal state. Total time (cost) to repair this old original fender? Much less than the cost of a new reproduction fender and the HOURS of labor necessary to make it fit!December 18, 2023
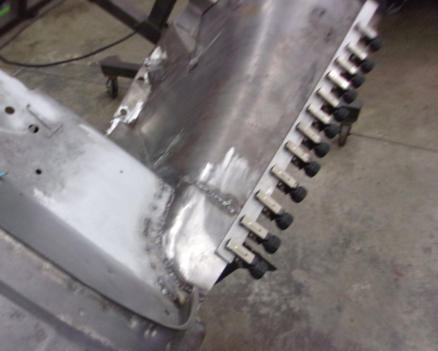
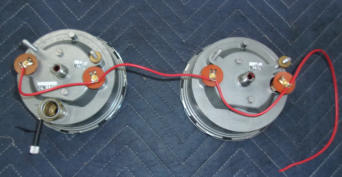
Expanding on last week’s topic of clamps, we have another alternative for you here. There will be times when conventional and specialty clamps aren’t going to work, and the wide patch panel shown here is one of those times. There are welding clamps which pass through the slot and hold a small gap between the two parts for MIG welding, but we prefer to TIG weld thin sheet metal. Welding by TIG gives us better heat control and reduces the inevitable warping that comes with welding thin materials. When TIG welding, we want minimal or zero gaps between the parts, and the MIG welding clamps leave a gap that is far too wide. In cases like this where normal clamps won’t reach into a seam, we’ll use our super-strong magnets. These aren’t your typical refrigerator magnets, but the ultra strong ones that are extremely hard to pull back off. There’s no way that a patch will move when being welded in place with these babies! Besides being a great tool to hold difficult panels in position, you can also have fun with these while watching your small grandchildren try to get them apart!December 11, 2023
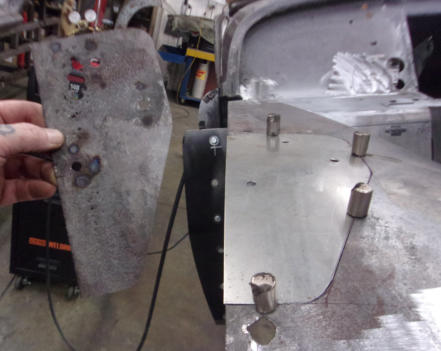
Woodworkers (especially those involved in making furniture and cabinetry) will tell you that you can never have enough clamps! Same is true for metal fabricators and coach builders, as can be seen here in this photo. The project here was to replace the rear corner of a TR3A inner front wheel well (AKA wheel arch), and a long straight piece of 1/8” steel was needed to maintain alignment and assure that the original section flowed smoothly into the repair patch. The clamps are a pinch style clamp which are tightened by the black screw knobs, and when screwed down they do stay tight! The Eastwood catalog where we found them says that they have 250 lbs. of clamping force, and we certainly believe it! Purchased several years ago, they have held up well despite being used frequently in our commercial shop. At $36.99 for 4 clamps, you’re looking at over $110 worth in this photo, and we probably have another dozen or so in the bin where we keep them. Expensive? Yes, but it’s also hard to put a price on “invaluable”. Special tools and equipment go a long way to help anyone become more efficient, and with that in mind we’ll never be bashful about investing heavily in them.December 4, 2023
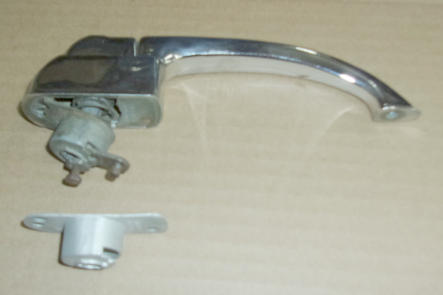
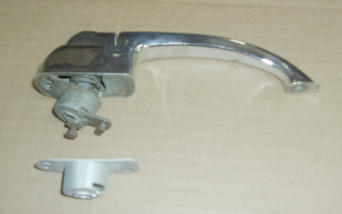
This week we have an exterior door handle from a TR4. The owner mentioned that the door would not open from the outside, and removing the handle showed us why. The thin die-cast cap on the back side had cracked over time, and allowed all of the handle components to drop out of alignment. These caps are not parts which can be easily welded or brazed securely enough to hold the internal spring pressure, so replacing the broken part is the only option. But this part is not being reproduced, nor has it ever been available outside of an entire handle assembly. New reproduction handles are available, and while the chrome on them is nice, they don’t bolt onto the doors seamlessly or function as well as the originals do. They are also a bit costly at $300 per pair. Fortunately for our clients, we generally don’t throw away parts that are serviceable but not nice enough to use on our full restorations. Old handles and other bits like this are sorted out in our 9500 sq ft warehouse, and then recalled for situations when we quickly need a part that is “un-obtainium”.November 27, 2023
Here’s a simple little thing that most people don’t realize until they’re up to their elbows in a wiring harness replacement. When you buy that expensive new wiring harness, it is not 100% complete! Triumph wiring harnesses, and probably those other British cars sourcing electrical components and systems from Lucas, are all comprised of a main harness and a few other “sub-harnesses”. Take this TR3A gauge light harness shown here in the proper red color. This simple little sub-harness is not included with a main wiring harness, nor is it readily available for purchase. Many times we’ll save and re-use an original lighting harness like this if it passes inspection, or recycle the old lamp sockets by simply soldering new wires onto them. New bulb sockets are available, but unless you knew to order them with your main harness, they won’t be there when you are rushing to complete the wiring install just days before some event. The bottom line is to never throw away any old parts (wiring or otherwise) until the job is finished!November 20, 2023
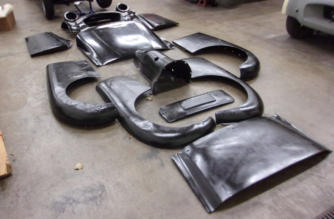
This pile of TR2 body panels recently arrived, along with a body tub that had been crudely “repaired” at some time in the distant past. The current owner had the paint, rust, and old filler removed, then had the whole mess E-coated in semi-gloss black (which makes all of the “warts” easily visible). Our task will be to repair all of the rust, straighten all of the crumpled and wadded up areas, and remove and correct all of the prior bad repairs. What’s most interesting here is the evidence of prior bad paint removal. Take a closer look at the trunk (boot) lid in the foreground. Can you see the faint “X” through the center of the lid? If the lid is turned over, this is the exact shape and location of the X brace used on the pre-TS60000 cars. What this shows is that this part was once stripped by sandblasting. The pressure from the sandblast operation has stretched the trunk skin over the brace, and basically ruined this part. With enough filler it might be made to look straight again, but the lid would probably be too heavy to lift! A thick application of filler will also be more prone to shrink and crack, a process surely hastened along by repeatedly opening and closing the trunk. This is just one example of why we have all of our body panels chemically stripped and avoid sandblasting!November 13, 2023
A pretty nice TR4 (older restoration) just arrived at our shop. At the top of a lengthy list of small items for us to look at is an overheating problem, something that’s not easily diagnosed here in November! But a mere 10 seconds after the bonnet was opened, we feel like we’re well along in locating the trouble. First off, this TR4 has a wider TR4A radiator shroud installed. Shrouds are meant to direct all of the air from the grill opening through the radiator core, but the wider shroud needed for the wider TR4A radiator allows air to follow the path of least resistance and flow around the sides of the TR4 radiator. Air that bypasses the radiator does nothing but reduce the efficiency of the cooling system. Triumph had two different part numbers for TR4 and TR4A radiator shrouds, but the parts suppliers today only sell the wider TR4A version. Their catalogs are wrong to claim that “one size fits all”. You might get away with this in a cooler climate, but head deep into the South and your summer drives will mean that all eyes are glued to the temp gauge. The other problem here is the engine cooling fan. They aren’t as efficient in pulling air through a radiator as our own Hurricane fans, but they will work a lot better than this one when installed correctly. This fan is on backwards, as the ridges should point forward to present the slightly cambered surface to the radiator. The tapered edges also need to be pointed rearward, adding to the curved camber effect that pulls air through the radiator.November 6, 2023
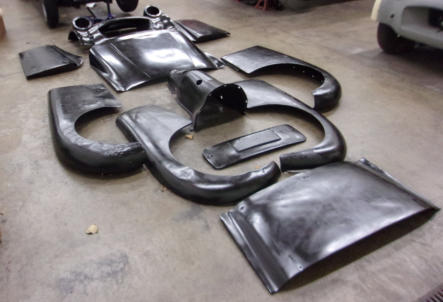
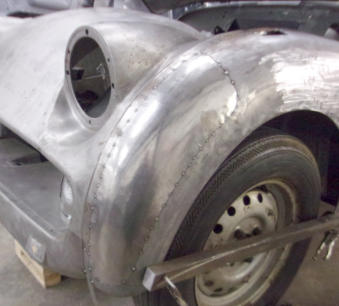
We covered the “customized” front end accessories of this TR3A back on September 18, and the unusual color combination on October 3. Now we have a photo of the completed car, ready to ship home to the owner in NJ. This week, we want to mention the rear wheel “spats”, A.K.A. “Fender Skirts” on this side of the pond. First seen on the Jabbeke TR2 and both TS1LO and TS2, spats were a necessary part of the “Boulevard Cruiser” look that was in vogue many decades ago. You don’t find them on too many cars today, but they are shown prominently in the Standard-Triumph TR2 & TR3 Spare Parts Catalogue. When required, we have to make these from scratch in our metal shop, using old world metal shaping techniques and equipment such as an English wheel, planishing hammer, shrinker/stretcher, and even a little time with our Dake power hammer to create the shape. Unfortunately, we can’t make a new set of these and ship them off like ordering from the parts catalog. After 60+ years, almost all rear fenders have been bumped and “re-shaped”, so today they must be custom built to fit a specific fender.October 30, 2023
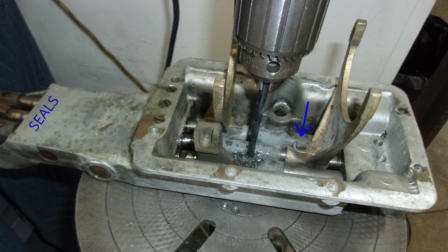
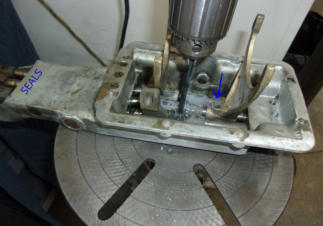
The top of a Triumph TR gearbox has all of the shift linkage and related mechanisms built into it. This is not a simple top cover, but a complex assembly with plenty of moving parts. We always disassemble these tops completely to at least replace the seals on the shift rods because they can leak a huge amount of oil, even though they are located at the top of the transmission! Other troubles which mandate a disassembly would be an excessively worn shift fork, or wear in the shift lever sockets or shift rod interlock parts, all of which can cause big-time transmission troubles. You might not expect something that’s constantly swimming in oil to freeze or lock up, but it’s not an uncommon occurrence for the bolts securing the forks to the rods. These bolts often snap off and leave the fork stuck on the rod, so we’ve had quite a bit of practice drilling out the bolt stubs, all while being extremely careful to leave the rods and the forks unscathed. New rods are not available, and only a very small selection of forks can be had. Careful and often tedious locating/drilling is the only way to save a genuine TR gearbox, and a good supply of serviceable used parts helps as well!October 23, 2023
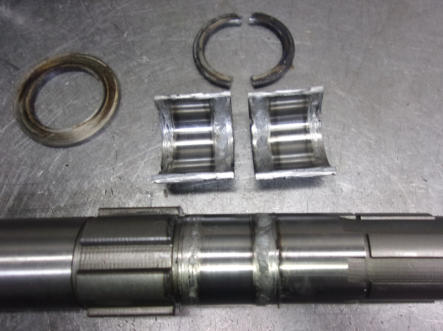
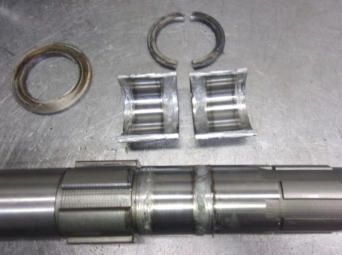
What we have for you this week is a new steel gearbox bushing that froze onto the mainshaft only 37 miles after a transmission rebuild and overdrive conversion. We had to cut the bushing in half to get it off of the shaft for inspection, but unfortunately the expensive new overdrive shaft was ruined by the failure. Steel gearbox bushings were used on the later TR6’s, and are listed as an “upgrade” for earlier transmissions that came with Oilite bronze bushings. I must tell you that I’ve always been leery of using steel bushings, expecting this exact same problem might occur. The Oilite bronze bushings will actually retain a little bit of oil, so a complete starvation like this is less likely to happen. But the bronze bushing availability has been hit or miss for the last few years, and there are instances (like here) where a steel bushing is the only option. The man who rebuilt this worked in a Triumph dealership in the late 1970’s, and was a transmission and differential tech at a GM dealership for 13 years prior to coming here 9 years ago. He’s done nearly 100% of our tranny work ever since, so I’m confident this wasn’t an installation error on the tech’s part. We’ll continue to install the Oilite bronze bushings when we have them, but for the times when we are forced to use steel we’re going to drill and chamfer a small oil hole in the middle, just to help the lubrication find it’s way in as needed.October 16, 2023
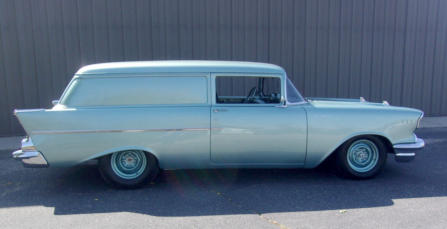
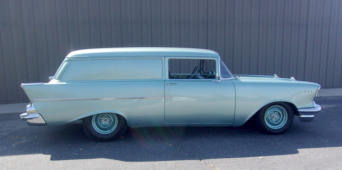
Way back on my March 15, 2021 Blog post (2021Q1), I showed my personal ‘57 Chevy Sedan Delivery project on the way to a Tri-5 Chevy specialist because we weren’t progressing on it here. My reasoning was that the clock was ticking and if I ever wanted to drive this car, it was time to get moving. Last week the car finally returned. It took 2.5 times as long as I thought it should when I sent it out, and it cost about 2.5x what I thought it would. The sad part is that I still have a lot of unfinished and “re-do” items to attend to before it’s done, but there’s no doubt that it wouldn’t be this far along if I had continued to peck away here a small amount at a time. After being “the customer”, I’m more pleased with the fantastic process we have here and extremely proud of the high-quality finished product we always return to our clients. If your TR2- TR6 is still sitting idle with little progress, perhaps it’s time to call in the Macy’s team for help. You won’t be disappointed with the results!October 9, 2023
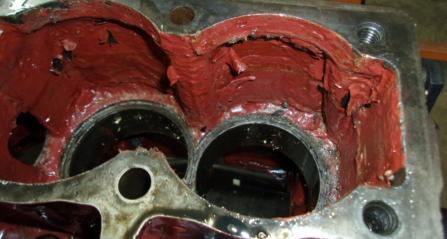
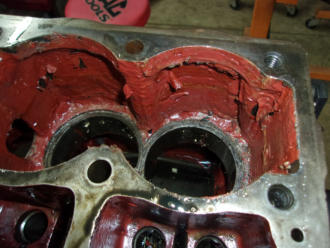
I’m almost sorry to say that we get a very large amount of work that is problem solving or a re- do of work that was done somewhere else. This TR3 engine ranks right up there at the top of the “what were they thinking” list. Rebuilt at home by the owner and his club buddy over 20 years ago, and then left to sit while the 30 year home restoration progressed (or not!). Once the car was finally “completed”, it had a serious overheating condition. The radiator would boil just from backing the car off of the trailer and a short drive onto the show field. Numerous hands and fingers scratched heads and tried to solve the problem before the car finally came here with instructions to “do whatever it takes”. We suspected mice debris in the water jackets, after sitting for 20 + years with open ports for the radiator hoses, but what we found was actually self inflicted. It is OK to paint the oil galleries inside an engine block to trap residual sand casting material and hasten the flow of oil back into the pan, but it is NOT a good idea to paint the water jackets. Unless you have some miracle paint that can live under water AND resist the heat/cool cycles, this is what will happen. This paint flaked off in big chunks, blocking water passages and rendering the whole cooling system worthless. Maybe every bright idea isn’t really that bright, especially if a 12-pack was involved!October 2, 2023
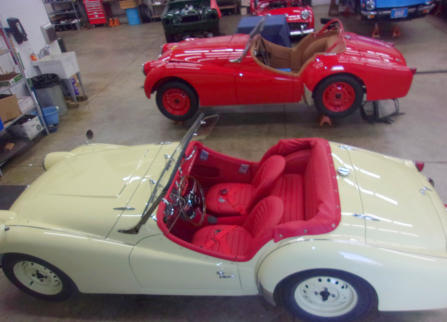
Today we have a larger image of the yellow and red TR3 from the previous two weeks, showing a more complete view of this uncommon color combination. It looks pretty good doesn’t it? According to Piggot’s Original Triumph TR2/3/3A book, this combination could have been ordered from the factory on the earliest TR3A’s between September 1957 (TS22014) when the Primrose Yellow paint was introduced with the first 3A’s and September 1958 (approx. TS37000) when Pale Yellow replaced the Primrose. During that time, ANY color combination could be ordered, and the later Pale Yellow cars were limited to either black or tan interiors. But isn’t this a small mouth TR3, and if it’s a TR3A, where is the white piping? As you can probably tell from the badge bar, lights, and badges on the front, this car was restored to suit the owner’s tastes. It’s actually a TR3A with a small mouth front end, and with the strong statement made by the yellow and red we opted for matching piping to avoid tossing another color into the mix. The chance of ever finding a nice car for sale in your choice of colors and accessories is basically nil, so the best option is to have your “Dream Triumph” restored just the way you see it in your mind. And we’re always thrilled to help make your dreams come true!
BLOG
2023-Q4

America’s BEST Triumph Shop


Macy’s Garage

© 2026 - Macy’s Garage, Ltd.

Blog
WHAT we’re doing, and HOW we’re doing it!
December 26, 2023
To complete the story of welding clamps, here is another example of a situation where the magnets shown last week were needed. There’s not a flat spot to be had anywhere around this patch for normal clamps to grab without distorting something, so the magnets were the perfect solution to hold this difficult patch into position. So why did we choose to replace only the center section of this area? Because that’s all that was damaged! At times, we’re not shy about cutting off the front half of a fender and grafting on a better section from another part, but this one was sooo very good around the wheel opening that it just made sense to try and save it. Amazingly the center section had suffered from some sort of minor collision without distorting the wheel opening, and someone had then beaten the central area to death in a crude attempt to straighten it. The result of their efforts stretched and distorted the metal to a point where only the most heroic efforts could have saved it. It was faster and less costly for our talented metal shop to form this complex shape out of a piece of flat steel, and then drop it into the opening and TIG weld it solidly into place. And this is where the super strong magnets entered into the story, as conventional clamps would have made this a real wrestling match to try and hold it while the tack welds were being applied. Once this patch was welded 100% of the way around and the welds were ground smooth, the repair became invisible to the naked eye, even while in this bare-metal state. Total time (cost) to repair this old original fender? Much less than the cost of a new reproduction fender and the HOURS of labor necessary to make it fit!December 18, 2023
Expanding on last week’s topic of clamps, we have another alternative for you here. There will be times when conventional and specialty clamps aren’t going to work, and the wide patch panel shown here is one of those times. There are welding clamps which pass through the slot and hold a small gap between the two parts for MIG welding, but we prefer to TIG weld thin sheet metal. Welding by TIG gives us better heat control and reduces the inevitable warping that comes with welding thin materials. When TIG welding, we want minimal or zero gaps between the parts, and the MIG welding clamps leave a gap that is far too wide. In cases like this where normal clamps won’t reach into a seam, we’ll use our super-strong magnets. These aren’t your typical refrigerator magnets, but the ultra strong ones that are extremely hard to pull back off. There’s no way that a patch will move when being welded in place with these babies! Besides being a great tool to hold difficult panels in position, you can also have fun with these while watching your small grandchildren try to get them apart!December 11, 2023
Woodworkers (especially those involved in making furniture and cabinetry) will tell you that you can never have enough clamps! Same is true for metal fabricators and coach builders, as can be seen here in this photo. The project here was to replace the rear corner of a TR3A inner front wheel well (AKA wheel arch), and a long straight piece of 1/8” steel was needed to maintain alignment and assure that the original section flowed smoothly into the repair patch. The clamps are a pinch style clamp which are tightened by the black screw knobs, and when screwed down they do stay tight! The Eastwood catalog where we found them says that they have 250 lbs. of clamping force, and we certainly believe it! Purchased several years ago, they have held up well despite being used frequently in our commercial shop. At $36.99 for 4 clamps, you’re looking at over $110 worth in this photo, and we probably have another dozen or so in the bin where we keep them. Expensive? Yes, but it’s also hard to put a price on “invaluable”. Special tools and equipment go a long way to help anyone become more efficient, and with that in mind we’ll never be bashful about investing heavily in them.December 4, 2023
This week we have an exterior door handle from a TR4. The owner mentioned that the door would not open from the outside, and removing the handle showed us why. The thin die-cast cap on the back side had cracked over time, and allowed all of the handle components to drop out of alignment. These caps are not parts which can be easily welded or brazed securely enough to hold the internal spring pressure, so replacing the broken part is the only option. But this part is not being reproduced, nor has it ever been available outside of an entire handle assembly. New reproduction handles are available, and while the chrome on them is nice, they don’t bolt onto the doors seamlessly or function as well as the originals do. They are also a bit costly at $300 per pair. Fortunately for our clients, we generally don’t throw away parts that are serviceable but not nice enough to use on our full restorations. Old handles and other bits like this are sorted out in our 9500 sq ft warehouse, and then recalled for situations when we quickly need a part that is “un-obtainium”.November 27, 2023
Here’s a simple little thing that most people don’t realize until they’re up to their elbows in a wiring harness replacement. When you buy that expensive new wiring harness, it is not 100% complete! Triumph wiring harnesses, and probably those other British cars sourcing electrical components and systems from Lucas, are all comprised of a main harness and a few other “sub- harnesses”. Take this TR3A gauge light harness shown here in the proper red color. This simple little sub-harness is not included with a main wiring harness, nor is it readily available for purchase. Many times we’ll save and re-use an original lighting harness like this if it passes inspection, or recycle the old lamp sockets by simply soldering new wires onto them. New bulb sockets are available, but unless you knew to order them with your main harness, they won’t be there when you are rushing to complete the wiring install just days before some event. The bottom line is to never throw away any old parts (wiring or otherwise) until the job is finished!November 20, 2023
This pile of TR2 body panels recently arrived, along with a body tub that had been crudely “repaired” at some time in the distant past. The current owner had the paint, rust, and old filler removed, then had the whole mess E-coated in semi-gloss black (which makes all of the “warts” easily visible). Our task will be to repair all of the rust, straighten all of the crumpled and wadded up areas, and remove and correct all of the prior bad repairs. What’s most interesting here is the evidence of prior bad paint removal. Take a closer look at the trunk (boot) lid in the foreground. Can you see the faint “X” through the center of the lid? If the lid is turned over, this is the exact shape and location of the X brace used on the pre-TS60000 cars. What this shows is that this part was once stripped by sandblasting. The pressure from the sandblast operation has stretched the trunk skin over the brace, and basically ruined this part. With enough filler it might be made to look straight again, but the lid would probably be too heavy to lift! A thick application of filler will also be more prone to shrink and crack, a process surely hastened along by repeatedly opening and closing the trunk. This is just one example of why we have all of our body panels chemically stripped and avoid sandblasting!November 13, 2023
A pretty nice TR4 (older restoration) just arrived at our shop. At the top of a lengthy list of small items for us to look at is an overheating problem, something that’s not easily diagnosed here in November! But a mere 10 seconds after the bonnet was opened, we feel like we’re well along in locating the trouble. First off, this TR4 has a wider TR4A radiator shroud installed. Shrouds are meant to direct all of the air from the grill opening through the radiator core, but the wider shroud needed for the wider TR4A radiator allows air to follow the path of least resistance and flow around the sides of the TR4 radiator. Air that bypasses the radiator does nothing but reduce the efficiency of the cooling system. Triumph had two different part numbers for TR4 and TR4A radiator shrouds, but the parts suppliers today only sell the wider TR4A version. Their catalogs are wrong to claim that “one size fits all”. You might get away with this in a cooler climate, but head deep into the South and your summer drives will mean that all eyes are glued to the temp gauge. The other problem here is the engine cooling fan. They aren’t as efficient in pulling air through a radiator as our own Hurricane fans, but they will work a lot better than this one when installed correctly. This fan is on backwards, as the ridges should point forward to present the slightly cambered surface to the radiator. The tapered edges also need to be pointed rearward, adding to the curved camber effect that pulls air through the radiator.November 6, 2023
We covered the “customized” front end accessories of this TR3A back on September 18, and the unusual color combination on October 3. Now we have a photo of the completed car, ready to ship home to the owner in NJ. This week, we want to mention the rear wheel “spats”, A.K.A. “Fender Skirts” on this side of the pond. First seen on the Jabbeke TR2 and both TS1LO and TS2, spats were a necessary part of the “Boulevard Cruiser” look that was in vogue many decades ago. You don’t find them on too many cars today, but they are shown prominently in the Standard-Triumph TR2 & TR3 Spare Parts Catalogue. When required, we have to make these from scratch in our metal shop, using old world metal shaping techniques and equipment such as an English wheel, planishing hammer, shrinker/stretcher, and even a little time with our Dake power hammer to create the shape. Unfortunately, we can’t make a new set of these and ship them off like ordering from the parts catalog. After 60+ years, almost all rear fenders have been bumped and “re-shaped”, so today they must be custom built to fit a specific fender.October 30, 2023
The top of a Triumph TR gearbox has all of the shift linkage and related mechanisms built into it. This is not a simple top cover, but a complex assembly with plenty of moving parts. We always disassemble these tops completely to at least replace the seals on the shift rods because they can leak a huge amount of oil, even though they are located at the top of the transmission! Other troubles which mandate a disassembly would be an excessively worn shift fork, or wear in the shift lever sockets or shift rod interlock parts, all of which can cause big-time transmission troubles. You might not expect something that’s constantly swimming in oil to freeze or lock up, but it’s not an uncommon occurrence for the bolts securing the forks to the rods. These bolts often snap off and leave the fork stuck on the rod, so we’ve had quite a bit of practice drilling out the bolt stubs, all while being extremely careful to leave the rods and the forks unscathed. New rods are not available, and only a very small selection of forks can be had. Careful and often tedious locating/drilling is the only way to save a genuine TR gearbox, and a good supply of serviceable used parts helps as well!October 23, 2023
What we have for you this week is a new steel gearbox bushing that froze onto the mainshaft only 37 miles after a transmission rebuild and overdrive conversion. We had to cut the bushing in half to get it off of the shaft for inspection, but unfortunately the expensive new overdrive shaft was ruined by the failure. Steel gearbox bushings were used on the later TR6’s, and are listed as an “upgrade” for earlier transmissions that came with Oilite bronze bushings. I must tell you that I’ve always been leery of using steel bushings, expecting this exact same problem might occur. The Oilite bronze bushings will actually retain a little bit of oil, so a complete starvation like this is less likely to happen. But the bronze bushing availability has been hit or miss for the last few years, and there are instances (like here) where a steel bushing is the only option. The man who rebuilt this worked in a Triumph dealership in the late 1970’s, and was a transmission and differential tech at a GM dealership for 13 years prior to coming here 9 years ago. He’s done nearly 100% of our tranny work ever since, so I’m confident that this wasn’t an installation error on the tech’s part. We’ll continue to install the Oilite bronze bushings when we have them, but for the times when we are forced to use steel we’re going to drill and chamfer a small oil hole in the middle, just to help the lubrication find it’s way in as needed.October 16, 2023
Way back on my March 15, 2021 Blog post (2021Q1), I showed my personal ‘57 Chevy Sedan Delivery project on the way to a Tri-5 Chevy specialist because we weren’t progressing on it here. My reasoning was that the clock was ticking and if I ever wanted to drive this car, it was time to get moving. Last week the car finally returned. It took 2.5 times as long as I thought it should when I sent it out, and it cost about 2.5x what I thought it would. The sad part is that I still have a lot of unfinished and “re-do” items to attend to before it’s done, but there’s no doubt that it wouldn’t be this far along if I had continued to peck away here a small amount at a time. After being “the customer”, I’m more pleased with the fantastic process we have here and extremely proud of the high-quality finished product we always return to our clients. If your TR2-TR6 is still sitting idle with little progress, perhaps it’s time to call in the Macy’s team for help. You won’t be disappointed with the results!October 9, 2023
I’m almost sorry to say that we get a very large amount of work that is problem solving or a re-do of work that was done somewhere else. This TR3 engine ranks right up there at the top of the “what were they thinking” list. Rebuilt at home by the owner and his club buddy over 20 years ago, and then left to sit while the 30 year home restoration progressed (or not!). Once the car was finally “completed”, it had a serious overheating condition. The radiator would boil just from backing the car off of the trailer and a short drive onto the show field. Numerous hands and fingers scratched heads and tried to solve the problem before the car finally came here with instructions to “do whatever it takes”. We suspected mice debris in the water jackets, after sitting for 20 + years with open ports for the radiator hoses, but what we found was actually self inflicted. It is OK to paint the oil galleries inside an engine block to trap residual sand casting material and hasten the flow of oil back into the pan, but it is NOT a good idea to paint the water jackets. Unless you have some miracle paint that can live under water AND resist the heat/cool cycles, this is what will happen. This paint flaked off in big chunks, blocking water passages and rendering the whole cooling system worthless. Maybe every bright idea isn’t really that bright, especially if a 12-pack was involved!October 2, 2023
Today we have a larger image of the yellow and red TR3 from the previous two weeks, showing a more complete view of this uncommon color combination. It looks pretty good doesn’t it? According to Piggot’s Original Triumph TR2/3/3A book, this combination could have been ordered from the factory on the earliest TR3A’s between September 1957 (TS22014) when the Primrose Yellow paint was introduced with the first 3A’s and September 1958 (approx. TS37000) when Pale Yellow replaced the Primrose. During that time, ANY color combination could be ordered, and the later Pale Yellow cars were limited to either black or tan interiors. But isn’t this a small mouth TR3, and if it’s a TR3A, where is the white piping? As you can probably tell from the badge bar, lights, and badges on the front, this car was restored to suit the owner’s tastes. It’s actually a TR3A with a small mouth front end, and with the strong statement made by the yellow and red we opted for matching piping to avoid tossing another color into the mix. The chance of ever finding a nice car for sale in your choice of colors and accessories is basically nil, so the best option is to have your “Dream Triumph” restored just the way you see it in your mind. And we’re always thrilled to help make your dreams come true!

America’s BEST Triumph Shop