


 Reproduction Parts
|
Macy's Garage, Ltd. America's BEST Triumph Shop! |
Birth of a Reproduction Part
As compared to most vintage auto enthusiasts, we’ve got it pretty easy. A very high percentage of the parts we need to restore our Triumphs and keep them on the road today are readily available. With little more effort than a phone call (or internet order) and a credit card, UPS will deliver a box with shiny new parts to your doorstep in just a few days. This was not always the case, and Triumph owners once had to hunt and dig for parts in much the same way that DeSoto collectors must today.
But did you ever stop and think about what it takes to bring just one Triumph part back into production? Original tooling has been lost or destroyed years ago, and most outside suppliers to Standard-Triumph back in the day have ceased to exist. To make any obsolete part available again is a major project requiring lots of time and money. This is the story of what I experienced to produce new cubby box doors and hinges for the TR2-3B models.
First, there must be a demand for any part to be reproduced. It must be something that either wears out, or deteriorates with age. In the case of the cubby box door and hinge assembly, both are known to happen. One of my own cars arrived here without an opening cubby box door. An upholstered board was bolted in place to cover the hole, but no hinge or aluminum door was there. Reproductions were not available, and my search for a used one turned up many with broken check rod tabs, rounded out lock holes, and rusted hinges that wouldn’t move. Watching eBay, I found that average used ones were selling in the $40-$50 range, which started me thinking about reproducing them myself.
At first glance, these door and hinge assemblies didn’t appear to be anything special. The flat aluminum door was probably stamped originally, but the laser and water jet cutting technologies we have today would make this an easy part to have made. The aluminum rivets that attach the door to the hinge had a striking resemblance to rivets I’d seen on airplanes, so I didn’t anticipate too many problems sourcing these either.
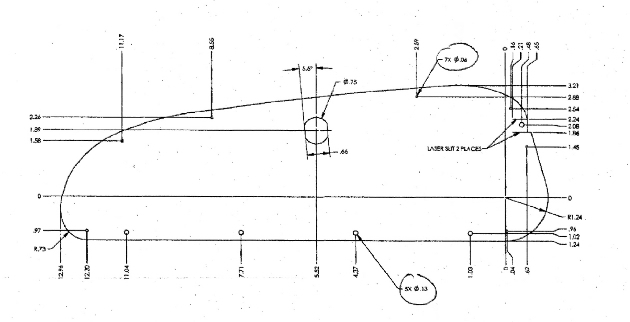
Detailed drawings are necessary
to "reverse engineer"
reproduction parts.
The hinge was going to be the hardest component. Originals were chromed steel (which rusted), but I planned to use a non-rusting stainless steel hinge that was highly polished to resemble chrome. I assumed that I could buy long lengths of stainless piano hinge, cut them to length, cut one side a little narrower than the other, add a bend, drill a few holes, have them polished, and ‘presto chango’, new TR2/3 hinges. And this is the point where the wheels came off of the wagon!
The internet is a wonderful research tool, and by searching for ‘piano hinge’, I was able to learn enough hinge terminology to become dangerous. I learned that the hinge I needed was a 3/32” diameter pin with 1” knuckles (the parts which wrap around the pin), and unequal leaf lengths (where the hinge attaches to the door and the dash). No luck finding pre-made hinges in a useable size, so I went searching for a custom hinge manufacturer to make up a few hundred of these.
On more than 30 different occasions I was
told that this particular hinge could not be made. The “industry standard” for
a 3/32 pin diameter is a ½” knuckle, which would mean twice as many segments on
each hinge. I could get hinges with 1” knuckles, but the pin diameter would
have to be ¼”, which is a huge increase. Other than those two choices, the
required tooling did not exist. Since the knuckles show when the door is
closed, both options were unacceptable to me.
Original door (top) with rusted hinge, corroded aluminum, and worn lock hole.
New reproduction door and hinge assembly (bottom).
Not to be discouraged for too long, I surmised that these hinges were originally from England, so perhaps they were operating under a different “industry standard”. Using a number of U.K. search engines, I found several hinge companies in Great Britain, and even a couple who said they could produce the needed type! I quickly shipped samples across the pond and smugly waited for the estimates to come in. WOW! Was I ever in for a shock. All of the cost estimates from the U.K. were well above what anyone would think to be reasonable, and did not include the polishing which was to be done here. The retail cost of a door and hinge was going to be around the century mark, and once again, an unacceptable option. I’d been chasing this for several months by now, and I hated to give up and admit defeat. I just had to find another way!
Next stop was to try the orient. Many of our reproduction parts come from that part of the globe, so why should this simple little hinge be any different? Sure enough, I found several places who could make this configuration with no problem. The only question that remained was “how many thousand do you want?” I was beginning to see why this part was not available from any of the usual sources.
And then it happened. Out of the blue and by shear luck, I received an e-mail from one of the U.S. companies who’d said “NO” originally. They were kind enough to suggest that I call another company (no web site or e-mail) and speak to “Mr. D”. In what I believed would be my last futile attempt to have these made, I picked up the phone. Yes they had the tooling, send the sample and they would work up a quote on a few hundred hinges. I was surprised again when I received their quote a couple of weeks later. They were going to be affordable! For the first time in about 6 months, I was starting to believe that these parts would become available again!
Orders were placed for the aluminum doors and hinges, and the doors were the first to arrive. I wasn’t completely satisfied with the finish on the bare aluminum, so off to the metal polisher they went. When I got them back, I still had to countersink the holes for all of the tiny wood screws used to hold the facings in place. Ten weeks after placing the order, I finally received the hinges. They were perfect copies of the originals, but still had to be polished to look like chrome. Another 2 weeks passed before I got the shiny new hinges back from the polisher, and final assembly could begin at last.
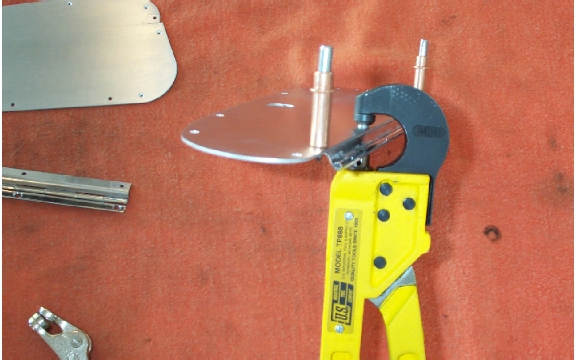 Using
aircraft cleco fasteners to hold the hinge and door together in the correct
orientation, and a special aircraft rivet squeezer tool, I was finally able to
join doors and hinges to create perfect copies of parts which have probably
never been available since the original Triumph supplies were exhausted. Ten
months had elapsed since I first got the wild idea to make these parts, and
required a huge investment in both time and effort (not to mention $). When I
compare my old nasty original samples to the bright, shiny and new
reproductions, there’s no doubt in my mind that it was all worth it. Would I do
it again? Just keep watching the Parts page of this web site to find out what's
next!!!
Using
aircraft cleco fasteners to hold the hinge and door together in the correct
orientation, and a special aircraft rivet squeezer tool, I was finally able to
join doors and hinges to create perfect copies of parts which have probably
never been available since the original Triumph supplies were exhausted. Ten
months had elapsed since I first got the wild idea to make these parts, and
required a huge investment in both time and effort (not to mention $). When I
compare my old nasty original samples to the bright, shiny and new
reproductions, there’s no doubt in my mind that it was all worth it. Would I do
it again? Just keep watching the Parts page of this web site to find out what's
next!!!
Update 10/07/2008:
We've just completed the reproduction of TR3 (smallmouth) Grille Reveal Moulding Joint Covers, p/n 604340 (Moss 870-035). The process this time took over 10 months, and 3 outside companies were involved in making these "simple" little parts available once again.
The first to get involved was a company that makes stainless steel trim for 1950's and 1960's American cars. I persuaded them to make the male and female dies needed to stamp the small joint covers, and then to hammer out a sizeable batch of these small shiny parts for eventual use on our Triumphs. From there, I took the newly stamped joint covers and several boxes of stainless steel screws to a precision laser welding company, where the screws were firmly attached to the back side to provide the attachment "studs". From there, they traveled to the metal polisher to have their outer surface buffed to a mirror like shine. Special care had to be taken at this point to keep the edges of one part from scratching the polished surface of another, and when I picked them up from polishing the studs were punched through a couple of large pieces of styrofoam to keep all of them apart. Once I arrived back at Macy's Garage with this new treasure of Triumph parts, I had to attach the nut and washer so that they wouldn't roll around in the bag and scratch the front side, and individually bag them for further protection. After 10 months of persistence and frustration, I can now look at these shiny new parts (which I've never had for either of my cars) and safely say that it was worth every bit of the effort!