


 Bodywork Basics page 2
|
Macy's Garage, Ltd. America's BEST Triumph Shop! |
There appears to be many folks out there who think that paint will hide minor bodywork flaws, and only find out after the paint has been applied that it magnifies even the tiniest imperfection. To achieve flawless paint, the underlying surface must be flawless as well. Beating crumpled metal out with a hammer and smearing a thick layer of bondo over the whole mess is never going to look right, and it probably isn't going to last either! Follow along as we create a perfect surface to hold the paint on the TR3B apron.
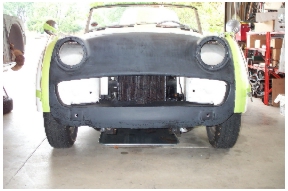 Once
all of the metalwork had reached the point of diminishing returns, the first
layer of epoxy primer was sprayed on. Epoxy primers are expensive, but
they grip bare steel like there's no tomorrow, and I've found it to be the
prefect foundation for long paint life. Yes, it's back on the car
again for another 'fitting'. Once
all of the metalwork had reached the point of diminishing returns, the first
layer of epoxy primer was sprayed on. Epoxy primers are expensive, but
they grip bare steel like there's no tomorrow, and I've found it to be the
prefect foundation for long paint life. Yes, it's back on the car
again for another 'fitting'. |
 While
bolted to the car to hold the apron's shape, a thin layer of premium filler
was applied to any 'low' areas we could see or feel. The 1st layer of
epoxy primer needs to be sanded with 120 grit before the filler is applied,
to promote adhesion. While
bolted to the car to hold the apron's shape, a thin layer of premium filler
was applied to any 'low' areas we could see or feel. The 1st layer of
epoxy primer needs to be sanded with 120 grit before the filler is applied,
to promote adhesion. |
 Careful
sanding with both air sanders and by hand removed most of the filler that
was applied in the last photo, leaving a super thin layer to level out some
of the light waves, probably no thicker than a manilla file folder. Careful
sanding with both air sanders and by hand removed most of the filler that
was applied in the last photo, leaving a super thin layer to level out some
of the light waves, probably no thicker than a manilla file folder. |
 A
second layer of epoxy primer is applied over the entire apron, sealing the
thin filler between two layers of epoxy. This is a relatively new
approach to filler application which has been made possible by modern
chemistry. Old time body guys will give you an argument about this,
but it's really the best method for today's products. A
second layer of epoxy primer is applied over the entire apron, sealing the
thin filler between two layers of epoxy. This is a relatively new
approach to filler application which has been made possible by modern
chemistry. Old time body guys will give you an argument about this,
but it's really the best method for today's products. |
 Next
we apply glazing or "spot putty" to any pin holes in the original filler,
and tiny dimples which might be visible. This putty is very thin and
creamy, and not only spreads easily, but sands easily too. You'll take
forever trying to get normal filler perfect, so this is the easy way to
bring your bodywork up another notch. Next
we apply glazing or "spot putty" to any pin holes in the original filler,
and tiny dimples which might be visible. This putty is very thin and
creamy, and not only spreads easily, but sands easily too. You'll take
forever trying to get normal filler perfect, so this is the easy way to
bring your bodywork up another notch. |
 Almost
all of the spot putty sands back off, but be careful that you don't go
through the epoxy and expose any bare metal. This will most likely
happen if you left a high spot during the metalworking phase, which should
have been caught and corrected before this point. Almost
all of the spot putty sands back off, but be careful that you don't go
through the epoxy and expose any bare metal. This will most likely
happen if you left a high spot during the metalworking phase, which should
have been caught and corrected before this point. |
 Now
is the time to get serious with your sanding. We used a light gray 2K
primer, applied for high-build, and then sprayed a light red guide coat all
over. If you noticed all of the different colors we've used, it's done
on purpose to provide a visual reference. Now
is the time to get serious with your sanding. We used a light gray 2K
primer, applied for high-build, and then sprayed a light red guide coat all
over. If you noticed all of the different colors we've used, it's done
on purpose to provide a visual reference. |
 From
this point forward, all sanding must be done with a block of some sort,
using progressively finer sandpaper. This photo shows about half of
the various sanding blocks I have, and I use them all depending on the shape
of the body panel I'm working. This should always be done wet, and I like to
put a few drops of dishwashing soap into the water, just to help keep the
sandpaper clean. From
this point forward, all sanding must be done with a block of some sort,
using progressively finer sandpaper. This photo shows about half of
the various sanding blocks I have, and I use them all depending on the shape
of the body panel I'm working. This should always be done wet, and I like to
put a few drops of dishwashing soap into the water, just to help keep the
sandpaper clean. |
 When
you use a sanding block and a guide coat, you can see the low spots quite
easily. Note the dark black spot where the epoxy has been exposed, so
you can't sand this area any more to level out the low next to it. Experience
will tell you whether you need to apply spot putty in the low, or if another
layer of high build primer will take care of it. When
you use a sanding block and a guide coat, you can see the low spots quite
easily. Note the dark black spot where the epoxy has been exposed, so
you can't sand this area any more to level out the low next to it. Experience
will tell you whether you need to apply spot putty in the low, or if another
layer of high build primer will take care of it. |
 When
you reach the point that block sanding the high build primer removes all of
the guide coat, the part will be straight. You should be down to 400
grit sandpaper by now, and a final layer of thin (not high build) 2K primer
should be applied and blocked with 600 in final preparation for paint.
Time to mix the color! When
you reach the point that block sanding the high build primer removes all of
the guide coat, the part will be straight. You should be down to 400
grit sandpaper by now, and a final layer of thin (not high build) 2K primer
should be applied and blocked with 600 in final preparation for paint.
Time to mix the color! |
 And
here's the finished product, an apron that looks and fits better than before
the accident. About 40 hours were needed to straighten and repair this
apron. Expensive? Absolutely! But still about $1000 less
than a new reproduction, and the best part is that it fits the car like it
was made for it. Oh!, that's right, it was! And
here's the finished product, an apron that looks and fits better than before
the accident. About 40 hours were needed to straighten and repair this
apron. Expensive? Absolutely! But still about $1000 less
than a new reproduction, and the best part is that it fits the car like it
was made for it. Oh!, that's right, it was! |
 Here's
a beauty shot the Editor took when he got the car home. Notice the cut
out areas under the bumper, along the lower edge of the apron. This is
why we took the time to fix them correctly! Here's
a beauty shot the Editor took when he got the car home. Notice the cut
out areas under the bumper, along the lower edge of the apron. This is
why we took the time to fix them correctly! |
So there you have it, a good example of the many steps required to properly restore one abused body panel. While this particular piece needed just about everything imaginable to save it, if you multiply this process by 4 fenders, 2 doors, a hood and a trunk lid, not to mention repairs to the basic body structure itself, you can begin to understand why vintage auto restoration is such an expensive endeavor!